点击上方 蓝字 关注我们
微信公众号: OpenCV学堂
关注获取更多计算机视觉与深度学习知识
前言
我写这篇文章之前,我搜索整个网络文章跟问各种语言大模型,太可怕了,它们没有一个正确的,但是都在给我一本正经的胡说八道。所以没办法,我只好自己研究一番,经过两天的折腾终于搞定了OpenCV DNN部署YOLOv5、YOLOv8等各种模型。然后我特别想把这块最关键的知识点给大家分享一下,所以写了这篇文章,以Java语言完成OpenCV DNN的实时人脸检测,同时解释其中的关键知识点。
OpenCV DNN人脸检测
各种博客上的很多Java人脸检测的文章都还是基于级联检测器的,有的好像是我2017年前文章的代码。后来我再也没写过Java,所以网上居然再也找不到Java版本的OpenCV DNN人脸检测的文章跟代码,各种博客上的代码一看就早已落伍多时。这里使用最新版本的Java SDK和OpenCV4.8深度神经网络模块进行深度学习和人脸检测的方法。关于JDK环境搭建与IDE安装可以看这篇文章:
OpenCV DNN官方提供的人脸检测模型下载地址如下:
https://gitee.com/opencv_ai/opencv_tutorial_data/tree/master/models
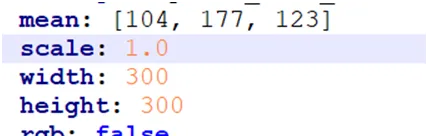
输入的数据格式如下:
这是一个SSD的对象检测模型输出的格式为:
1x1xNx7[batchId, classId, confidence, left, top, right, bottom]
代码实现与演示
我给OpenCV DNN 人脸检测的Java实现封装成了一个类,客户端只要两行代码即可调用执行,简单方便,写个Java的Main方法即可调用,实现人脸检测,唯一需要的就是先加载OpenCV Java的DLL支持,然后就可以正常调用了。客户端代码如下:
publicstaticvoidmain(String[] args){
 String model_file = "D:/projects/opencv_face_detector_uint8.pb";
 String pb_txt_file = "D:/projects/opencv_face_detector.pbtxt";
 System.load("D:/opencv-4.8.0/opencv/build/java/x64/opencv_java480.dll");
 System.out.println("start to read image...");
 Mat inputImage = Imgcodecs.imread("D:/images/mmc.png");
 JavaFaceDetection face_detector = new JavaFaceDetection(model_file, pb_txt_file, 0.5f);
 face_detector.infer_image(inputImage);
 HighGui.imshow("OpenCV Java 深度学习人脸检测演示", inputImage);
 HighGui.waitKey(0);
 VideoCapture capture = new VideoCapture();
 capture.open(0);
while(true) {
 Mat frame = new Mat();
boolean ret = capture.read(frame);
 Core.flip(frame, frame, 1);
if(ret) {
 face_detector.infer_image(frame);
 HighGui.imshow("OpenCV Java 深度学习人脸检测演示", frame);
int c = HighGui.waitKey(1);
if (c == 27) {
break;
 }
 }
 }
 HighGui.destroyAllWindows();
 System.exit(0);
}
封装的 Java版本深度学习人脸检测类 的代码如下:
import com.sun.jna.Pointer;
import org.opencv.core.*;
import org.opencv.imgproc.Imgproc;
import org.opencv.dnn.*;
import org.opencv.highgui.HighGui;
import org.opencv.imgcodecs.Imgcodecs;
import org.opencv.videoio.VideoCapture;
public classJavaFaceDetection{
public Net getNet(){
return net;
 }
publicvoidsetNet(Net net){
this.net = net;
 }
private Net net;
privatefloat score_t = 0.5f;
publicJavaFaceDetection(String model_path, String pb_txt_file, float conf){
this.score_t = conf;
this.net = Dnn.readNetFromTensorflow(model_path, pb_txt_file);
 }
publicvoidinfer_image(Mat frame){
long stime = System.currentTimeMillis();
// 推理
 Mat blob = Dnn.blobFromImage(frame, 1.0, new Size(300, 300), new Scalar(104.0, 177.0, 123.0), false, false);
this.net.setInput(blob);
 Mat probs = this.net.forward();
// 1x1xNx7
int rows = probs.size(2);
int cols = probs.size(3);
float[] result = new Pointer(probs.dataAddr()).getFloatArray(0, rows*cols);
 probs.get(0, 0, result);
 Mat detectOut = new Mat(rows, cols, CvType.CV_32F);
 detectOut.put(0, 0, result);
for (int row = 0; row < detectOut.rows(); row++) {
float conf = (float)detectOut.get(row, 2)[0];
if (conf > this.score_t) {
float x1 = (float)(detectOut.get(row, 3)[0] * frame.cols());
float y1 = (float)(detectOut.get(row, 4)[0] * frame.rows());
float x2 = (float)(detectOut.get(row, 5)[0] * frame.cols());
float y2 = (float)(detectOut.get(row, 6)[0] * frame.rows());
 Rect2d box = new Rect2d();
 box.x = x1;
 box.y = y1;
 box.width = x2 - x1;
 box.height = y2 - y1;
 Rect rect = new Rect((int) box.x, (int) box.y, (int) box.width, (int) box.height);
 Imgproc.rectangle(frame, rect, new Scalar(0,0, 255), 2, 8);
 Imgproc.putText(frame, String.format("%.2f", conf), new Point(rect.x, rect.y-5), Imgproc.FONT_HERSHEY_COMPLEX, 0.5, new Scalar(255, 0, 255), 1, 8);
 }
 }
long end_time = System.currentTimeMillis();
float fps = 1000.0f / (end_time - stime);
 Imgproc.putText(frame, String.format("FPS: %.2f", fps), new Point(30, 30), Imgproc.FONT_HERSHEY_COMPLEX, 1.0, new Scalar(0, 0, 255), 2, 8);
 }
}
其中最关键的是 如何把推理输出得到四维Tensor张量 1x1xNx7 转换为 一个2D的Mat对象 ,这个就是各种大语言模型胡编乱造的地方,其实只有用JNA通过JNI接口访问本地C++地址获取推理以后的浮点数数组,然后重新构建一个2D Mat对象即可。解决这个问题其它代码基本是C++版本的Java语言翻译,容易了。
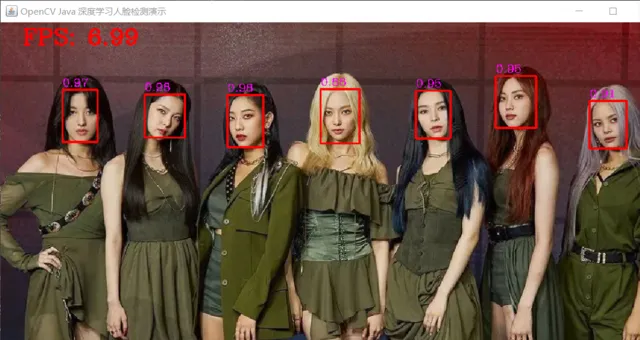
检测单张图像
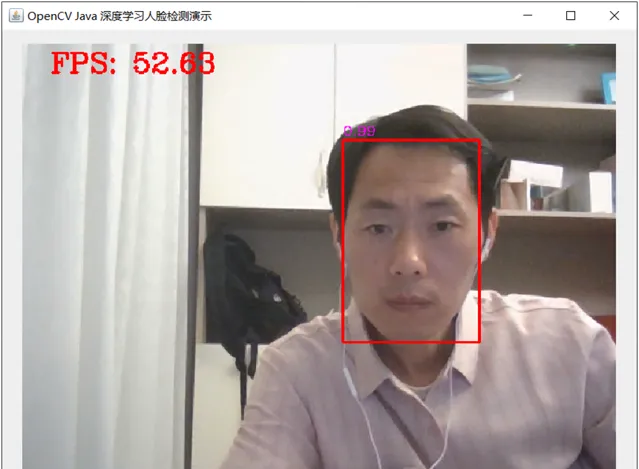
视频实时检测-本人亲测有效
系统化学习直接扫码查看

推荐阅读