一:背景
1. 讲故事
这个问题的由来是在
.NET高级调试训练营第十期
分享ThreadStatic底层玩法的时候,有朋友提出了
AsyncLocal
是如何实现的,虽然做了口头上的表述,但总还是会不具体,所以觉得有必要用
文字+图表
的方式来系统的说一下这个问题。
二:AsyncLocal 线程间传值
1. 线程间传值途径
在 C# 编程中实现多线程以及线程切换的方式大概如下三种:
Thread
Task
await,async
这三种场景下的线程间传值有各自的实现方式,由于篇幅限制,先从 Thread 开始聊吧。本质上来说 AsyncLocal 是一个纯托管的C#玩法,和 coreclr,Windows 没有任何关系。
2. Thread 小例子
为了方便讲述,先来一个例子看下如何在新Thread线程中提取 _asyncLocal 中的值,参考代码如下:
internal classProgram
 {
static AsyncLocal<int> _asyncLocal = new AsyncLocal<int>();
staticvoidMain(string[] args)
 {
 _asyncLocal.Value = 10;
var t = new Thread(() =>
 {
 Console.WriteLine($"Tid={Thread.CurrentThread.ManagedThreadId}, AsyncLocal value: {_asyncLocal.Value},");
 Debugger.Break();
 });
 t.Start();
 Console.ReadLine();
 }
 }
从截图看 tid=7 线程果然拿到了 主线程设置的
10
,哈哈,是不是充满了好奇心?接下来逐一分析下吧。
3. 流转分析
首先观察下
_asyncLocal.Value = 10
在源码层做了什么,参考代码如下:
public T Value
 {
set
 {
 ExecutionContext.SetLocalValue(this, value, m_valueChangedHandler != null);
 }
 }
internalstaticvoidSetLocalValue(IAsyncLocal local, object newValue, bool needChangeNotifications)
 {
 ExecutionContext executionContext = Thread.CurrentThread._executionContext;
 Thread.CurrentThread._executionContext = new ExecutionContext(asyncLocalValueMap, array, flag2));
 }
从源码中可以看到这个 10 最终封印在
Thread.CurrentThread._executionContext
字段中,接下来就是核心问题了,它是如何被送到新线程中的呢?
其实仔细想一想,要让我实现的话,我肯定这么实现。
将主线程的 _executionContext 字段赋值给新线程 t._executionContext 字段。
将
var t = new Thread()中的t作为参数传递给 win32 的 CreateThread 函数,这样在新线程中就可以提取 到 t 了,然后执行 t 的callback。
这么说大家可能有点抽象,我就直接画下C#是怎么流转的图吧:
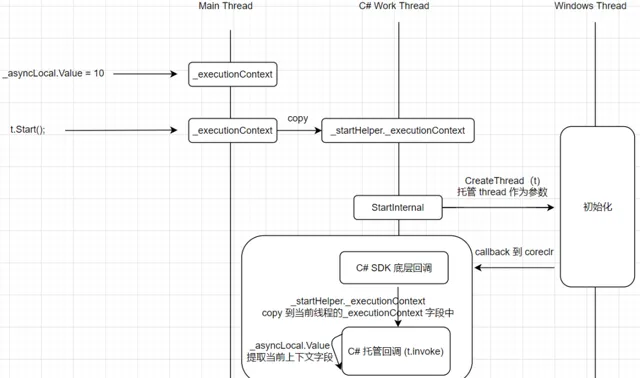
有了这张图之后接下来的问题就是验证了,首先看一下 copy 操作在哪里?可以观察下 Start 源码。
privatevoidStart(bool captureContext)
 {
 StartHelper startHelper = _startHelper;
if (startHelper != null)
 {
 startHelper._startArg = null;
 startHelper._executionContext = (captureContext ? System.Threading.ExecutionContext.Capture() : null);
 }
 StartCore();
 }
publicstatic ExecutionContext? Capture()
 {
 ExecutionContext executionContext = Thread.CurrentThread._executionContext;
return executionContext;
 }
从源码中可以看到将主线程的
_executionContext
字段给了新线程t下的
startHelper._executionContext
。
接下来我们观察下在创建 OS 线程的时候是不是将 Thread 作为参数传过去了,如果传过去了,那就可以直接在新线程中拿到
Thread._startHelper._executionContext
字段,验证起来也很简单,在win32 的
ntdll!NtCreateThreadEx
上下一个断点即可。
0:000> bp ntdll!NtCreateThreadEx
0:000> g
Breakpoint 1 hit
ntdll!NtCreateThreadEx:
00007ff9`0fe8e8c0 4c8bd1 mov r10,rcx
0:000> r
rax=00007ff8b4a529d0 rbx=0000000000000000 rcx=0000008471b7df28
rdx=00000000001fffff rsi=0000027f2ca25b01 rdi=0000027f2ca25b60
rip=00007ff90fe8e8c0 rsp=0000008471b7de68 rbp=00007ff8b4a529d0
 r8=0000000000000000 r9=ffffffffffffffff r10=0000027f2c8a0000
r11=0000008471b7de40 r12=0000008471b7e890 r13=0000008471b7e4f8
r14=ffffffffffffffff r15=0000000000010000
iopl=0 nv up ei pl nz na po nc
cs=0033 ss=002b ds=002b es=002b fs=0053 gs=002b efl=00000206
ntdll!NtCreateThreadEx:
00007ff9`0fe8e8c0 4c8bd1 mov r10,rcx
0:000> !t
ThreadCount: 4
UnstartedThread: 1
BackgroundThread: 2
PendingThread: 0
DeadThread: 0
Hosted Runtime: no
 Lock
 DBG ID OSID ThreadOBJ State GC Mode GC Alloc Context Domain Count Apt Exception
012cd8 0000027F2C9E6610 2a020 Preemptive 0000027F2E5DB438:0000027F2E5DB4A0 0000027f2c9dd670 -00001 MTA
622b24 0000027F2CA121E0 21220 Preemptive 0000000000000000:00000000000000000000027f2c9dd670 -00001 Ukn (Finalizer)
7326580000027F4EAA0AE0 2b220 Preemptive 0000000000000000:00000000000000000000027f2c9dd670 -00001 MTA
XXXX 400000027F2CA25B60 9400 Preemptive 0000000000000000:00000000000000000000027f2c9dd670 -00001 Ukn
从输出中可以看到 NtCreateThreadEx 方法的第二个参数即
rdi=0000027f2ca25b60
就是我们的托管线程,如果你不相信的话可以再用 windbg 找到它的托管线程信息,输出如下:
0:000> dt coreclr!Thread 0000027F2CA25B60 -y m_ExposedObject
 +0x1c8 m_ExposedObject : 0x0000027f`2c8f11d0 OBJECTHANDLE__
0:000> !dopoi(0x0000027f`2c8f11d0)
Name: System.Threading.Thread
MethodTable: 00007ff855090d78
EE class: 00007ff85506a700
Tracked Type: false
Size: 72(0x48) bytes
File: C:\Program Files\dotnet\shared\Microsoft.NETCore.App\6.0.25\System.Private.CoreLib.dll
Fields:
 MT Field Offset Type VT Attr Value Name
00007ff8550c76d8 4000b35 8 ....ExecutionContext 0 instance 0000000000000000 _executionContext
0000000000000000 4000b36 10 ...ronizationContext 0 instance 0000000000000000 _synchronizationContext
00007ff85508d708 4000b37 18 System.String 0 instance 0000000000000000 _name
00007ff8550cb9d0 4000b38 20 ...hread+StartHelper 0 instance 0000027f2e5db3b0 _startHelper
...
有些朋友可能要说,你现在的 _executionContext 字段是保留在 _startHelper 类里,并没有赋值到Thread._executionContext字段呀?那这一块在哪里实现的呢?从上图可以看到其实是在新线程的执行函数上,在托管函数执行之前会将 _startHelper._executionContext 赋值给 Thread._executionContext , 让 windbg 继续执行,输出如下:
0:009> k
# Child-SP RetAddr Call Site
0000000084`728ff778 00007ff8`b4c23d19 KERNELBASE!wil::details::DebugBreak+0x2
0100000084`728ff780 00007ff8`b43ba7ea coreclr!DebugDebugger::Break+0x149 [D:\a\_work\1\s\src\coreclr\vm\debugdebugger.cpp @ 148]
0200000084`728ff900 00007ff8`54ff56e3 System_Private_CoreLib!System.Diagnostics.Debugger.Break+0xa [/_/src/coreclr/System.Private.CoreLib/src/System/Diagnostics/Debugger.cs @ 18]
0300000084`728ff930 00007ff8`b42b4259 ConsoleApp9!ConsoleApp9.Program.<>c.<Main>b__1_0+0x113
0400000084`728ff9c0 00007ff8`b42bddd9 System_Private_CoreLib!System.Threading.Thread.StartHelper.Callback+0x39 [/_/src/libraries/System.Private.CoreLib/src/System/Threading/Thread.cs @ 42]
0500000084`728ffa00 00007ff8`b42b2f4a System_Private_CoreLib!System.Threading.ExecutionContext.RunInternal+0x69 [/_/src/libraries/System.Private.CoreLib/src/System/Threading/ExecutionContext.cs @ 183]
0600000084`728ffa70 00007ff8`b4b7ba53 System_Private_CoreLib!System.Threading.Thread.StartCallback+0x8a [/_/src/coreclr/System.Private.CoreLib/src/System/Threading/Thread.CoreCLR.cs @ 105]
0700000084`728ffab0 00007ff8`b4a763dc coreclr!CallDescrWorkerInternal+0x83
0800000084`728ffaf0 00007ff8`b4b5e713 coreclr!DispatchCallSimple+0x80 [D:\a\_work\1\s\src\coreclr\vm\callhelpers.cpp @ 220]
0900000084`728ffb80 00007ff8`b4a52d25 coreclr!ThreadNative::KickOffThread_Worker+0x63 [D:\a\_work\1\s\src\coreclr\vm\comsynchronizable.cpp @ 158]
...
0d (Inline Function) --------`-------- coreclr!ManagedThreadBase_FullTransition+0x2d [D:\a\_work\1\s\src\coreclr\vm\threads.cpp @ 7569]
0e (Inline Function) --------`-------- coreclr!ManagedThreadBase::KickOff+0x2d [D:\a\_work\1\s\src\coreclr\vm\threads.cpp @ 7604]
0f00000084`728ffd60 00007ff9`0e777614 coreclr!ThreadNative::KickOffThread+0x79 [D:\a\_work\1\s\src\coreclr\vm\comsynchronizable.cpp @ 230]
1000000084`728ffdc0 00007ff9`0fe426a1 KERNEL32!BaseThreadInitThunk+0x14
1100000084`728ffdf0 00000000`00000000 ntdll!RtlUserThreadStart+0x21
...
在上面的回调函数中看的非常清楚,在执行托管函数
<Main>b__1_0
之前执行了一个
ExecutionContext.RunInternal
函数,对,就是它来实现的,参考代码如下:
privatesealed classStartHelper
 {
internalvoidRun()
 {
 System.Threading.ExecutionContext.RunInternal(_executionContext, s_threadStartContextCallback, this);
 }
 }
internalstaticvoidRunInternal(ExecutionContext executionContext, ContextCallback callback, object state)
 {
 Thread currentThread = Thread.CurrentThread;
 RestoreChangedContextToThread(currentThread, executionContext, executionContext3);
 }
internalstaticvoidRestoreChangedContextToThread(Thread currentThread, ExecutionContext contextToRestore, ExecutionContext currentContext)
 {
 currentThread._executionContext = contextToRestore;
 }
既然将 StartHelper.executionContext 塞到了 currentThread._executionContext 中,在
<Main>b__1_0
方法中自然就能通过
_asyncLocal.Value
提取了。
三:总结
说了这么多,其实精妙之处在于创建OS线程的时候,会把C# Thread实例(coreclr对应线程) 作为参数传递给新线程,即下面方法签名中的
lpParameter
参数,新线程拿到了Thread实例,自然就能获取到被调用线程赋值的
Thread._executionContext
字段,所以这是完完全全的C#层面玩法,希望能给后来者解惑吧!
HANDLE CreateThread(
 [in, optional] LPSECURITY_ATTRIBUTES lpThreadAttributes,
 [in] SIZE_T dwStackSize,
 [in] LPTHREAD_START_ROUTINE lpStartAddress,
 [in, optional] __drv_aliasesMem LPVOID lpParameter,
 [in] DWORD dwCreationFlags,
 [out, optional] LPDWORD lpThreadId
);


