点击上方
蓝字
关注我们
微信公众号: OpenCV学堂
关注获取更多计算机视觉与深度学习知识
模型导出与输入输出
YOLOv10模型导出ONNX脚本如下:
from ultralytics import YOLOv10"""Test exporting the YOLO model to ONNX format."""f = YOLOv10("yolov10n.pt").export(format="onnx", opset=11, dynamic=False)
如果不指明opset=11或者12,默认opset=10导出的模型推理时候会非常的慢。指定opset=11以后,导出的模型结构如下:
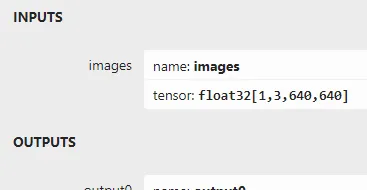
输入与输出格式解释如下:
输入支持格式为:1x3x640x640输出格式为1x300x6
输出格式300是指输出得预测框数目,6分别是
x1 y1 x2 y2 score classid
C++推理
OpenVINO2023 C++ 推理 ,发现一个很大的BUG,就是当使用AUTO模式的时候:
ov::CompiledModel compiled_model = ie.compile_model("D:/python/yolov10-1.0/yolov10n.onnx", "AUTO");auto infer_request = compiled_model.create_infer_request();
模型推理针对视频推理会发生结果紊乱现象,图示如下:
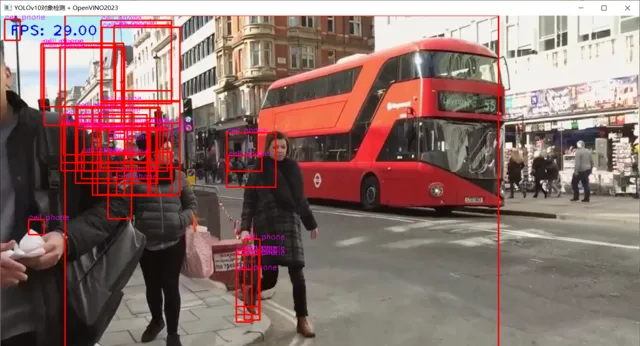
但是当我把推理设备设定为CPU时候就会非常稳定的运行。说明OpenVINO虚拟推理设备AUTO对YOLOv10支持度还有待提升。

把ONNX格式模型通过下面的命令行转换为engine文件
trtexec.exe -onnx=yolov10n.onnx --saveEngine=yolov10n.engine
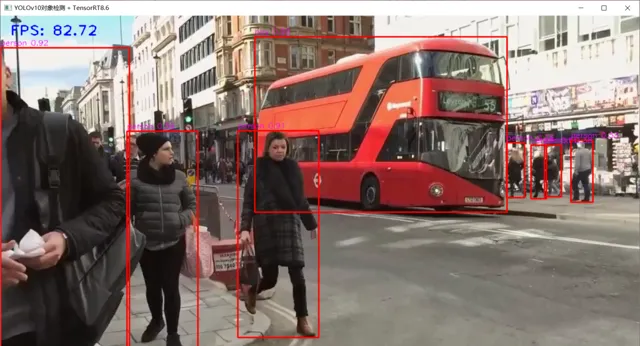
TensorRT8.6 C++ 推理演示 , 本人笔记本 显卡为3050ti

C++推理的相关代码如下:
int64 start = cv::getTickCount();
// 图象预处理 - 格式化操作
int w = frame.cols;
int h = frame.rows;
int _max = std::max(h, w);
cv::Mat image = cv::Mat::zeros(cv::Size(_max, _max), CV_8UC3);
cv::Rect roi(0, 0, w, h);
frame.copyTo(image(roi));
// HWC => CHW
float x_factor = image.cols / static_cast<float>(input_w);
float y_factor = image.rows / static_cast<float>(input_h);
cv::Mat tensor = cv::dnn::blobFromImage(image, 1.0f / 225.f, cv::Size(input_w, input_h), cv::Scalar(), true);
// 内存到GPU显存
cudaMemcpyAsync(buffers[0], tensor.ptr<float>(), input_h * input_w * 3 * sizeof(float), cudaMemcpyHostToDevice, stream);
// 推理
context->enqueueV2(buffers, stream, nullptr);
// GPU显存到内存
cudaMemcpyAsync(prob.data(), buffers[1], output_h *output_w * sizeof(float), cudaMemcpyDeviceToHost, stream);
// 后处理
cv::Mat det_output(output_h, output_w, CV_32F, (float*)prob.data());
for (int i = 0; i < det_output.rows; i++) {
float tl_x = det_output.at<float>(i, 0) * x_factor;
float tl_y = det_output.at<float>(i, 1) * y_factor;
float br_x = det_output.at<float>(i, 2)* x_factor;
float br_y = det_output.at<float>(i, 3)* y_factor;
float score = det_output.at<float>(i, 4);
int class_id = static_cast<int>(det_output.at<float>(i, 5));
if (score > 0.25) {
 cv::Rect box((int)tl_x, (int)tl_y, (int)(br_x - tl_x), (int)(br_y - tl_y));
 rectangle(frame, box, cv::Scalar(0, 0, 255), 2, 8, 0);
 putText(frame, cv::format("%s %.2f", classNames[ class_id], score), cv::Point(box.tl().x, box.tl().y-5), fontface, fontScale, cv::Scalar(255, 0, 255), thickness, 8);
 }
}
float t = (cv::getTickCount() - start) / static_cast<float>(cv::getTickFrequency());
putText(frame, cv::format("FPS: %.2f", 1.0 / t), cv::Point(20, 40), cv::FONT_HERSHEY_PLAIN, 2.0, cv::Scalar(255, 0, 0), 2, 8);
cv::imshow("YOLOv10对象检测 + TensorRT8.6", frame);
对比YOLOv5跟YOLOv8同等的模型,速度还是非常快。唯一不是很满意的就是感觉对小目标检测能力好像没有YOLOv5跟YOLOv8那么厉害,只是个人感觉。
掌握深度学习模型部署
掌握三种主流的深度学习模型部署框架,实现模型在CPU、GPU、AMD等不同平台硬件上加速推理最佳性能。 OpenCV学堂已经推出 OpenVINO、TensorRT、ONNXRUNTIME深度学习部署系统化学习路线图 。 「工欲善其事,必先利其器」 ,做深度学习工程师,学完部署再打工,一切都来得及,现在开始刚刚好!
深度学习模型部署路线图视频课程
推荐阅读