
👉 歡迎 ,你將獲得: 專屬的計畫實戰 / 1v1 提問 / Java 學習路線 / 學習打卡 / 每月贈書 / 社群討論
新計畫: 【從零手擼:仿小紅書(微服務架構)】 正在持續爆肝中,基於 Spring Cloud Alibaba + Spring Boot 3.x + JDK 17..., ;
【從零手擼:前後端分離部落格計畫(全棧開發)】 2期已完結,演示連結: http://116.62.199.48/ ;
截止目前, 累計輸出 50w+ 字,講解圖 2200+ 張,還在持續爆肝中.. 後續還會上新更多計畫,目標是將 Java 領域典型的計畫都整一波,如秒殺系統, 線上商城, IM 即時通訊,Spring Cloud Alibaba 等等,
定時任務的實作方式多種多樣,框架也是層出不窮。
「
本文所談及的是 SpringBoot 本身所帶有的
@EnableScheduling
、
@Scheduled
實作定時任務的方式。
以及采用這種方式,在分布式排程中可能會出現的問題,又針對為什麽會發生這種問題?又該如何解決,做出了一些敘述。
為了適合每個階段的讀者,我把前面測試的程式碼都貼出來啦~
確保每一步都是有跡可循的,希望大家不要嫌啰嗦,感謝
一、搭建基本環境
基本依賴
 <parent>
 <artifactId>spring-boot-parent</artifactId>
 <groupId>org.springframework.boot</groupId>
 <version>2.7.2</version>
 </parent>
 <dependencies>
 <dependency>
 <groupId>org.springframework.boot</groupId>
 <artifactId>spring-boot</artifactId>
 </dependency>
 <dependency>
 <groupId>org.springframework.boot</groupId>
 <artifactId>spring-boot-starter</artifactId>
 </dependency>
 <dependency>
 <groupId>org.springframework.boot</groupId>
 <artifactId>spring-boot-starter-web</artifactId>
 </dependency>
 <dependency>
 <dependency>
 <groupId>org.projectlombok</groupId>
 <artifactId>lombok</artifactId>
 </dependency>
 </dependencies>
建立個啟動類及定時任務
@SpringBootApplication
public class ApplicationScheduling {
 public static void main(String[] args) {
 SpringApplication.run(ApplicationScheduling. class, args);
 }
}
/**
 * @description:
 * @author: Ning Zaichun
 */
@Slf4j
@Component
@EnableScheduling
public class ScheduleService {
 // 每五秒執行一次,cron的運算式就不再多說明了
 @Scheduled(cron = "0/5 * * * * ? ")
 public void testSchedule() {
 log.info("當前執行任務的執行緒號ID===>{}", Thread.currentThread().getId());
 }
}
二、問題::執行時間延遲和單執行緒執行
按照上面程式碼中給定的cron運算式
@Scheduled(cron = "0/5 * * * * ? ")
每五秒執行一次,那麽最近五次的執行結果應當為:
 2022-09-06 00:21:10
 2022-09-06 00:21:15
 2022-09-06 00:21:20
 2022-09-06 00:21:25
 2022-09-06 00:21:30
如果定時任務中是執行非常快的任務的,時間非常非常短,確實不會有什麽的延遲性。
上面程式碼執行結果:
 2022-09-06 19:42:10.018 INFO 24496 --- [ scheduling-1] com.nzc.service.ScheduleService : 當前執行任務的執行緒號ID===>64
 2022-09-06 19:42:15.015 INFO 24496 --- [ scheduling-1] com.nzc.service.ScheduleService : 當前執行任務的執行緒號ID===>64
 2022-09-06 19:42:20.001 INFO 24496 --- [ scheduling-1] com.nzc.service.ScheduleService : 當前執行任務的執行緒號ID===>64
 2022-09-06 19:42:25.005 INFO 24496 --- [ scheduling-1] com.nzc.service.ScheduleService : 當前執行任務的執行緒號ID===>64
 2022-09-06 19:42:30.007 INFO 24496 --- [ scheduling-1] com.nzc.service.ScheduleService : 當前執行任務的執行緒號ID===>64
如果說從時間上來看,說不上什麽延遲性,但真實的業務場景中,業務的執行時間可能遠比這裏時間長。
我主動讓執行緒睡上10秒,讓我們再來看看輸出結果是如何的吧
@Scheduled(cron = "0/5 * * * * ? ")
public void testSchedule() {
 try {
 Thread.sleep(10000);
 log.info("當前執行任務的執行緒號ID===>{}", Thread.currentThread().getId());
 } catch (Exception e) {
 e.printStackTrace();
 }
}
輸出結果
 2022-09-06 19:46:50.019 INFO 27236 --- [ scheduling-1] com.nzc.service.ScheduleService : 當前執行任務的執行緒號ID===>64
 2022-09-06 19:47:05.024 INFO 27236 --- [ scheduling-1] com.nzc.service.ScheduleService : 當前執行任務的執行緒號ID===>64
 2022-09-06 19:47:20.016 INFO 27236 --- [ scheduling-1] com.nzc.service.ScheduleService : 當前執行任務的執行緒號ID===>64
 2022-09-06 19:47:35.005 INFO 27236 --- [ scheduling-1] com.nzc.service.ScheduleService : 當前執行任務的執行緒號ID===>64
 2022-09-06 19:47:50.006 INFO 27236 --- [ scheduling-1] com.nzc.service.ScheduleService : 當前執行任務的執行緒號ID===>64
請註意兩個問題:
執行時間延遲: 從時間上可以明顯看出,不再是每五秒執行一次,執行時間延遲很多,造成任務的
單執行緒執行: 從始至終都只有一個執行緒在執行任務,造成任務的堵塞.
三、為什麽會出現上述問題?
問題的根本:執行緒阻塞式執行,執行任務執行緒數量過少。
那到底是為什麽呢?
回到啟動類上,我們在啟動上標明了一個
@EnableScheduling
註解。
大家在看到諸如
@Enablexxxx
這樣的註解的時候,就要知道它一定有一個
xxxxxAutoConfiguration
的自動裝配的類。
@EnableScheduling
也不例外,它的自動裝配的類是
TaskSchedulingAutoConfiguration
。
我們來看看它到底做了一些什麽設定?我們如何修改?
@ConditionalOn class(ThreadPoolTaskScheduler. class)
@Configuration(proxyBeanMethods = false)
@EnableConfigurationProperties(TaskSchedulingProperties. class)
@AutoConfigureAfter(TaskExecutionAutoConfiguration. class)
public class TaskSchedulingAutoConfiguration {
 @Bean
 @ConditionalOnBean(name = TaskManagementConfigUtils.SCHEDULED_ANNOTATION_PROCESSOR_BEAN_NAME)
 @ConditionalOnMissingBean({ SchedulingConfigurer. class, TaskScheduler. class, ScheduledExecutorService. class })
 public ThreadPoolTaskScheduler taskScheduler(TaskSchedulerBuilder builder) {
return builder.build();
 }
 // ......
}
可以看到它也是構造了一個 執行緒池註入到Spring 中
從
build()
呼叫繼續看下去,
 public ThreadPoolTaskScheduler build() {
return configure(new ThreadPoolTaskScheduler());
 }
ThreadPoolTaskScheduler`中,給定的執行緒池的核心參數就為1,這也表明了之前為什麽只有一條執行緒在執行任務。`private volatile int poolSize = 1;
這一段是分開的用程式碼不好展示,我用圖片標明出來。
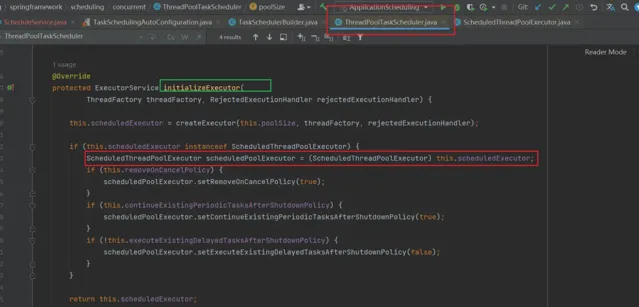
主要邏輯在這裏,建立執行緒池的時候,只使用了三個參數,剩下的都是使用
ScheduledExecutorService
的預設的參數
protected ScheduledExecutorService createExecutor(
 int poolSize, ThreadFactory threadFactory, RejectedExecutionHandler rejectedExecutionHandler)
而這預設參數是不行的,生產環境的大坑,阿裏的 Java 開發手冊中也明確規定,要手動建立執行緒池,並給定合適的參數值~是為什麽呢?
因為預設的執行緒池中, 池中允許的最大執行緒數和最大任務等待佇列都是
Integer.MAX_VALUE
.

大家都懂的,如果使用這玩意,只要出了問題,必定掛~
configure(new ThreadPoolTaskScheduler())
這裏就是構造,略過~
如果已經較為熟悉SpringBoot的朋友,現在已然明白解決當前問題的方式~
四、解決方式
1、
@EnableConfigurationProperties(TaskSchedulingProperties. class)
,自動裝配類通常也都會對應有個
xxxxProperties
檔滴,
TaskSchedulingProperties
也確實可以配置核心執行緒數等基本參數,但是無法配置執行緒池中最大的執行緒數量和等待佇列數量,這種方式還是不合適的。
2、可以手動異步編排,交給某個執行緒池來執行。
3、將定時任務加上異步註解
@Async
,將其改為異步的定時任務,另外自訂一個系統通用的執行緒池,讓異步任務使用該執行緒執行任務~
我們分別針對上述三種方式來實作一遍
4.1、修改配置檔
可以配置的就下面幾項~
 spring:
 task:
 scheduling:
 thread-name-prefix: nzc-schedule- #執行緒名字首
 pool:
 size: 10 #核心執行緒數
# shutdown:
# await-termination: true #執行程式是否應等待計劃任務在關機時完成。
# await-termination-period: #執行程式應等待剩余任務完成的最長時間。
測試結果:
 2022-09-06 20:49:15.015 INFO 7852 --- [ nzc-schedule-1] com.nzc.service.ScheduleService : 當前執行任務的執行緒號ID===>64
 2022-09-06 20:49:30.004 INFO 7852 --- [ nzc-schedule-2] com.nzc.service.ScheduleService : 當前執行任務的執行緒號ID===>66
 2022-09-06 20:49:45.024 INFO 7852 --- [ nzc-schedule-1] com.nzc.service.ScheduleService : 當前執行任務的執行緒號ID===>64
 2022-09-06 20:50:00.025 INFO 7852 --- [ nzc-schedule-3] com.nzc.service.ScheduleService : 當前執行任務的執行緒號ID===>67
 2022-09-06 20:50:15.023 INFO 7852 --- [ nzc-schedule-2] com.nzc.service.ScheduleService : 當前執行任務的執行緒號ID===>66
 2022-09-06 20:50:30.008 INFO 7852 --- [ nzc-schedule-4] com.nzc.service.ScheduleService : 當前執行任務的執行緒號ID===>68
「
請註意:這裏的配置並非是一定生效的,修改後有可能成功,有可能失敗,具體原因未知,但這一點是真實存在的。
不過從執行結果中可以看出,這裏的執行的執行緒不再是孤單單的一個。
4.2、執行邏輯改為異步執行
首先我們先向Spring中註入一個我們自己編寫的執行緒池,參數自己設定即可,我這裏比較隨意。
 @Configuration
 public class MyTheadPoolConfig {
 @Bean
 public TaskExecutor taskExecutor() {
 ThreadPoolTaskExecutor executor = new ThreadPoolTaskExecutor();
 //設定核心執行緒數
 executor.setCorePoolSize(10);
 //設定最大執行緒數
 executor.setMaxPoolSize(20);
 //緩沖佇列200:用來緩沖執行任務的佇列
 executor.setQueueCapacity(200);
 //執行緒活路時間 60 秒
 executor.setKeepAliveSeconds(60);
 //執行緒池名的字首:設定好了之後可以方便我們定位處理任務所在的執行緒池
 // 這裏我繼續沿用 scheduling 預設的執行緒名字首
 executor.setThreadNamePrefix("nzc-create-scheduling-");
 //設定拒絕策略
 executor.setRejectedExecutionHandler(new ThreadPoolExecutor.CallerRunsPolicy());
 executor.setWaitForTasksToCompleteOnShutdown(true);
return executor;
 }
 }
然後在定時任務這裏註入進去:
 /**
 * @description:
 * @author: Ning Zaichun
 */
 @Slf4j
 @Component
 @EnableScheduling
 public class ScheduleService {
 @Autowired
 TaskExecutor taskExecutor;
 @Scheduled(cron = "0/5 * * * * ? ")
 public void testSchedule() {
 CompletableFuture.runAsync(()->{
 try {
 Thread.sleep(10000);
 log.info("當前執行任務的執行緒號ID===>{}", Thread.currentThread().getId());
 } catch (Exception e) {
 e.printStackTrace();
 }
 },taskExecutor);
 }
 }
測試結果:
 2022-09-06 21:00:00.019 INFO 18356 --- [te-scheduling-1] com.nzc.service.ScheduleService : 當前執行任務的執行緒號ID===>66
 2022-09-06 21:00:05.022 INFO 18356 --- [te-scheduling-2] com.nzc.service.ScheduleService : 當前執行任務的執行緒號ID===>67
 2022-09-06 21:00:10.013 INFO 18356 --- [te-scheduling-3] com.nzc.service.ScheduleService : 當前執行任務的執行緒號ID===>68
 2022-09-06 21:00:15.020 INFO 18356 --- [te-scheduling-4] com.nzc.service.ScheduleService : 當前執行任務的執行緒號ID===>69
 2022-09-06 21:00:20.026 INFO 18356 --- [te-scheduling-5] com.nzc.service.ScheduleService : 當前執行任務的執行緒號ID===>70
可以看到雖然業務執行時間比較長,但是木有再出現,延遲執行定時任務的情況。
4.3、異步定時任務
異步定時任務其實和上面的方式原理是一樣的,不過實作稍稍不同罷了。
在定時任務的類上再加一個
@EnableAsync
註解,給方法添加一個
@Async
即可。
不過一般@Async都會指定執行緒池,比如寫成這樣
@Async(value = "taskExecutor")
,
 /**
 * @description:
 * @author: Ning Zaichun
 */
 @Slf4j
 @Component
 @EnableAsync
 @EnableScheduling
 public class ScheduleService {
 @Autowired
 TaskExecutor taskExecutor;
 @Async(value = "taskExecutor")
 @Scheduled(cron = "0/5 * * * * ? ")
 public void testSchedule() {
 try {
 Thread.sleep(10000);
 log.info("當前執行任務的執行緒號ID===>{}", Thread.currentThread().getId());
 } catch (Exception e) {
 e.printStackTrace();
 }
 }
 }
執行結果:
 2022-09-06 21:10:15.022 INFO 22760 --- [zc-scheduling-1] com.nzc.service.ScheduleService : 當前執行任務的執行緒號ID===>66
 2022-09-06 21:10:20.021 INFO 22760 --- [zc-scheduling-2] com.nzc.service.ScheduleService : 當前執行任務的執行緒號ID===>67
 2022-09-06 21:10:25.007 INFO 22760 --- [zc-scheduling-3] com.nzc.service.ScheduleService : 當前執行任務的執行緒號ID===>68
 2022-09-06 21:10:30.020 INFO 22760 --- [zc-scheduling-4] com.nzc.service.ScheduleService : 當前執行任務的執行緒號ID===>69
 2022-09-06 21:10:35.007 INFO 22760 --- [zc-scheduling-5] com.nzc.service.ScheduleService : 當前執行任務的執行緒號ID===>70
結果顯而易見是可行的啦~
分析:
@EnableAsync`註解相應的也有一個自動裝配類為`TaskExecutionAutoConfiguration
也有一個
TaskExecutionProperties
配置類,可以在yml檔中對參數進行設定,這裏的話是可以配置執行緒池最大存活數量的。
它的預設核心執行緒數為8,這裏我不再進行演示了,同時它的執行緒池中最大存活數量以及任務等待數量也都為
Integer.MAX_VALUE
,這也是不建議大家使用預設執行緒池的原因。
4.4、小結
 /**
 * 定時任務
 * 1、@EnableScheduling 開啟定時任務
 * 2、@Scheduled開啟一個定時任務
 * 3、自動裝配類 TaskSchedulingAutoConfiguration
 *
 * 異步任務
 * 1、@EnableAsync:開啟異步任務
 * 2、@Async:給希望異步執行的方法標註
 * 3、自動裝配類 TaskExecutionAutoConfiguration
 */
實作方式雖不同,但從效率而言,並無太大區別,覺得那種合適使用那種便可。
不過總結起來,考查的都是對執行緒池的理解,對於執行緒池的了解是真的非常重要的,也很有用處。
五、分布式下的思考
針對上述情況而言,這些解決方法在不引入第三包的情況下是足以應付大部份情況了。
定時框架的實作有許多方式,在此並非打算討論這個。
「
在單體計畫中,也許上面的問題是解決了,但是站在分布式的情況下考慮,就並非是安全的了。
當多個計畫在同時執行,那麽必然會有多個計畫同時這段程式碼。
思考:並行執行
如果一個定時任務同時在多個機器中執行,會產生怎麽樣的問題?
「
假如這個定時任務是收集某個資訊,發送給訊息佇列,如果多台機器同時執行,同時給訊息佇列發送資訊,那麽必然導致之後產生一系列的臟數據。這是非常不可靠的
解決方式:分布式鎖
很簡單也不簡單,加分布式鎖~ 或者是用一些分布式排程的框架
如使用XXL-JOB實作,或者是其他的定時任務框架。
大家在執行這個定時任務之前,先去獲取一把分布式鎖,獲取到了就執行,獲取不到就直接結束。
我這裏使用的是 redission,因為方便,打算寫分布式鎖的文章,還在準備當中。
加入依賴:
 <dependency>
 <groupId>org.springframework.boot</groupId>
 <artifactId>spring-boot-starter-data-redis</artifactId>
 </dependency>
 <dependency>
 <groupId>org.redisson</groupId>
 <artifactId>redisson-spring-boot-starter</artifactId>
 <version>3.17.6</version>
 </dependency>
按照文件說的,編寫配置類,註入
RedissonClient
,
redisson
的全部操作都是基於此。
 /**
 * @description:
 * @author: Ning Zaichun
 */
 @Configuration
 public class MyRedissonConfig {
 /**
 * 所有對Redisson的使用都是透過RedissonClient
 * @return
 * @throws IOException
 */
 @Bean(destroyMethod="shutdown")
 public RedissonClient redissonClient() throws IOException {
 //1、建立配置
 Config config = new Config();
 // 這裏規定要用 redis://+IP地址
 config.useSingleServer().setAddress("redis://xxxxx:6379").setPassword("000415"); // 有密碼就寫密碼~ 木有不用寫~
 //2、根據Config建立出RedissonClient例項
 //Redis url should start with redis:// or rediss://
 RedissonClient redissonClient = Redisson.create(config);
return redissonClient;
 }
 }
修改定時任務:
 /**
 * @description:
 * @author: Ning Zaichun
 */
 @Slf4j
 @Component
 @EnableAsync
 @EnableScheduling
 public class ScheduleService {
 @Autowired
 TaskExecutor taskExecutor;
 @Autowired
 RedissonClient redissonClient;
 private final String SCHEDULE_LOCK = "schedule:lock";
 @Async(value = "taskExecutor")
 @Scheduled(cron = "0/5 * * * * ? ")
 public void testSchedule() {
 //分布式鎖
 RLock lock = redissonClient.getLock(SCHEDULE_LOCK);
 try {
 //加鎖 10 為時間,加上時間 預設會去掉 redisson 的看門狗機制(即自動續鎖機制)
 lock.lock(10, TimeUnit.SECONDS);
 Thread.sleep(10000);
 log.info("當前執行任務的執行緒號ID===>{}", Thread.currentThread().getId());
 } catch (Exception e) {
 e.printStackTrace();
 } finally {
 // 一定要記得解鎖~
 lock.unlock();
 }
 }
 }
這裏只是給出個大概的實作,實際上還是可以最佳化的,比如在給定一個flag,在獲取鎖之前判斷。如果有人搶到鎖,就修改這個值,之後的請求,判斷這個flag,如果不是預設的值,則直接結束任務等等。
「
思考:繼續往深處思考,在分布式情況下如果一個定時任務搶到鎖,但是它在執行業務過程中失敗或者是宕機了,這又該如何處理呢?如何補償呢?
個人思考:
失敗還比較好說,我們可以直接
try{}catch(){}
中進行通知告警,及時檢查出問題。
如果是掛了,我還沒想好怎麽做。
後記
但實際上,我所闡述的這種方式,只能說適用於簡單的單體計畫,一旦牽扯到動態定時任務,使用這種方式就不再那麽方便了。
大部份都是使用定時任務框架整合了,尤其是分布式排程遠比單體計畫需要考慮多的多。
希望大家有所收獲
👉 歡迎 ,你將獲得: 專屬的計畫實戰 / 1v1 提問 / Java 學習路線 / 學習打卡 / 每月贈書 / 社群討論
新計畫: 【從零手擼:仿小紅書(微服務架構)】 正在持續爆肝中,基於 Spring Cloud Alibaba + Spring Boot 3.x + JDK 17..., ;
【從零手擼:前後端分離部落格計畫(全棧開發)】 2期已完結,演示連結: http://116.62.199.48/ ;
截止目前, 累計輸出 50w+ 字,講解圖 2200+ 張,還在持續爆肝中.. 後續還會上新更多計畫,目標是將 Java 領域典型的計畫都整一波,如秒殺系統, 線上商城, IM 即時通訊,Spring Cloud Alibaba 等等,

1.
2.
3.
4.
最近面試BAT,整理一份面試資料【Java面試BATJ通關手冊】,覆蓋了Java核心技術、JVM、Java並行、SSM、微服務、資料庫、數據結構等等。
獲取方式:點「在看」,關註公眾號並回復 Java 領取,更多內容陸續奉上。
PS:因公眾號平台更改了推播規則,如果不想錯過內容,記得讀完點一下「在看」,加個「星標」,這樣每次新文章推播才會第一時間出現在你的訂閱列表裏。
點「在看」支持小哈呀,謝謝啦


