RBAC权限分析
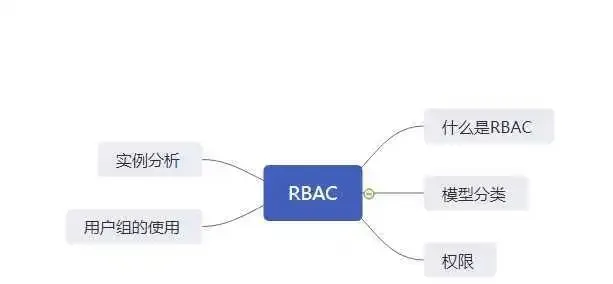
RBAC 全称为基于角色的权限控制,本文将会从什么是RBAC,模型分类,什么是权限,用户组的使用,实例分析等几个方面阐述RBAC
思维导图
什么是RBAC
实例分析等几个方面阐述RBAC
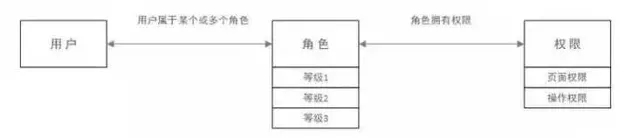
RBAC 全称为用户角色权限控制,通过角色关联用户,角色关联权限,这种方式,间阶的赋予用户的权限,如下图所示
对于通常的系统而言,存在多个用户具有相同的权限,在分配的时候,要为指定的用户分配相关的权限,修改的时候也要依次的对这几个用户的权限进行修改,有了角色这个权限,在修改权限的时候,只需要对角色进行修改,就可以实现相关的权限的修改。这样做增加了效率,减少了权限漏洞的发生。
模型分类
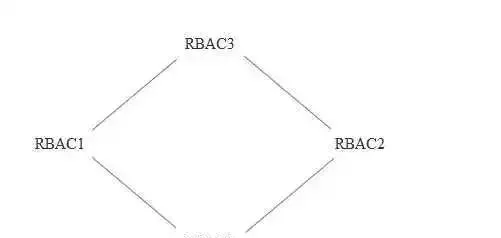
对于RBAC模型来说,分为以下几个模型 分别是RBAC0,RBAC1,RBAC2,RBAC3,这四个模型,这段将会依次介绍这四个模型,其中最常用的模型有RBAC0.
RBAC0
RBAC0是最简单的RBAC模型,这里面包含了两种。
用户和角色是多对一的关系 ,即一个用户只充当一种角色,一个角色可以有多个角色的担当。
用户和角色是多对多的关系 ,即,一个用户可以同时充当多个角色,一个角色可以有多个用户。
此系统功能单一,人员较少,这里举个栗子,张三既是行政,也负责财务,此时张三就有俩个权限,分别是行政权限,和财务权限两个部分。
RBAC1
相对于RBAC0模型来说,增加了子角色,引入了继承的概念。
RBAC2 模型
这里RBAC2模型,在RBAC0模型的基础上,增加了一些功能,以及限制
角色互斥
即,同一个用户不能拥有两个互斥的角色,举个例子,在财务系统中,一个用户不能拥有会计员和审计这两种角色。
基数约束
即,用一个角色,所拥有的成员是固定的,例如对于CEO这种角色,同一个角色,也只能有一个用户。
先决条件
即,对于该角色来说,如果想要获得更高的角色,需要先获取低一级别的角色。举个栗子,对于副总经理和经理这两个权限来说,需要先有副总经理权限,才能拥有经理权限,其中副总经理权限是经理权限的先决条件。
运行时互斥
即,一个用户可以拥有两个角色,但是这俩个角色不能同时使用,需要切换角色才能进入另外一个角色。举个栗子,对于总经理和专员这两个角色,系统只能在一段时间,拥有其一个角色,不能同时对这两种角色进行操作。
RBAC3模型
即,RBAC1,RBAC2,两者模型全部累计,称为统一模型。
什么是权限
权限是资源的集合,这里的资源指的是软件中的所有的内容,即,对页面的操作权限,对页面的访问权限,对数据的增删查改的权限。举个栗子。对于下图中的系统而言,
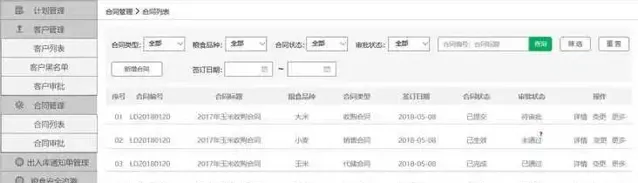
拥有,计划管理,客户管理,合同管理,出入库通知单管理,粮食安全追溯,粮食统计查询,设备管理这几个页面,对这几个页面的访问,以及是否能够访问到菜单,都属于权限。
用户组的使用
对于用户组来说,是把众多的用户划分为一组,进行批量授予角色,即,批量授予权限。
举个栗子,对于部门来说,一个部门拥有一万多个员工,这些员工都拥有相同的角色,如果没有用户组,可能需要一个个的授予相关的角色,在拥有了用户组以后,只需要,把这些用户全部划分为一组,然后对该组设置授予角色,就等同于对这些用户授予角色。
优点:减少工作量,便于理解,增加多级管理,等。
SpringSecurity 简单使用
首先添加依赖
<dependency>
<groupId>org.springframework.boot</groupId>
<artifactId>spring-boot-starter-security</artifactId>
</dependency>
然后添加相关的访问接口
packagecom.example.demo.web;
importorg.springframework.web.bind.annotation.RequestMapping;
importorg.springframework.web.bind.annotation.RestController;
@RestController
@RequestMapping("/test")
public class Test {
 @RequestMapping("/test")
 public String test(){
return "test";
 }
}
最后启动项目,在日志中查看相关的密码
访问接口,可以看到相关的登录界面
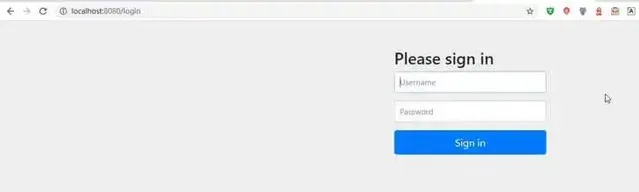
输入用户名和相关的密码
用户名:user
密码 984cccf2-ba82-468e-a404-7d32123d0f9c
增加用户名和密码
在配置文件中,书写相关的登录和密码
spring:
security:
user:
name: ming
password: 123456
roles: admin
在登录页面,输入用户名和密码,即可正常登录
基于内存的认证
需要自定义类继承 WebSecurityConfigurerAdapter 代码如下
packagecom.example.demo.config;
importorg.springframework.context.annotation.Bean;
importorg.springframework.context.annotation.Configuration;
importorg.springframework.security.config.annotation.authentication.builders.AuthenticationManagerBuilder;
importorg.springframework.security.config.annotation.web.configuration.WebSecurityConfigurerAdapter;
importorg.springframework.security.crypto.password.NoOpPasswordEncoder;
importorg.springframework.security.crypto.password.PasswordEncoder;
@Configuration
public class MyWebSecurityConfig extends WebSecurityConfigurerAdapter {
 @Bean
 PasswordEncoder passwordEncoder(){
returnNoOpPasswordEncoder.getInstance();
 }
 @Override
 protected void configure(AuthenticationManagerBuilder auth) throws Exception {
auth.inMemoryAuthentication()
.withUser("admin").password("123").roles("admin");
 }
}
即,配置的用户名为admin,密码为123,角色为admin
HttpSecurity
这里对一些方法进行拦截
package com.ming.demo.interceptor;
import org.springframework.beans.factory.annotation.Autowired;
import org.springframework.context.annotation.Bean;
import org.springframework.context.annotation.Configuration;
import org.springframework.http.HttpMethod;
import org.springframework.security.config.annotation.authentication.builders.AuthenticationManagerBuilder;
import org.springframework.security.config.annotation.method.configuration.EnableGlobalMethodSecurity;
import org.springframework.security.config.annotation.web.builders.HttpSecurity;
import org.springframework.security.config.annotation.web.configuration.EnableWebSecurity;
import org.springframework.security.config.annotation.web.configuration.WebSecurityConfigurerAdapter;
import org.springframework.security.crypto.bcrypt.BCryptPasswordEncoder;
import org.springframework.security.crypto.password.PasswordEncoder;
import org.springframework.security.web.authentication.rememberme.TokenBasedRememberMeServices;
@Configuration
@EnableWebSecurity
public classSecurityConfigextendsWebSecurityConfigurerAdapter{
//基于内存的用户存储
@Override
publicvoidconfigure(AuthenticationManagerBuilder auth)throws Exception {
 auth.inMemoryAuthentication()
 .withUser("itguang").password("123456").roles("USER").and()
 .withUser("admin").password("{noop}" + "123456").roles("ADMIN");
 }
//请求拦截
@Override
protectedvoidconfigure(HttpSecurity http)throws Exception {
 http.authorizeRequests()
 .anyRequest().permitAll()
 .and()
 .formLogin()
 .permitAll()
 .and()
 .logout()
 .permitAll();
 }
}
即,这里完成了对所有的方法访问的拦截。
SpringSecurity 集成JWT
这是一个小demo,目的,登录以后返回jwt生成的token
导入依赖
添加web依赖

导入JWT和Security依赖
<!-- https://mvnrepository.com/artifact/io.jsonwebtoken/jjwt -->
<dependency>
<groupId>io.jsonwebtoken</groupId>
<artifactId>jjwt</artifactId>
<version>0.9.1</version>
</dependency>
<!-- https://mvnrepository.com/artifact/org.springframework.boot/spring-boot-starter-security -->
<dependency>
<groupId>org.springframework.boot</groupId>
<artifactId>spring-boot-starter-security</artifactId>
<version>2.3.1.RELEASE</version>
</dependency>
创建一个JwtUser实现UserDetails
创建 一个相关的JavaBean
package com.example.demo;
import org.springframework.security.core.GrantedAuthority;
import org.springframework.security.core.userdetails.UserDetails;
import java.util.Collection;
public classJwtUserimplementsUserDetails{
private String username;
private String password;
private Integer state;
private Collection<? extends GrantedAuthority> authorities;
publicJwtUser(){
 }
publicJwtUser(String username, String password, Integer state, Collection<? extends GrantedAuthority> authorities){
this.username = username;
this.password = password;
this.state = state;
this.authorities = authorities;
 }
@Override
public Collection<? extends GrantedAuthority> getAuthorities() {
return authorities;
 }
@Override
public String getPassword(){
returnthis.password;
 }
@Override
public String getUsername(){
returnthis.username;
 }
@Override
publicbooleanisAccountNonExpired(){
returntrue;
 }
@Override
publicbooleanisAccountNonLocked(){
returntrue;
 }
@Override
publicbooleanisCredentialsNonExpired(){
returntrue;
 }
@Override
publicbooleanisEnabled(){
returntrue;
 }
}
编写工具类生成令牌
编写工具类,用来生成token,以及刷新token,以及验证token
package com.example.demo;
import io.jsonwebtoken.Claims;
import io.jsonwebtoken.Jwts;
import io.jsonwebtoken.SignatureAlgorithm;
import org.springframework.security.core.userdetails.UserDetails;
import java.io.Serializable;
import java.util.Date;
import java.util.HashMap;
import java.util.Map;
public class JwtTokenUtil implements Serializable {
privateString secret;
private Long expiration;
privateString header;
privateString generateToken(Map<String, Object> claims) {
Date expirationDate = newDate(System.currentTimeMillis() + expiration);
return Jwts.builder().setClaims(claims).setExpiration(expirationDate).signWith(SignatureAlgorithm.HS512, secret).compact();
 }
private Claims getClaimsFromToken(String token) {
 Claims claims;
try {
 claims = Jwts.parser().setSigningKey(secret).parseClaimsJws(token).getBody();
 } catch (Exception e) {
 claims = null;
 }
return claims;
 }
publicString generateToken(UserDetails userDetails) {
 Map<String, Object> claims = new HashMap<>(2);
 claims.put("sub", userDetails.getUsername());
 claims.put("created", newDate());
return generateToken(claims);
 }
publicString getUsernameFromToken(String token) {
String username;
try {
 Claims claims = getClaimsFromToken(token);
 username = claims.getSubject();
 } catch (Exception e) {
 username = null;
 }
return username;
 }
publicBoolean isTokenExpired(String token) {
try {
 Claims claims = getClaimsFromToken(token);
Date expiration = claims.getExpiration();
return expiration.before(newDate());
 } catch (Exception e) {
returnfalse;
 }
 }
publicString refreshToken(String token) {
String refreshedToken;
try {
 Claims claims = getClaimsFromToken(token);
 claims.put("created", newDate());
 refreshedToken = generateToken(claims);
 } catch (Exception e) {
 refreshedToken = null;
 }
return refreshedToken;
 }
publicBoolean validateToken(String token, UserDetails userDetails) {
 JwtUser user = (JwtUser) userDetails;
String username = getUsernameFromToken(token);
return (username.equals(user.getUsername()) && !isTokenExpired(token));
 }
}
编写拦截器
编写Filter 用来检测JWT
package com.example.demo;
import org.apache.commons.lang.StringUtils;
import org.springframework.beans.factory.annotation.Autowired;
import org.springframework.security.authentication.UsernamePasswordAuthenticationToken;
import org.springframework.security.core.context.SecurityContextHolder;
import org.springframework.security.core.userdetails.UserDetails;
import org.springframework.security.core.userdetails.UserDetailsService;
import org.springframework.security.web.authentication.WebAuthenticationDetailsSource;
import org.springframework.stereotype.Component;
import org.springframework.web.filter.OncePerRequestFilter;
import javax.servlet.FilterChain;
import javax.servlet.ServletException;
import javax.servlet.http.HttpServletRequest;
import javax.servlet.http.HttpServletResponse;
import java.io.IOException;
@Component
public classJwtAuthenticationTokenFilterextendsOncePerRequestFilter{
@Autowired
private UserDetailsService userDetailsService;
@Autowired
private JwtTokenUtil jwtTokenUtil;
@Override
protectedvoiddoFilterInternal(HttpServletRequest httpServletRequest, HttpServletResponse httpServletResponse, FilterChain filterChain)throws ServletException, IOException {
 String authHeader = httpServletRequest.getHeader(jwtTokenUtil.getHeader());
if (authHeader != null && StringUtils.isNotEmpty(authHeader)) {
 String username = jwtTokenUtil.getUsernameFromToken(authHeader);
if (username != null && SecurityContextHolder.getContext().getAuthentication() == null) {
 UserDetails userDetails = this.userDetailsService.loadUserByUsername(username);
if (jwtTokenUtil.validateToken(authHeader, userDetails)) {
 UsernamePasswordAuthenticationToken authentication =
new UsernamePasswordAuthenticationToken(userDetails,null,userDetails.getAuthorities());
 authentication.setDetails(new WebAuthenticationDetailsSource().buildDetails(httpServletRequest));
 SecurityContextHolder.getContext().setAuthentication(authentication);
 }
 }
 }
 filterChain.doFilter(httpServletRequest, httpServletResponse);
 }
}
编写userDetailsService的实现类
在上方代码中,编写userDetailsService,类,实现其验证过程
package com.example.demo;
import org.springframework.beans.factory.annotation.Autowired;
import org.springframework.security.core.authority.SimpleGrantedAuthority;
import org.springframework.security.core.userdetails.User;
import org.springframework.security.core.userdetails.UserDetails;
import org.springframework.security.core.userdetails.UserDetailsService;
import org.springframework.security.core.userdetails.UsernameNotFoundException;
import org.springframework.stereotype.Service;
import javax.management.relation.Role;
import java.util.List;
@Service
public classJwtUserDetailsServiceImplimplementsUserDetailsService{
@Autowired
private UserMapper userMapper;
@Override
public UserDetails loadUserByUsername(String s)throws UsernameNotFoundException {
 User user = userMapper.selectByUserName(s);
if (user == null) {
thrownew UsernameNotFoundException(String.format("'%s'.这个用户不存在", s));
 }
 List<SimpleGrantedAuthority> collect = user.getRoles().stream().map(Role::getRolename).map(SimpleGrantedAuthority::new).collect(Collectors.toList());
returnnew JwtUser(user.getUsername(), user.getPassword(), user.getState(), collect);
 }
}
编写登录
编写登录业务的实现类 其login方法会返回一个JWTUtils 的token
@Service
public classUserServiceImplimplementsUserService{
@Autowired
private UserMapper userMapper;
@Autowired
private AuthenticationManager authenticationManager;
@Autowired
private UserDetailsService userDetailsService;
@Autowired
private JwtTokenUtil jwtTokenUtil;
public User findByUsername(String username){
 User user = userMapper.selectByUserName(username);
return user;
 }
public RetResult login(String username, String password)throws AuthenticationException {
 UsernamePasswordAuthenticationToken upToken = new UsernamePasswordAuthenticationToken(username, password);
final Authentication authentication = authenticationManager.authenticate(upToken);
 SecurityContextHolder.getContext().setAuthentication(authentication);
 UserDetails userDetails = userDetailsService.loadUserByUsername(username);
returnnew RetResult(RetCode.SUCCESS.getCode(),jwtTokenUtil.generateToken(userDetails));
 }
}
最后配置Config
@EnableGlobalMethodSecurity(prePostEnabled = true)
@EnableWebSecurity
public classWebSecurityextendsWebSecurityConfigurerAdapter{
@Autowired
private UserDetailsService userDetailsService;
@Autowired
private JwtAuthenticationTokenFilter jwtAuthenticationTokenFilter;
@Autowired
publicvoidconfigureAuthentication(AuthenticationManagerBuilder authenticationManagerBuilder)throws Exception {
 authenticationManagerBuilder.userDetailsService(this.userDetailsService).passwordEncoder(passwordEncoder());
 }
@Bean(name = BeanIds.AUTHENTICATION_MANAGER)
@Override
public AuthenticationManager authenticationManagerBean()throws Exception {
returnsuper.authenticationManagerBean();
 }
@Bean
public PasswordEncoder passwordEncoder(){
returnnew BCryptPasswordEncoder();
 }
@Override
protectedvoidconfigure(HttpSecurity http)throws Exception {
 http.csrf().disable().sessionManagement().sessionCreationPolicy(SessionCreationPolicy.STATELESS)
 .and().authorizeRequests()
 .antMatchers(HttpMethod.OPTIONS, "/**").permitAll()
 .antMatchers("/auth/**").permitAll()
 .anyRequest().authenticated()
 .and().headers().cacheControl();
 http.addFilterBefore(jwtAuthenticationTokenFilter, UsernamePasswordAuthenticationFilter. class);
 ExpressionUrlAuthorizationConfigurer<HttpSecurity>.ExpressionInterceptUrlRegistry registry = http.authorizeRequests();
 registry.requestMatchers(CorsUtils::isPreFlightRequest).permitAll();
 }
@Bean
public CorsFilter corsFilter(){
final UrlBasedCorsConfigurationSource urlBasedCorsConfigurationSource = new UrlBasedCorsConfigurationSource();
final CorsConfiguration cors = new CorsConfiguration();
 cors.setAllowCredentials(true);
 cors.addAllowedOrigin("*");
 cors.addAllowedHeader("*");
 cors.addAllowedMethod("*");
 urlBasedCorsConfigurationSource.registerCorsConfiguration("/**", cors);
returnnew CorsFilter(urlBasedCorsConfigurationSource);
 }
}
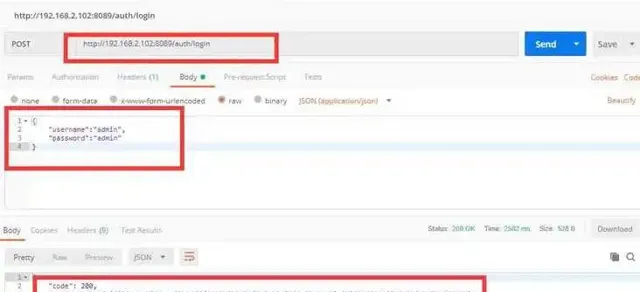
运行,返回token
运行,返回结果为token
SpringSecurity JSON登录
这里配置SpringSecurity之JSON登录
这里需要重写UsernamePasswordAnthenticationFilter类,以及配置SpringSecurity
重写UsernamePasswordAnthenticationFilter
public classCustomAuthenticationFilterextendsUsernamePasswordAuthenticationFilter{
@Override
public Authentication attemptAuthentication(HttpServletRequest request, HttpServletResponse response)throws AuthenticationException {
//attempt Authentication when Content-Type is json
if(request.getContentType().equals(MediaType.APPLICATION_JSON_UTF8_VALUE)
 ||request.getContentType().equals(MediaType.APPLICATION_JSON_VALUE)){
//use jackson to deserialize json
 ObjectMapper mapper = new ObjectMapper();
 UsernamePasswordAuthenticationToken authRequest = null;
try (InputStream is = request.getInputStream()){
 AuthenticationBean authenticationBean = mapper.readValue(is,AuthenticationBean. class);
 authRequest = new UsernamePasswordAuthenticationToken(
 authenticationBean.getUsername(), authenticationBean.getPassword());
 }catch (IOException e) {
 e.printStackTrace();
 authRequest = new UsernamePasswordAuthenticationToken(
"", "");
 }finally {
 setDetails(request, authRequest);
returnthis.getAuthenticationManager().authenticate(authRequest);
 }
 }
//transmit it to UsernamePasswordAuthenticationFilter
else {
returnsuper.attemptAuthentication(request, response);
 }
 }
}
配置SecurityConfig
@Override
protectedvoidconfigure(HttpSecurity http)throws Exception {
 http
 .cors().and()
 .antMatcher("/**").authorizeRequests()
 .antMatchers("/", "/login**").permitAll()
 .anyRequest().authenticated()
//这里必须要写formLogin(),不然原有的UsernamePasswordAuthenticationFilter不会出现,也就无法配置我们重新的UsernamePasswordAuthenticationFilter
 .and().formLogin().loginPage("/")
 .and().csrf().disable();
//用重写的Filter替换掉原有的UsernamePasswordAuthenticationFilter
 http.addFilterAt(customAuthenticationFilter(),
 UsernamePasswordAuthenticationFilter. class);
}
//注册自定义的UsernamePasswordAuthenticationFilter
@Bean
CustomAuthenticationFilter customAuthenticationFilter()throws Exception {
 CustomAuthenticationFilter filter = new CustomAuthenticationFilter();
 filter.setAuthenticationSuccessHandler(new SuccessHandler());
 filter.setAuthenticationFailureHandler(new FailureHandler());
 filter.setFilterProcessesUrl("/login/self");
//这句很关键,重用WebSecurityConfigurerAdapter配置的AuthenticationManager,不然要自己组装AuthenticationManager
 filter.setAuthenticationManager(authenticationManagerBean());
return filter;
}
这样就完成使用json登录SpringSecurity
Spring Security 密码加密方式
需要在Config 类中配置如下内容
/**
 * 密码加密
 */
 @Bean
public BCryptPasswordEncoder passwordEncoder(){
returnnew BCryptPasswordEncoder();
 }
即,使用此方法,对密码进行加密, 在业务层的时候,使用此加密的方法
@Service
@Transactional
public classUserServiceImplimplementsUserService{
@Resource
private UserRepository userRepository;
@Resource
private BCryptPasswordEncoder bCryptPasswordEncoder; //注入bcryct加密
@Override
public User add(User user){
 user.setPassword(bCryptPasswordEncoder.encode(user.getPassword())); //对密码进行加密
 User user2 = userRepository.save(user);
return user2;
 }
@Override
public ResultInfo login(User user){
 ResultInfo resultInfo=new ResultInfo();
 User user2 = userRepository.findByName(user.getName());
if (user2==null) {
 resultInfo.setCode("-1");
 resultInfo.setMessage("用户名不存在");
return resultInfo;
 }
//判断密码是否正确
if (!bCryptPasswordEncoder.matches(user.getPassword(),user2.getPassword())) {
 resultInfo.setCode("-1");
 resultInfo.setMessage("密码不正确");
return resultInfo;
 }
 resultInfo.setMessage("登录成功");
return resultInfo;
 }
}
即,使用BCryptPasswordEncoder 对密码进行加密,保存数据库
使用数据库认证
这里使用数据库认证SpringSecurity
设计数据表
这里设计数据表

着重配置SpringConfig
@Configurable
public classWebSecurityConfigextendsWebSecurityConfigurerAdapter{
@Autowired
private UserService userService; // service 层注入
@Bean
PasswordEncoder passwordEncoder(){
returnnew BCryptPasswordEncoder();
 }
@Override
protectedvoidconfigure(AuthenticationManagerBuilder auth)throws Exception {
// 参数传入Service,进行验证
 auth.userDetailsService(userService);
 }
@Override
protectedvoidconfigure(HttpSecurity http)throws Exception {
 http.authorizeRequests()
 .antMatchers("/admin/**").hasRole("admin")
 .anyRequest().authenticated()
 .and()
 .formLogin()
 .loginProcessingUrl("/login").permitAll()
 .and()
 .csrf().disable();
 }
}
这里着重配置SpringConfig
小结
着重讲解了RBAC的权限配置,以及简单的使用SpringSecurity,以及使用SpringSecurity + JWT 完成前后端的分离,以及配置json登录,和密码加密方式。
如喜欢本文,请点击右上角,把文章分享到朋友圈
如有想了解学习的技术点,请留言给若飞安排分享
因公众号更改推送规则,请点「在看」并加「星标」 第一时间获取精彩技术分享
·END·
相关阅读:
作者:小小____
来源:https://segmentfault.com/a/1190000023052493
版权申明:内容来源网络,仅供学习研究,版权归原创者所有。如有侵权烦请告知,我们会立即删除并表示歉意。谢谢!
架构师
我们都是架构师!
关注 架构师(JiaGouX),添加「星标」
获取每天技术干货,一起成为牛逼架构师
技术群请 加若飞: 1321113940 进架构师群
投稿、合作、版权等邮箱: [email protected]


