前言
為了防止世界被破壞,為了守護世界的和平。。。說錯了,重來~
為了防止驗證系統被暴力破解,很多系統都增加了驗證碼效驗,比較常見的就是圖片二維碼,業內比較安全的是簡訊驗證碼,當然還有一些拼圖驗證碼,加入人工智慧的二維碼等等,我們今天的主題就是前後端分離的圖片二維碼登入方案。
未分離驗證碼登入方案
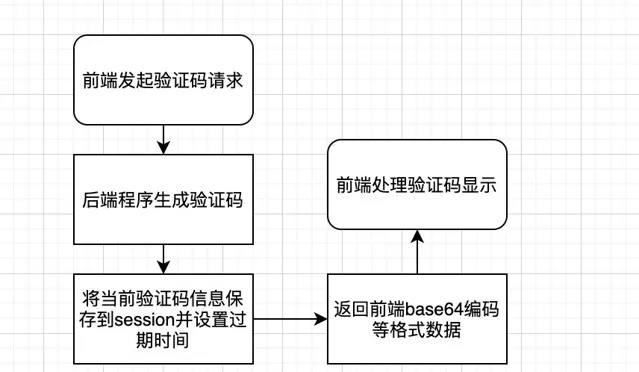
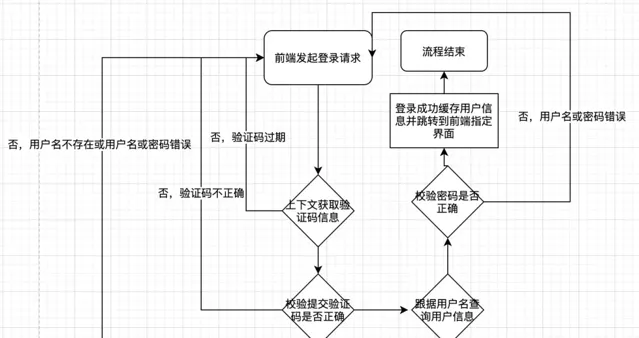
傳統的計畫大都是基於session互動的,前後端都在一個計畫裏面,比如傳統的SSH計畫或者一些JSP系統,當前端頁面觸發到獲取驗證碼請求,可以將驗證碼裏面的資訊存在上下文中,所以登入的時候只需要
使用者名稱
、
密碼
、
驗證碼
即可。
驗證碼生成流程如下

登入驗證流程如下

可以發現,整個登入流程還是依賴session上下文的,並且由後端調整頁面。
分離驗證碼登入方案
隨著系統和業務的不停升級,前後端程式碼放在一起的計畫越來越臃腫,已經無法快速叠代和職責區分了,於是紛紛投入了前後端分離的懷抱,發現程式碼和職責分離以後,開發效率越來越高了,功能叠代還越來越快,但是以前的驗證碼登入方案就要更改了。
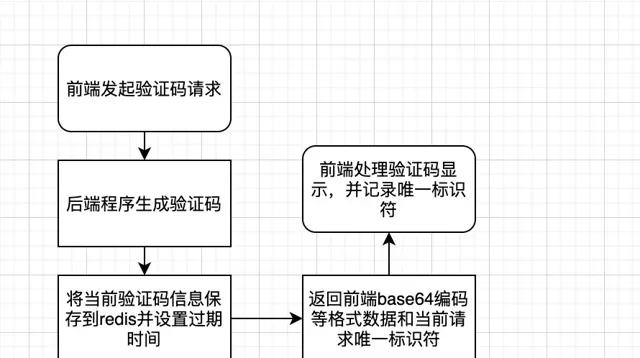
驗證碼生成流程如下

對比原來的方案,增加了redis中介軟體,不再是存在session裏面了,但是後面怎麽區分這個驗證碼是這個請求生成的呢?所以我們加入了唯一識別元來區分
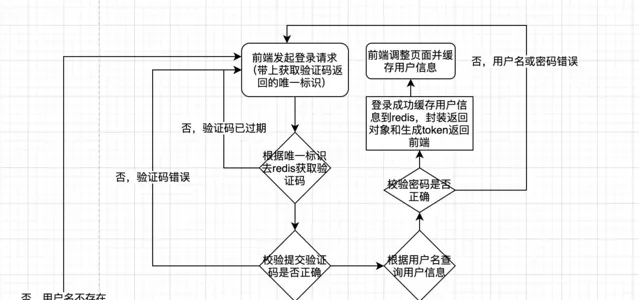
登入驗證流程如下

可以發現,基於前後端分離的分布式計畫登入方案對比原來,加了一個redis中介軟體和token返回,不再依賴上下文session,並且頁面調整也是由後端換到了前端
動手擼輪子
基於驗證碼的輪子還是挺多的,本文就以
Kaptcha
這個計畫為例,透過springboot計畫整合
Kaptcha
來實作驗證碼生成和登入方案。
Kaptcha介紹
Kaptcha是一個基於SimpleCaptcha的驗證碼開源計畫
我找的這個輪子是基於SimpleCaptcha二次封裝的,maven依賴如下
<!--Kaptcha是一個基於SimpleCaptcha的驗證碼開源計畫-->
<dependency>
<groupId>com.github.penggle</groupId>
<artifactId>kaptcha</artifactId>
<version>2.3.2</version>
</dependency>
新建計畫並加入依賴
依賴主要有 SpringBoot、Kaptcha、Redis
pom.xml
<?xml version="1.0" encoding="UTF-8"?>
<projectxmlns="http://maven.apache.org/POM/4.0.0"
xmlns:xsi="http://www.w3.org/2001/XMLSchema-instance"
xsi:schemaLocation="http://maven.apache.org/POM/4.0.0 http://maven.apache.org/xsd/maven-4.0.0.xsd">
<modelVersion>4.0.0</modelVersion>
<groupId>com.lzp</groupId>
<artifactId>kaptcha</artifactId>
<version>1.0-SNAPSHOT</version>
<parent>
<groupId>org.springframework.boot</groupId>
<artifactId>spring-boot-starter-parent</artifactId>
<version>2.3.0.RELEASE</version>
<relativePath/><!-- lookup parent from repository -->
</parent>
<dependencies>
<!--Kaptcha是一個基於SimpleCaptcha的驗證碼開源計畫-->
<dependency>
<groupId>com.github.penggle</groupId>
<artifactId>kaptcha</artifactId>
<version>2.3.2</version>
</dependency>
<dependency>
<groupId>org.springframework.boot</groupId>
<artifactId>spring-boot-starter-web</artifactId>
</dependency>

<dependency>
<groupId>org.springframework.boot</groupId>
<artifactId>spring-boot-starter-data-redis</artifactId>
</dependency>
<!-- redis依賴commons-pool 這個依賴一定要添加 -->
<dependency>
<groupId>org.apache.commons</groupId>
<artifactId>commons-pool2</artifactId>
</dependency>
<dependency>
<groupId>com.alibaba</groupId>
<artifactId>fastjson</artifactId>
<version>1.2.3</version>
</dependency>
<dependency>
<groupId>com.fasterxml.jackson.core</groupId>
<artifactId>jackson-databind</artifactId>
</dependency>
</dependencies>

<build>
<plugins>
<plugin>
<groupId>org.springframework.boot</groupId>
<artifactId>spring-boot-maven-plugin</artifactId>
</plugin>
</plugins>
</build>
</project>
Redis配置類
RedisConfig
@Configuration
public classRedisConfig{
@Bean
public RedisTemplate<String, Object> redisTemplate(LettuceConnectionFactory redisConnectionFactory){
 RedisTemplate<String, Object> redisTemplate = new RedisTemplate<String, Object>();
 redisTemplate.setKeySerializer(new StringRedisSerializer());
 redisTemplate.setValueSerializer(new GenericJackson2JsonRedisSerializer());
 redisTemplate.setHashKeySerializer(new StringRedisSerializer());
 redisTemplate.setHashValueSerializer(new GenericJackson2JsonRedisSerializer());
 redisTemplate.setConnectionFactory(redisConnectionFactory);
return redisTemplate;
 }
}
驗證碼配置類
KaptchaConfig
@Configuration
public classKaptchaConfig{
@Bean
public DefaultKaptcha producer(){
 DefaultKaptcha defaultKaptcha = new DefaultKaptcha();
 Properties properties = new Properties();
 properties.setProperty("kaptcha.border", "no");
 properties.setProperty("kaptcha.border.color", "105,179,90");
 properties.setProperty("kaptcha.textproducer.font.color", "black");
 properties.setProperty("kaptcha.image.width", "110");
 properties.setProperty("kaptcha.image.height", "40");
 properties.setProperty("kaptcha.textproducer.char.string","23456789abcdefghkmnpqrstuvwxyzABCDEFGHKMNPRSTUVWXYZ");
 properties.setProperty("kaptcha.textproducer.font.size", "30");
 properties.setProperty("kaptcha.textproducer.char.space","3");
 properties.setProperty("kaptcha.session.key", "code");
 properties.setProperty("kaptcha.textproducer.char.length", "4");
 properties.setProperty("kaptcha.textproducer.font.names", "宋體,楷體,微軟雅黑");
// properties.setProperty("kaptcha.obscurificator.impl","com.xxx");可以重寫實作類
 properties.setProperty("kaptcha.noise.impl","com.google.code.kaptcha.impl.NoNoise");
 Config config = new Config(properties);
 defaultKaptcha.setConfig(config);
return defaultKaptcha;
 }
驗證碼控制層
CaptchaController
為了方便程式碼寫一塊了,講究看
package com.lzp.kaptcha.controller;
import com.google.code.kaptcha.impl.DefaultKaptcha;
import com.lzp.kaptcha.service.CaptchaService;
import com.lzp.kaptcha.vo.CaptchaVO;
import org.springframework.beans.factory.annotation.Autowired;
import org.springframework.web.bind.annotation.GetMapping;
import org.springframework.web.bind.annotation.RequestMapping;
import org.springframework.web.bind.annotation.ResponseBody;
import org.springframework.web.bind.annotation.RestController;
import sun.misc.BASE64Encoder;
import javax.imageio.ImageIO;
import java.awt.image.BufferedImage;
import java.io.ByteArrayOutputStream;
import java.io.IOException;
@RestController
@RequestMapping("/captcha")
public classCaptchaController{
@Autowired
private DefaultKaptcha producer;
@Autowired
private CaptchaService captchaService;
@ResponseBody
@GetMapping("/get")
public CaptchaVO getCaptcha()throws IOException {
// 生成文字驗證碼
 String content = producer.createText();
// 生成圖片驗證碼
 ByteArrayOutputStream outputStream = null;
 BufferedImage image = producer.createImage(content);
 outputStream = new ByteArrayOutputStream();
 ImageIO.write(image, "jpg", outputStream);
// 對字節陣列Base64編碼
 BASE64Encoder encoder = new BASE64Encoder();
 String str = "data:image/jpeg;base64,";
 String base64Img = str + encoder.encode(outputStream.toByteArray()).replace("\n", "").replace("\r", "");
 CaptchaVO captchaVO =captchaService.cacheCaptcha(content);
 captchaVO.setBase64Img(base64Img);
return captchaVO;
 }
}
驗證碼返回物件
CaptchaVO
package com.lzp.kaptcha.vo;
public classCaptchaVO{
/**
 * 驗證碼識別元
 */
private String captchaKey;
/**
 * 驗證碼過期時間
 */
private Long expire;
/**
 * base64字串
 */
private String base64Img;
public String getCaptchaKey(){
return captchaKey;
 }
publicvoidsetCaptchaKey(String captchaKey){
this.captchaKey = captchaKey;
 }
public Long getExpire(){
return expire;
 }
publicvoidsetExpire(Long expire){
this.expire = expire;
 }
public String getBase64Img(){
return base64Img;
 }
publicvoidsetBase64Img(String base64Img){
this.base64Img = base64Img;
 }
}
Redis封裝類
RedisUtils
網上隨意找的,類裏面註明來源,將就用,程式碼較多就不貼了,文末有程式碼獲取
驗證碼方法層
CaptchaService
package com.lzp.kaptcha.service;
import com.lzp.kaptcha.utils.RedisUtils;
import com.lzp.kaptcha.vo.CaptchaVO;
import org.springframework.beans.factory.annotation.Autowired;
import org.springframework.beans.factory.annotation.Value;
import org.springframework.stereotype.Service;
import java.util.UUID;
@Service
public classCaptchaService{
@Value("${server.session.timeout:300}")
private Long timeout;
@Autowired
private RedisUtils redisUtils;

privatefinal String CAPTCHA_KEY = "captcha:verification:";
public CaptchaVO cacheCaptcha(String captcha){
//生成一個隨機識別元
 String captchaKey = UUID.randomUUID().toString();
//緩存驗證碼並設定過期時間
 redisUtils.set(CAPTCHA_KEY.concat(captchaKey),captcha,timeout);
 CaptchaVO captchaVO = new CaptchaVO();
 captchaVO.setCaptchaKey(captchaKey);
 captchaVO.setExpire(timeout);
return captchaVO;
 }
}
使用者登入物件封裝
LoginDTO
package com.lzp.kaptcha.dto;
public classLoginDTO{
private String userName;
private String pwd;
private String captchaKey;
private String captcha;
public String getUserName(){
return userName;
 }
publicvoidsetUserName(String userName){
this.userName = userName;
 }
public String getPwd(){
return pwd;
 }
publicvoidsetPwd(String pwd){
this.pwd = pwd;
 }
public String getCaptchaKey(){
return captchaKey;
 }
publicvoidsetCaptchaKey(String captchaKey){
this.captchaKey = captchaKey;
 }
public String getCaptcha(){
return captcha;
 }
publicvoidsetCaptcha(String captcha){
this.captcha = captcha;
 }
}
登入控制層
UserController
這塊我寫邏輯程式碼了,相信大家都看的懂
package com.lzp.kaptcha.controller;
import com.lzp.kaptcha.dto.LoginDTO;
import com.lzp.kaptcha.utils.RedisUtils;
import com.lzp.kaptcha.vo.UserVO;
import org.springframework.beans.factory.annotation.Autowired;
import org.springframework.web.bind.annotation.PostMapping;
import org.springframework.web.bind.annotation.RequestBody;
import org.springframework.web.bind.annotation.RequestMapping;
import org.springframework.web.bind.annotation.RestController;
@RestController
@RequestMapping("/user")
public classUserController{
@Autowired
private RedisUtils redisUtils;
@PostMapping("/login")
public UserVO login(@RequestBody LoginDTO loginDTO){
 Object captch = redisUtils.get(loginDTO.getCaptchaKey());
if(captch == null){
// throw 驗證碼已過期
 }
if(!loginDTO.getCaptcha().equals(captch)){
// throw 驗證碼錯誤
 }
// 查詢使用者資訊
//判斷使用者是否存在 不存在丟擲使用者名稱密碼錯誤
//判斷密碼是否正確,不正確丟擲使用者名稱密碼錯誤
//構造返回到前端的使用者物件並封裝資訊和生成token
returnnew UserVO();
 }
}
驗證碼獲取和檢視


如喜歡本文,請點選右上角,把文章分享到朋友圈
如有想了解學習的技術點,請留言給若飛安排分享
因公眾號更改推播規則,請點「在看」並加「星標」 第一時間獲取精彩技術分享
·END·
相關閱讀:
來源: 碼畜君
源碼:https://github.com/pengziliu/
版權申明:內容來源網路,僅供學習研究,版權歸原創者所有。如有侵權煩請告知,我們會立即刪除並表示歉意。謝謝!
架構師
我們都是架構師!

關註 架構師(JiaGouX),添加「星標」
獲取每天技術幹貨,一起成為牛逼架構師
技術群請 加若飛: 1321113940 進架構師群
投稿、合作、版權等信箱: [email protected]


