點選「 IT碼徒 」, 關註,置頂 公眾號
每日技術幹貨,第一時間送達!
網上關於實作 SSO 的文章一大堆,但是當你真的照著寫的時候就會發現根本不是那麽回事兒,簡直讓人抓狂,尤其是對於我這樣的菜鳥。
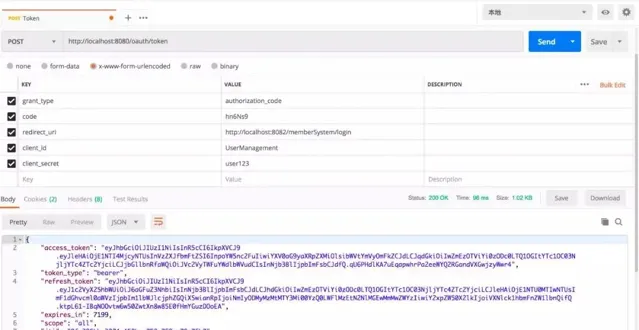
幾經曲折,終於搞定了,決定記錄下來,以便後續檢視。先來看一下效果:
1
準備
①單點登入
最常見的例子是,我們開啟淘寶 APP,首頁就會有天貓、聚劃算等服務的連結,當你點選以後就直接跳過去了,並沒有讓你再登入一次。
下面這個圖是我在網上找的,我覺得畫得比較明白:
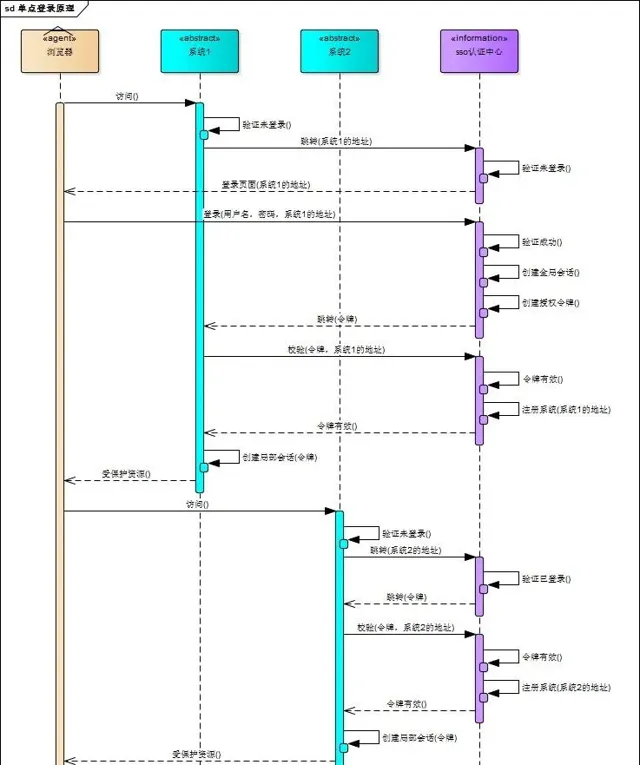
可惜有點兒不清晰,於是我又畫了個簡版的:
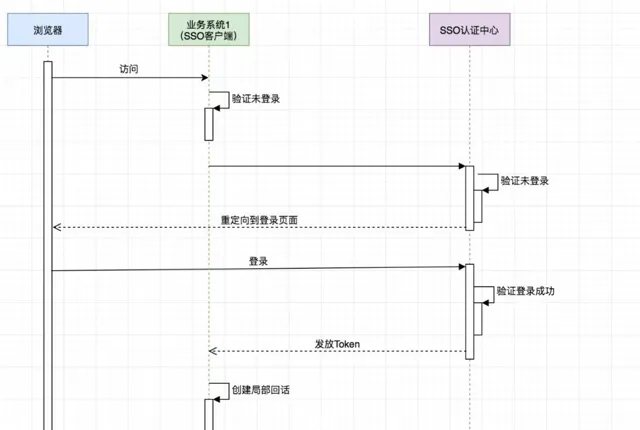
重要的是理解:
SSO 伺服端和 SSO 客戶端直接是透過授權以後發放 Token 的形式來存取受保護的資源。
相對於瀏覽器來說,業務系統是伺服端,相對於 SSO 伺服端來說,業務系統是客戶端。
瀏覽器和業務系統之間透過會話正常存取。
不是每次瀏覽器請求都要去 SSO 伺服端去驗證,只要瀏覽器和它所存取的伺服端的會話有效它就可以正常存取。
2
利用 OAuth2 實作單點登入
接下來,只講跟本例相關的一些配置,不講原理,不講為什麽。
眾所周知,在 OAuth2 在有授權伺服器、資源伺服器、客戶端這樣幾個角色,當我們用它來實作 SSO 的時候是不需要資源伺服器這個角色的,有授權伺服器和客戶端就夠了。
授權伺服器當然是用來做認證的,客戶端就是各個套用系統,我們只需要登入成功後拿到使用者資訊以及使用者所擁有的許可權即可。
之前我一直認為把那些需要許可權控制的資源放到資源伺服器裏保護起來就可以實作許可權控制,其實是我想錯了,許可權控制還得透過 Spring Security 或者自訂攔截器來做。
①Spring Security 、OAuth2、JWT、SSO
在本例中,一定要分清楚這幾個的作用:
首先,SSO 是一種思想,或者說是一種解決方案,是抽象的,我們要做的就是按照它的這種思想去實作它。
其次,OAuth2 是用來允許使用者授權第三方套用存取他在另一個伺服器上的資源的一種協定,它不是用來做單點登入的,但我們可以利用它來實作單點登入。
在本例實作 SSO 的過程中,受保護的資源就是使用者的資訊(包括,使用者的基本資訊,以及使用者所具有的許可權)。
而我們想要存取這這一資源就需要使用者登入並授權,OAuth2 伺服端負責令牌的發放等操作,這令牌的生成我們采用 JWT,也就是說 JWT 是用來承載使用者的 Access_Token 的。
最後,Spring Security 是用於安全存取的,這裏我們我們用來做存取許可權控制。
3
認證伺服器配置
Maven 依賴:
<?xml version="1.0" encoding="UTF-8"?><projectxmlns="http://maven.apache.org/POM/4.0.0"xmlns:xsi="http://www.w3.org/2001/XMLSchema-instance"xsi:schemaLocation="http://maven.apache.org/POM/4.0.0 http://maven.apache.org/xsd/maven-4.0.0.xsd"><modelVersion>4.0.0</modelVersion><parent><groupId>org.springframework.boot</groupId><artifactId>spring-boot-starter-parent</artifactId><version>2.1.3.RELEASE</version><relativePath/><!-- lookup parent from repository --></parent><groupId>com.cjs.sso</groupId><artifactId>oauth2-sso-auth-server</artifactId><version>0.0.1-SNAPSHOT</version><name>oauth2-sso-auth-server</name><properties><java.version>1.8</java.version></properties><dependencies><dependency><groupId>org.springframework.boot</groupId><artifactId>spring-boot-starter-data-jpa</artifactId></dependency><dependency><groupId>org.springframework.boot</groupId><artifactId>spring-boot-starter-data-redis</artifactId></dependency><dependency><groupId>org.springframework.boot</groupId><artifactId>spring-boot-starter-security</artifactId></dependency><dependency><groupId>org.springframework.security.oauth.boot</groupId><artifactId>spring-security-oauth2-autoconfigure</artifactId><version>2.1.3.RELEASE</version></dependency><dependency><groupId>org.springframework.boot</groupId><artifactId>spring-boot-starter-thymeleaf</artifactId></dependency><dependency><groupId>org.springframework.boot</groupId><artifactId>spring-boot-starter-web</artifactId></dependency><dependency><groupId>org.springframework.session</groupId><artifactId>spring-session-data-redis</artifactId></dependency><dependency><groupId>mysql</groupId><artifactId>mysql-connector-java</artifactId><scope>runtime</scope></dependency><dependency><groupId>org.projectlombok</groupId><artifactId>lombok</artifactId><optional>true</optional></dependency><dependency><groupId>org.springframework.boot</groupId><artifactId>spring-boot-starter-test</artifactId><scope>test</scope></dependency><dependency><groupId>org.springframework.security</groupId><artifactId>spring-security-test</artifactId><scope>test</scope></dependency><dependency><groupId>org.apache.commons</groupId><artifactId>commons-lang3</artifactId><version>3.8.1</version></dependency><dependency><groupId>com.alibaba</groupId><artifactId>fastjson</artifactId><version>1.2.56</version></dependency></dependencies><build><plugins><plugin><groupId>org.springframework.boot</groupId><artifactId>spring-boot-maven-plugin</artifactId></plugin></plugins></build></project>
這裏面最重要的依賴是:spring-security-oauth2-autoconfigure。
application.yml:
spring: datasource: url: jdbc:mysql://localhost:3306/permissionusername: root password: 123456driver- class-name: com.mysql.jdbc.Driver jpa: show-sql: true session: store-type: redis redis: host: 127.0.0.1password: 123456port: 6379server: port: 8080
AuthorizationServerConfig(重要):
@Configuration@EnableAuthorizationServerpublic classAuthorizationServerConfigextendsAuthorizationServerConfigurerAdapter{ @Autowiredprivate DataSource dataSource; @Overridepublicvoidconfigure(AuthorizationServerSecurityConfigurer security)throws Exception { security.allowFormAuthenticationForClients(); security.tokenKeyAccess("isAuthenticated()"); } @Overridepublicvoidconfigure(ClientDetailsServiceConfigurer clients)throws Exception { clients.jdbc(dataSource); } @Overridepublicvoidconfigure(AuthorizationServerEndpointsConfigurer endpoints)throws Exception { endpoints.accessTokenConverter(jwtAccessTokenConverter()); endpoints.tokenStore(jwtTokenStore()); } @Beanpublic JwtTokenStore jwtTokenStore(){ returnnew JwtTokenStore(jwtAccessTokenConverter()); } @Beanpublic JwtAccessTokenConverter jwtAccessTokenConverter(){ JwtAccessTokenConverter jwtAccessTokenConverter = new JwtAccessTokenConverter(); jwtAccessTokenConverter.setSigningKey("cjs"); // Sets the JWT signing keyreturn jwtAccessTokenConverter; }}
說明:
別忘了 @EnableAuthorizationServer。
Token 儲存采用的是 JWT。
客戶端以及登入使用者這些配置儲存在資料庫,為了減少資料庫的查詢次數,可以從資料庫讀出來以後再放到記憶體中。
WebSecurityConfig(重要):
@Configuration@EnableWebSecuritypublic class WebSecurityConfig extends WebSecurityConfigurerAdapter { @Autowired private MyUserDetailsService userDetailsService; @Override protected void configure(AuthenticationManagerBuilder auth) throws Exception { auth.userDetailsService(userDetailsService).passwordEncoder(passwordEncoder()); } @Overridepublicvoidconfigure(WebSecurity web) throwsException { web.ignoring().antMatchers("/assets/**", "/css/**", "/images/**"); } @Overrideprotectedvoidconfigure(HttpSecurity http) throwsException { http.formLogin() .loginPage("/login") .and() .authorizeRequests() .antMatchers("/login").permitAll() .anyRequest() .authenticated() .and().csrf().disable().cors(); } @BeanpublicPasswordEncoderpasswordEncoder() { returnnewBCryptPasswordEncoder(); }}
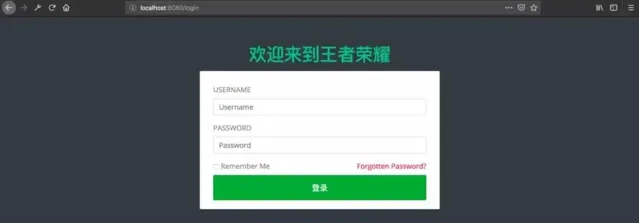
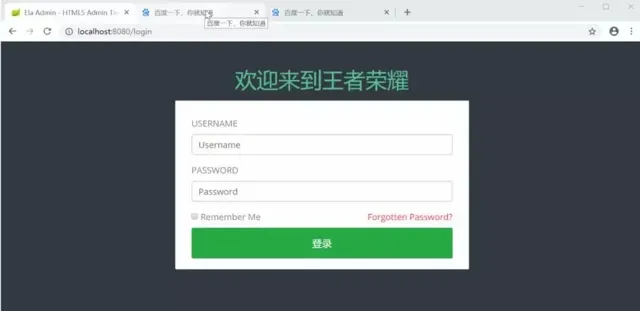
自訂登入頁面(一般來講都是要自訂的):
@Controllerpublic classLoginController{ @GetMapping("/login") public String login(){ return"login"; } @GetMapping("/") public String index(){ return"index"; }}
自訂登入頁面的時候,只需要準備一個登入頁面,然後寫個 Controller 令其可以存取到即可,登入頁面表單送出的時候 method 一定要是 post,最重要的時候 action 要跟存取登入頁面的 url 一樣。
千萬記住了,存取登入頁面的時候是 GET 請求,表單送出的時候是 POST 請求,其他的就不用管了。
<!DOCTYPE html><htmlxmlns:th="http://www.thymeleaf.org"><head><metacharset="utf-8"><metahttp-equiv="X-UA-Compatible"content="IE=edge"><title>Ela Admin - HTML5 Admin Template</title><metaname="description"content="Ela Admin - HTML5 Admin Template"><metaname="viewport"content="width=device-width, initial-scale=1"><linktype="text/css"rel=" stylesheet"th:href="@{/assets/css/normalize.css}"><linktype="text/css"rel=" stylesheet"th:href="@{/assets/bootstrap-4.3.1-dist/css/bootstrap.min.css}"><linktype="text/css"rel=" stylesheet"th:href="@{/assets/css/font-awesome.min.css}"><linktype="text/css"rel=" stylesheet"th:href="@{/assets/css/ style.css}"></head><body class="bg-dark"><div class="sufee-login d-flex align-content-center flex-wrap"><div class="container"><div class="login-content"><div class="login-logo"><h1 style="color: #57bf95;">歡迎來到王者榮耀</h1></div><div class="login-form"><formth:action="@{/login}"method="post"><div class="form-group"><label>Username</label><inputtype="text" class="form-control"name="username"placeholder="Username"></div><div class="form-group"><label>Password</label><inputtype="password" class="form-control"name="password"placeholder="Password"></div><div class="checkbox"><label><inputtype="checkbox"> Remember Me </label><label class="pull-right"><ahref="#">Forgotten Password?</a></label></div><buttontype="submit" class="btn btn-success btn-flat m-b-30 m-t-30" style="font-size: 18px;">登入</button></form></div></div></div></div><scripttype="text/javascript"th:src="@{/assets/js/jquery-2.1.4.min.js}"></script><scripttype="text/javascript"th:src="@{/assets/bootstrap-4.3.1-dist/js/bootstrap.min.js}"></script><scripttype="text/javascript"th:src="@{/assets/js/main.js}"></script></body></html>
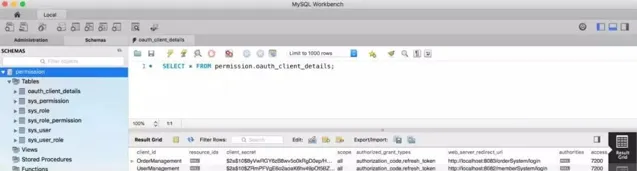
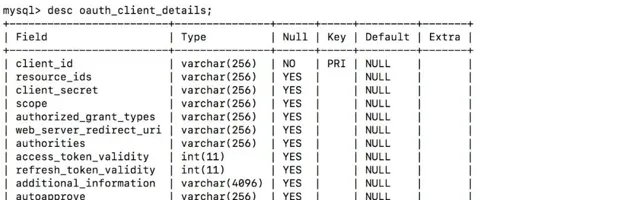
定義客戶端,如下圖:
載入使用者,登入帳戶:
@Datapublic class MyUser extends User { private Integer departmentId; // 舉個例子,部門IDprivateString mobile; // 舉個例子,假設我們想增加一個欄位,這裏我們增加一個mobile表示手機號public MyUser(String username, String password, Collection<? extends GrantedAuthority> authorities) { super(username, password, authorities); } public MyUser(String username, String password, boolean enabled, boolean accountNonExpired, boolean credentialsNonExpired, boolean accountNonLocked, Collection<? extends GrantedAuthority> authorities) { super(username, password, enabled, accountNonExpired, credentialsNonExpired, accountNonLocked, authorities); }}
載入登入帳戶:
@Slf4j@Servicepublic classMyUserDetailsServiceimplementsUserDetailsService{ @Autowiredprivate PasswordEncoder passwordEncoder; @Autowiredprivate UserService userService; @Autowiredprivate PermissionService permissionService; @Overridepublic UserDetails loadUserByUsername(String username)throws UsernameNotFoundException { SysUser sysUser = userService.getByUsername(username); if (null == sysUser) { log.warn("使用者{}不存在", username); thrownew UsernameNotFoundException(username); } List<SysPermission> permissionList = permissionService.findByUserId(sysUser.getId()); List<SimpleGrantedAuthority> authorityList = new ArrayList<>(); if (!CollectionUtils.isEmpty(permissionList)) { for (SysPermission sysPermission : permissionList) { authorityList.add(new SimpleGrantedAuthority(sysPermission.getCode())); } } MyUser myUser = new MyUser(sysUser.getUsername(), passwordEncoder.encode(sysUser.getPassword()), authorityList); log.info("登入成功!使用者: {}", JSON.toJSONString(myUser)); return myUser; }}
驗證:
當我們看到這個界面的時候,表示認證伺服器配置完成。
4
兩個客戶端
Maven 依賴:
<?xml version="1.0" encoding="UTF-8"?><projectxmlns="http://maven.apache.org/POM/4.0.0"xmlns:xsi="http://www.w3.org/2001/XMLSchema-instance"xsi:schemaLocation="http://maven.apache.org/POM/4.0.0 http://maven.apache.org/xsd/maven-4.0.0.xsd"><modelVersion>4.0.0</modelVersion><parent><groupId>org.springframework.boot</groupId><artifactId>spring-boot-starter-parent</artifactId><version>2.1.3.RELEASE</version><relativePath/><!-- lookup parent from repository --></parent><groupId>com.cjs.sso</groupId><artifactId>oauth2-sso-client-member</artifactId><version>0.0.1-SNAPSHOT</version><name>oauth2-sso-client-member</name><description>Demo project for Spring Boot</description><properties><java.version>1.8</java.version></properties><dependencies><dependency><groupId>org.springframework.boot</groupId><artifactId>spring-boot-starter-data-jpa</artifactId></dependency><dependency><groupId>org.springframework.boot</groupId><artifactId>spring-boot-starter-oauth2-client</artifactId></dependency><dependency><groupId>org.springframework.boot</groupId><artifactId>spring-boot-starter-security</artifactId></dependency><dependency><groupId>org.springframework.security.oauth.boot</groupId><artifactId>spring-security-oauth2-autoconfigure</artifactId><version>2.1.3.RELEASE</version></dependency><dependency><groupId>org.springframework.boot</groupId><artifactId>spring-boot-starter-thymeleaf</artifactId></dependency><dependency><groupId>org.thymeleaf.extras</groupId><artifactId>thymeleaf-extras-springsecurity5</artifactId><version>3.0.4.RELEASE</version></dependency><dependency><groupId>org.springframework.boot</groupId><artifactId>spring-boot-starter-web</artifactId></dependency><dependency><groupId>com.h2database</groupId><artifactId>h2</artifactId><scope>runtime</scope></dependency><dependency><groupId>org.projectlombok</groupId><artifactId>lombok</artifactId><optional>true</optional></dependency><dependency><groupId>org.springframework.boot</groupId><artifactId>spring-boot-starter-test</artifactId><scope>test</scope></dependency><dependency><groupId>org.springframework.security</groupId><artifactId>spring-security-test</artifactId><scope>test</scope></dependency></dependencies><build><plugins><plugin><groupId>org.springframework.boot</groupId><artifactId>spring-boot-maven-plugin</artifactId></plugin></plugins></build></project>
application.yml:
server: port: 8082servlet: context-path: /memberSystemsecurity: oauth2: client: client-id: UserManagement client-secret: user123 access-token-uri: http://localhost:8080/oauth/tokenuser-authorization-uri: http://localhost:8080/oauth/authorizeresource: jwt: key-uri: http://localhost:8080/oauth/token_key
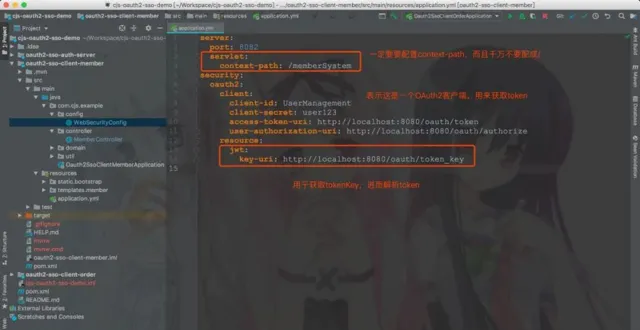
這裏 context-path 不要設成 /,不然重新導向獲取 code 的時候回被攔截。
WebSecurityConfig:
@EnableOAuth2Sso@Configurationpublic class WebSecurityConfig extends WebSecurityConfigurerAdapter { @Autowired private EnvironmentUtils environmentUtils; @Override public void configure(WebSecurity web) throws Exception { web.ignoring().antMatchers("/bootstrap/**"); } @Overrideprotectedvoidconfigure(HttpSecurity http) throwsException { if ("local".equals(environmentUtils.getActiveProfile())) { http.authorizeRequests().anyRequest().permitAll(); }else { http.logout().logoutSuccessUrl("http://localhost:8080/logout") .and() .authorizeRequests() .anyRequest().authenticated() .and() .csrf().disable(); } }}
說明:
最重要的註解是 @EnableOAuth2Sso。
許可權控制這裏采用 Spring Security 方法級別的存取控制,結合 Thymeleaf 可以很容易做許可權控制。
順便多提一句,如果是前後端分離的話,前端需求載入使用者的許可權,然後判斷應該顯示那些按鈕那些選單。
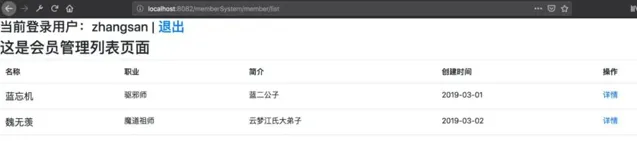
MemberController:
@Controller@RequestMapping("/member")public classMemberController{ @GetMapping("/list") public String list(){ return"member/list"; } @GetMapping("/info") @ResponseBodypublic Principal info(Principal principal){ return principal; } @GetMapping("/me") @ResponseBodypublic Authentication me(Authentication authentication){ return authentication; } @PreAuthorize("hasAuthority('member:save')") @ResponseBody@PostMapping("/add") public String add(){ return"add"; } @PreAuthorize("hasAuthority('member:detail')") @ResponseBody@GetMapping("/detail") public String detail(){ return"detail"; }}
Order 計畫跟它是一樣的:
server: port: 8083servlet: context-path: /orderSystemsecurity: oauth2: client: client-id: OrderManagement client-secret: order123 access-token-uri: http://localhost:8080/oauth/tokenuser-authorization-uri: http://localhost:8080/oauth/authorizeresource: jwt: key-uri: http://localhost:8080/oauth/token_key
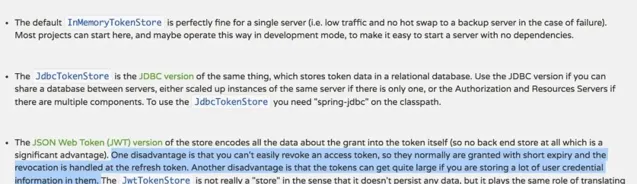
關於結束:結束就是清空用於與 SSO 客戶端建立的所有的會話,簡單的來說就是使所有端點的 Session 失效,如果想做得更好的話可以令 Token 失效,但是由於我們用的 JWT,故而撤銷 Token 就不是那麽容易,關於這一點,在官網上也有提到:
本例中采用的方式是在結束的時候先結束業務伺服器,成功以後再回呼認證伺服器,但是這樣有一個問題,就是需要主動依次呼叫各個業務伺服器的 logout。
5
工程結構
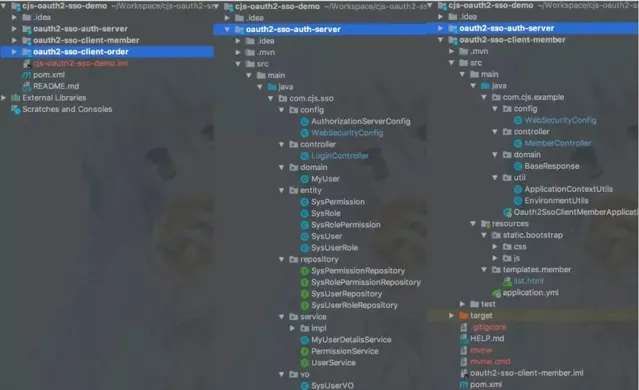
附上源碼:
https://github.com/chengjiansheng/cjs-oauth2-sso-demo.git
演示
作者:廢物師兄
來源:cnblogs.com/cjsblog/p/10548022.html
— END —
PS:防止找不到本篇文章,可以收藏點贊,方便翻閱尋找哦。
往期推薦


