點選上方
藍字
關註我們
微信公眾號: OpenCV學堂
關註獲取更多電腦視覺與深度學習知識
YOLOv10模型
早晨看到一堆推文,說YOLOv10已經釋出了,嚇我一跳,這個世界變化這麽快,

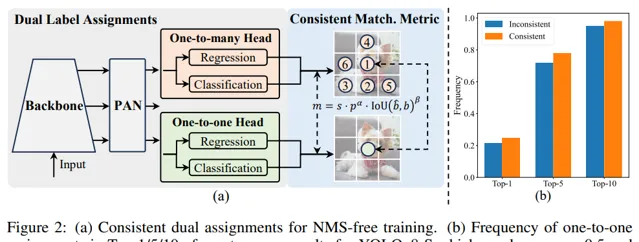
然後快速的看一下相關的文件,發現YOLOv10 相比YOLOv8有兩個最大的改變分別是 添加了 PSA層跟CIB 層


去掉了NMS
匯出與部署
github上YOLOv10的地址如下
https://github.com/THU-MIG/yolov10
下載源碼,直接用下面的程式碼就可以匯出ONNX格式模型了,發現匯出以後還沒來得及把格式搞清楚,輸出得居然是動態得ONNX格式表示,但是實際上
輸入支持格式為:1x3x640x640輸出格式為1x300x6
輸出格式300是指輸出得預測框數目,6分別是
x1 y1 x2 y2 score classid
因為YOLOv10模型不需要NMS了,所以就直接輸出最終得預測結果,支持預設最大得boxes數目是300, 這個應該是可以改得,我還沒仔細研究,不然顯然支持得預測框太少,這點跟YOLOv8預測框相比少了很多。模型轉換程式碼如下:
from ultralytics import RTDETR, YOLO
"""Test exporting the YOLO model to ONNX format."""
f = YOLO("yolov10s.pt").export(format="onnx", dynamic=True)
單純從推理上看 YOLOv10的確比YOLOv8簡單很多,有點SSD模型得既視感。推理程式碼實作如下:
import cv2 as cv
import numpy as np
from openvino.runtime import Core

# load model
labels = load_ classes()
ie = Core()
for device in ie.available_devices:
 print(device)
model = ie.read_model(model="yolov10n.onnx")
compiled_model = ie.compile_model(model=model, device_name="CPU")
output_layer = compiled_model.output(0)
frame = cv.imread("D:/images/1234.jpg")
image = format_yolov10(frame)
h, w, c = image.shape
x_factor = w / 640.0
y_factor = h / 640.0
# 檢測 2/255.0, NCHW = 1x3x640x640
blob = cv.dnn.blobFromImage(image, 1 / 255.0, (640, 640), swapRB=True, crop=False)
# 設定網路輸入
cvOut = compiled_model([blob])[output_layer]
# [left,top, right, bottom, score, classId]
print(cvOut.shape)
for row in cvOut[0,:,:]:
 score = float(row[4])
 objIndex = int(row[5])
if score > 0.5:
 left, top, right, bottom = row[0].item(), row[1].item(), row[2].item(), row[3].item()
 left = int(left * x_factor)
 top = int(top * y_factor)
 right = int(right * x_factor)
 bottom = int(bottom * y_factor)
# 繪制
 cv.rectangle(frame, (int(left), int(top)), (int(right), int(bottom)), (255, 0, 0), thickness=2)
 cv.putText(frame, "score:%.2f, %s"%(score, labels[objIndex]),
 (int(left) - 10, int(top) - 5), cv.FONT_HERSHEY_SIMPLEX, 0.7, (0, 0, 255), 2, 8);
cv.imshow('YOLOv10 Object Detection', frame)
cv.imwrite("D:/result.png", frame)
cv.waitKey(0)
cv.destroyAllWindows()
執行結果如下:

總結與看法
個人認為,這個就是一個YOLOv8的魔改版本,直接叫YOLOv10有點過分,這樣魔改下去,馬上YOLOv20也不會太遠了。然後下載它的源碼之後,你會發現裏面很多YOLOv8的包跟程式碼註釋連名字都還沒有改過來,特別是推理的演示程式碼裏面還是YOLOv8的,我暈倒,能專業點不!
系統化學習直接掃碼檢視

推薦閱讀