故事背景
忘記密碼這件事,相信絕大多數人都遇到過,輸一次錯一次,錯到幾次以上,就不允許你繼續嘗試了。
但當你嘗試重設密碼,又發現新密碼不能和原密碼重復:

相信此刻心情只能用一張圖形容:

雖然,但是,密碼還是很重要的,順便我有了一個問題:三次輸錯密碼後,系統是怎麽做到不讓我繼續嘗試的?
我想了想,有如下幾個問題需要搞定
是只有輸錯密碼才釘選,還是帳戶名和密碼任何一個輸錯就釘選?
輸錯之後也不是完全凍結,為啥隔了幾分鐘又可以重新輸了?
技術棧到底麻不麻煩?
去網上搜了搜,也問了下 ChatGPT ,找到一套解決方案:SpringBoot+Redis+Lua指令碼。這套方案也不算新,很早就有人在用了,不過難得是自己想到的問題和解法,就記錄一下吧。
順便回答一下上面的三個問題:
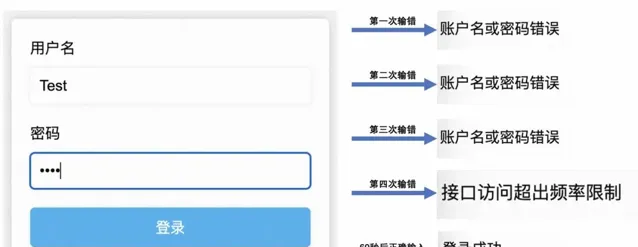
釘選的是IP,不是輸入的帳戶名或者密碼,也就是說任一一個輸錯3次就會被釘選
Redis的Lua指令碼中實作了key過期策略,當key消失時釘選自然也就消失了
技術棧同SpringBoot+Redis+Lua指令碼
那麽自己動手實作一下
前端部份
首先寫一個賬密輸入頁面,使用很簡單HTML加表單送出
<!DOCTYPE html>
<html>
<head>
<title>登入頁面</title>
< style>
body {
background-color: #F5F5F5;
 }
form {
width: 300px;
margin: 0 auto;
margin-top: 100px;
padding: 20px;
background-color: white;
border-radius: 5px;
box-shadow: 0010pxrgba(0,0,0,0.2);
 }
label {
display: block;
margin-bottom: 10px;
 }
input[type="text"], input[type="password"] {
border: none;
padding: 10px;
margin-bottom: 20px;
border-radius: 5px;
box-shadow: 005pxrgba(0,0,0,0.1);
width: 100%;
box-sizing: border-box;
font-size: 16px;
 }
input[type="submit"] {
background-color: #30B0F0;
color: white;
border: none;
padding: 10px;
border-radius: 5px;
box-shadow: 005pxrgba(0,0,0,0.1);
width: 100%;
font-size: 16px;
cursor: pointer;
 }
input[type="submit"]:hover {
background-color: #1C90D6;
 }
</ style>
</head>
<body>
<formaction="http://localhost:8080/login"method="get">
<labelfor="username">使用者名稱</label>
<inputtype="text"id="username"name="username"placeholder="請輸入使用者名稱"required>
<labelfor="password">密碼</label>
<inputtype="password"id="password"name="password"placeholder="請輸入密碼"required>
<inputtype="submit"value="登入">
</form>
</body>
</html>
效果如下:

後端部份
技術選型分析
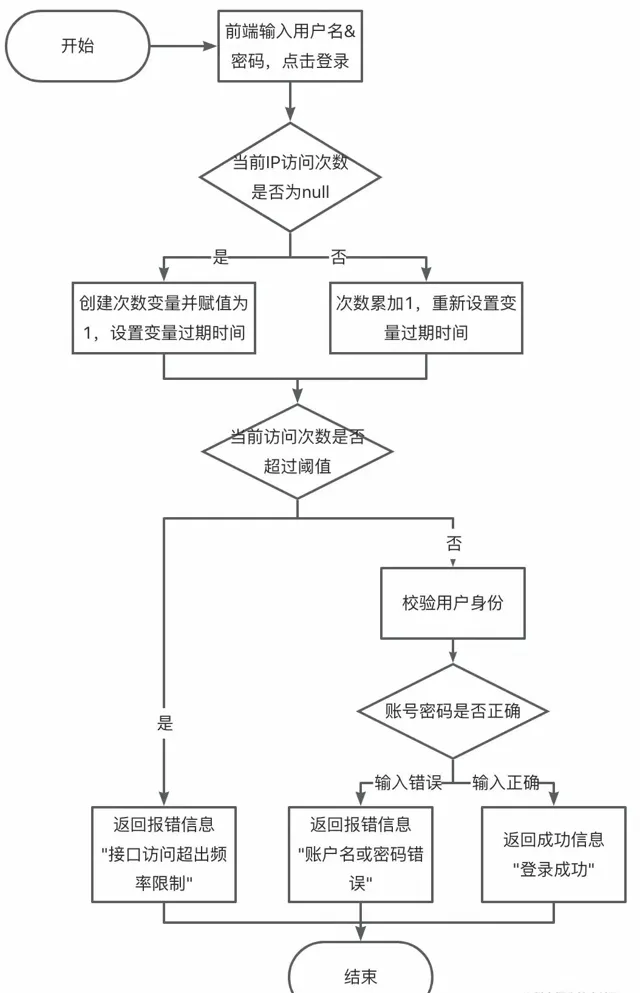
首先我們畫一個流程圖來分析一下這個登入限制流程

❝
從流程圖上看,首先存取次數的統計與判斷不是在登入邏輯執行後,而是執行前就加1了; 其次登入邏輯的成功與失敗並不會影響到次數的統計; 最後還有一點流程圖上沒有體現出來,這個次數的統計是有過期時間的,當過期之後又可以重新登入了。
❞那為什麽是Redis+Lua指令碼呢?
Redis的選擇不難看出,這個流程比較重要的是存在一個用來計數的變量,這個變量既要滿足分布式讀寫需求,還要滿足全域遞增或遞減的需求,那Redis的
incr方法
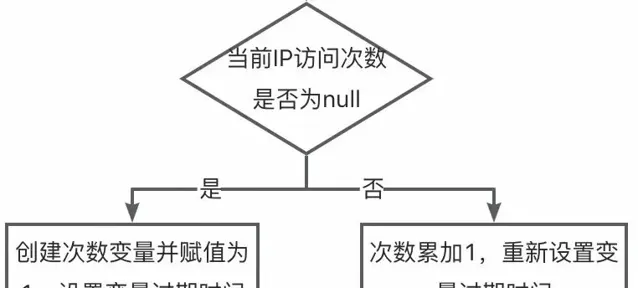
是最優選了。 那為什麽需要Lua指令碼呢?流程上在驗證使用者操作前有些操作,如圖:

這裏至少有3步Redis的操作,get、incr、expire,如果全放到套用裏面來操作,有點慢且浪費資源。
Lua指令碼的優點如下:
減少網路開銷。可以將多個請求透過指令碼的形式一次發送,減少網路時延。
原子操作。Redis會將整個指令碼作為一個整體執行,中間不會被其他請求插入。因此在指令碼執行過程中無需擔心會出現競態條件,無需使用事務。
復用。客戶端發送的指令碼會永久存在redis中,這樣其他客戶端可以復用這一指令碼,而不需要使用程式碼完成相同的邏輯。
「最後為了增加功能的復用性,我打算使用Java註解的方式實作這個功能。」
程式碼實作
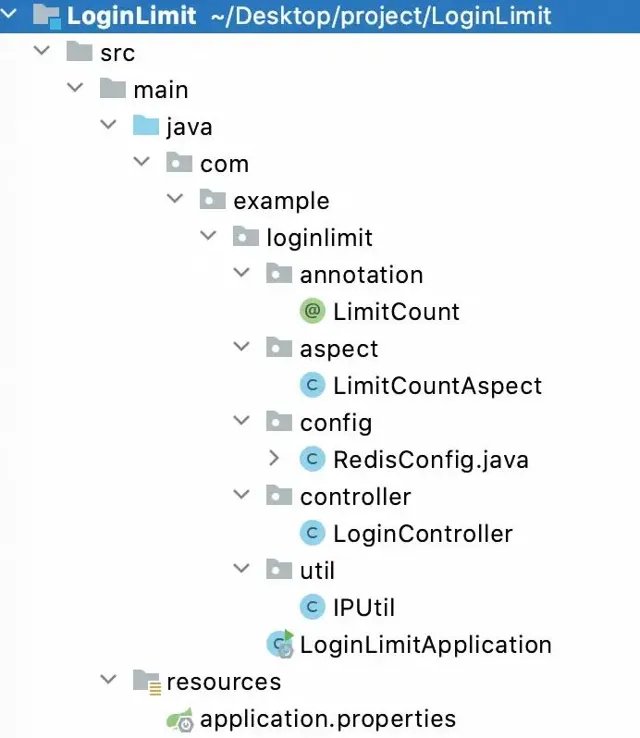
計畫結構如下

配置檔
pom.xml
<?xml version="1.0" encoding="UTF-8"?>
<projectxmlns="http://maven.apache.org/POM/4.0.0"xmlns:xsi="http://www.w3.org/2001/XMLSchema-instance"
xsi:schemaLocation="http://maven.apache.org/POM/4.0.0 https://maven.apache.org/xsd/maven-4.0.0.xsd">
<modelVersion>4.0.0</modelVersion>
<parent>
<groupId>org.springframework.boot</groupId>
<artifactId>spring-boot-starter-parent</artifactId>
<version>2.7.11</version>
<relativePath/><!-- lookup parent from repository -->
</parent>
<groupId>com.example</groupId>
<artifactId>LoginLimit</artifactId>
<version>0.0.1-SNAPSHOT</version>
<name>LoginLimit</name>
<description>Demo project for Spring Boot</description>
<properties>
<java.version>1.8</java.version>
</properties>
<dependencies>
<dependency>
<groupId>org.springframework.boot</groupId>
<artifactId>spring-boot-starter-web</artifactId>
</dependency>
<dependency>
<groupId>org.springframework.boot</groupId>
<artifactId>spring-boot-starter-test</artifactId>
<scope>test</scope>
</dependency>
<!-- redis -->
<dependency>
<groupId>org.springframework.boot</groupId>
<artifactId>spring-boot-starter-data-redis</artifactId>
</dependency>
<!-- Jedis -->
<dependency>
<groupId>redis.clients</groupId>
<artifactId>jedis</artifactId>
</dependency>
<!--切面依賴 -->
<dependency>
<groupId>org.aspectj</groupId>
<artifactId>aspectjweaver</artifactId>
</dependency>
<!-- commons-lang3 -->
<dependency>
<groupId>org.apache.commons</groupId>
<artifactId>commons-lang3</artifactId>
</dependency>
<!-- guava -->
<dependency>
<groupId>com.google.guava</groupId>
<artifactId>guava</artifactId>
<version>23.0</version>
</dependency>
<!-- lombok -->
<dependency>
<groupId>org.projectlombok</groupId>
<artifactId>lombok</artifactId>
<optional>true</optional>
</dependency>
</dependencies>
<build>
<plugins>
<plugin>
<groupId>org.springframework.boot</groupId>
<artifactId>spring-boot-maven-plugin</artifactId>
</plugin>
</plugins>
</build>
</project>
application.properties
## Redis配置
spring.redis.host=127.0.0.1
spring.redis.port=6379
spring.redis.password=
spring.redis.timeout=1000
## Jedis配置
spring.redis.jedis.pool.min-idle=0
spring.redis.jedis.pool.max-idle=500
spring.redis.jedis.pool.max-active=2000
spring.redis.jedis.pool.max-wait=10000
註解部份
LimitCount.java
package com.example.loginlimit.annotation;
import java.lang.annotation.ElementType;
import java.lang.annotation.Retention;
import java.lang.annotation.RetentionPolicy;
import java.lang.annotation.Target;
/**
 * 次數限制註解
 * 作用在介面方法上
 */
@Target(ElementType.METHOD)
@Retention(RetentionPolicy.RUNTIME)
public@interface LimitCount {
/**
 * 資源名稱,用於描述介面功能
 */
String name()default "";
/**
 * 資源 key
 */
String key()default "";
/**
 * key prefix
 *
 * @return
 */
String prefix()default "";
/**
 * 時間的,單位秒
 * 預設60s過期
 */
intperiod()default 60;
/**
 * 限制存取次數
 * 預設3次
 */
intcount()default 3;
}
核心處理邏輯類:LimitCountAspect.java
package com.example.loginlimit.aspect;
import java.io.Serializable;
import java.lang.reflect.Method;
import java.util.Objects;
import javax.servlet.http.HttpServletRequest;
import com.example.loginlimit.annotation.LimitCount;
import com.example.loginlimit.util.IPUtil;
import com.google.common.collect.ImmutableList;
import lombok.extern.slf4j.Slf4j;
import org.apache.commons.lang3.StringUtils;
import org.aspectj.lang.ProceedingJoinPoint;
import org.aspectj.lang.annotation.Around;
import org.aspectj.lang.annotation.Aspect;
import org.aspectj.lang.annotation.Pointcut;
import org.aspectj.lang.reflect.MethodSignature;
import org.springframework.beans.factory.annotation.Autowired;
import org.springframework.data.redis.core.RedisTemplate;
import org.springframework.data.redis.core.script.DefaultRedisScript;
import org.springframework.data.redis.core.script.RedisScript;
import org.springframework.stereotype.Component;
import org.springframework.web.context.request.RequestContextHolder;
import org.springframework.web.context.request.ServletRequestAttributes;
@Slf4j
@Aspect
@Component
public classLimitCountAspect{
privatefinal RedisTemplate<String, Serializable> limitRedisTemplate;
@Autowired
publicLimitCountAspect(RedisTemplate<String, Serializable> limitRedisTemplate){
this.limitRedisTemplate = limitRedisTemplate;
 }
@Pointcut("@annotation(com.example.loginlimit.annotation.LimitCount)")
publicvoidpointcut(){
// do nothing
 }
@Around("pointcut()")
public Object around(ProceedingJoinPoint point)throws Throwable {
 HttpServletRequest request = ((ServletRequestAttributes)Objects.requireNonNull(
 RequestContextHolder.getRequestAttributes())).getRequest();
 MethodSignature signature = (MethodSignature)point.getSignature();
 Method method = signature.getMethod();
 LimitCount annotation = method.getAnnotation(LimitCount. class);
//註解名稱
 String name = annotation.name();
//註解key
 String key = annotation.key();
//存取IP
 String ip = IPUtil.getIpAddr(request);
//過期時間
int limitPeriod = annotation.period();
//過期次數
int limitCount = annotation.count();
 ImmutableList<String> keys = ImmutableList.of(StringUtils.join(annotation.prefix() + "_", key, ip));
 String luaScript = buildLuaScript();
 RedisScript<Number> redisScript = new DefaultRedisScript<>(luaScript, Number. class);
 Number count = limitRedisTemplate.execute(redisScript, keys, limitCount, limitPeriod);
 log.info("IP:{} 第 {} 次存取key為 {},描述為 [{}] 的介面", ip, count, keys, name);
if (count != null && count.intValue() <= limitCount) {
return point.proceed();
 } else {
return"介面存取超出頻率限制";
 }
 }
/**
 * 限流指令碼
 * 呼叫的時候不超過閾值,則直接返回並執行小算盤自加。
 *
 * @return lua指令碼
 */
private String buildLuaScript(){
return"local c" +
"\nc = redis.call('get',KEYS[1])" +
"\nif c and tonumber(c) > tonumber(ARGV[1]) then" +
"\nreturn c;" +
"\nend" +
"\nc = redis.call('incr',KEYS[1])" +
"\nif tonumber(c) == 1 then" +
"\nredis.call('expire',KEYS[1],ARGV[2])" +
"\nend" +
"\nreturn c;";
 }
}
獲取IP地址的功能我寫了一個工具類IPUtil.java,程式碼如下:
package com.example.loginlimit.util;
import javax.servlet.http.HttpServletRequest;
public classIPUtil{
privatestaticfinal String UNKNOWN = "unknown";
protectedIPUtil(){
 }
/**
 * 獲取 IP地址
 * 使用 Nginx等反向代理軟體, 則不能透過 request.getRemoteAddr()獲取 IP地址
 * 如果使用了多級反向代理的話,X-Forwarded-For的值並不止一個,而是一串IP地址,
 * X-Forwarded-For中第一個非 unknown的有效IP字串,則為真實IP地址
 */
publicstatic String getIpAddr(HttpServletRequest request){
 String ip = request.getHeader("x-forwarded-for");
if (ip == null || ip.length() == 0 || UNKNOWN.equalsIgnoreCase(ip)) {
 ip = request.getHeader("Proxy-Client-IP");
 }
if (ip == null || ip.length() == 0 || UNKNOWN.equalsIgnoreCase(ip)) {
 ip = request.getHeader("WL-Proxy-Client-IP");
 }
if (ip == null || ip.length() == 0 || UNKNOWN.equalsIgnoreCase(ip)) {
 ip = request.getRemoteAddr();
 }
return"0:0:0:0:0:0:0:1".equals(ip) ? "127.0.0.1" : ip;
 }
}
另外就是Lua限流指令碼的說明,指令碼程式碼如下:
private String buildLuaScript(){
return"local c" +
"\nc = redis.call('get',KEYS[1])" +
"\nif c and tonumber(c) > tonumber(ARGV[1]) then" +
"\nreturn c;" +
"\nend" +
"\nc = redis.call('incr',KEYS[1])" +
"\nif tonumber(c) == 1 then" +
"\nredis.call('expire',KEYS[1],ARGV[2])" +
"\nend" +
"\nreturn c;";
}
這段指令碼有一個判斷,
tonumber(c) > tonumber(ARGV[1])
這行表示如果當前key 的值大於了limitCount,直接返回;否則呼叫
incr
方法進行累加1,且呼叫
expire
方法設定過期時間。
最後就是RedisConfig.java,程式碼如下:
package com.example.loginlimit.config;
import java.io.IOException;
import java.io.Serializable;
import java.time.Duration;
import java.util.Arrays;
import com.fasterxml.jackson.core.JsonProcessingException;
import com.fasterxml.jackson.databind.ObjectMapper;
import org.apache.commons.lang3.StringUtils;
import org.springframework.beans.factory.annotation.Value;
import org.springframework.boot.autoconfigure.condition.ConditionalOnMissingBean;
import org.springframework.cache.CacheManager;
import org.springframework.cache.annotation.CachingConfigurerSupport;
import org.springframework.cache.interceptor.KeyGenerator;
import org.springframework.context.annotation.Bean;
import org.springframework.context.annotation.Configuration;
import org.springframework.data.redis.cache.RedisCacheManager;
import org.springframework.data.redis.connection.RedisConnectionFactory;
import org.springframework.data.redis.connection.RedisPassword;
import org.springframework.data.redis.connection.RedisStandaloneConfiguration;
import org.springframework.data.redis.connection.jedis.JedisClientConfiguration;
import org.springframework.data.redis.connection.jedis.JedisConnectionFactory;
import org.springframework.data.redis.core.RedisTemplate;
import org.springframework.data.redis.core.StringRedisTemplate;
import org.springframework.data.redis.serializer.GenericJackson2JsonRedisSerializer;
import org.springframework.data.redis.serializer.RedisSerializer;
import org.springframework.data.redis.serializer.SerializationException;
import org.springframework.data.redis.serializer.StringRedisSerializer;
import redis.clients.jedis.JedisPool;
import redis.clients.jedis.JedisPoolConfig;
@Configuration
public classRedisConfigextendsCachingConfigurerSupport{
@Value("${spring.redis.host}")
private String host;
@Value("${spring.redis.port}")
privateint port;
@Value("${spring.redis.password}")
private String password;
@Value("${spring.redis.timeout}")
privateint timeout;
@Value("${spring.redis.jedis.pool.max-idle}")
privateint maxIdle;
@Value("${spring.redis.jedis.pool.max-wait}")
privatelong maxWaitMillis;
@Value("${spring.redis.database:0}")
privateint database;
@Bean
public JedisPool redisPoolFactory(){
 JedisPoolConfig jedisPoolConfig = new JedisPoolConfig();
 jedisPoolConfig.setMaxIdle(maxIdle);
 jedisPoolConfig.setMaxWaitMillis(maxWaitMillis);
if (StringUtils.isNotBlank(password)) {
returnnew JedisPool(jedisPoolConfig, host, port, timeout, password, database);
 } else {
returnnew JedisPool(jedisPoolConfig, host, port, timeout, null, database);
 }
 }
@Bean
JedisConnectionFactory jedisConnectionFactory(){
 RedisStandaloneConfiguration redisStandaloneConfiguration = new RedisStandaloneConfiguration();
 redisStandaloneConfiguration.setHostName(host);
 redisStandaloneConfiguration.setPort(port);
 redisStandaloneConfiguration.setPassword(RedisPassword.of(password));
 redisStandaloneConfiguration.setDatabase(database);
 JedisClientConfiguration.JedisClientConfigurationBuilder jedisClientConfiguration = JedisClientConfiguration
 .builder();
 jedisClientConfiguration.connectTimeout(Duration.ofMillis(timeout));
 jedisClientConfiguration.usePooling();
returnnew JedisConnectionFactory(redisStandaloneConfiguration, jedisClientConfiguration.build());
 }
@Bean(name = "redisTemplate")
@SuppressWarnings({"rawtypes"})
@ConditionalOnMissingBean(name = "redisTemplate")
public RedisTemplate<Object, Object> redisTemplate(RedisConnectionFactory redisConnectionFactory){
 RedisTemplate<Object, Object> template = new RedisTemplate<>();
//使用 fastjson 序列化
 JacksonRedisSerializer jacksonRedisSerializer = new JacksonRedisSerializer<>(Object. class);
// value 值的序列化采用 fastJsonRedisSerializer
 template.setValueSerializer(jacksonRedisSerializer);
 template.setHashValueSerializer(jacksonRedisSerializer);
// key 的序列化采用 StringRedisSerializer
 template.setKeySerializer(new StringRedisSerializer());
 template.setHashKeySerializer(new StringRedisSerializer());
 template.setConnectionFactory(redisConnectionFactory);
return template;
 }
//緩存管理器
@Bean
public CacheManager cacheManager(RedisConnectionFactory redisConnectionFactory){
 RedisCacheManager.RedisCacheManagerBuilder builder = RedisCacheManager.RedisCacheManagerBuilder
 .fromConnectionFactory(redisConnectionFactory);
return builder.build();
 }
@Bean
@ConditionalOnMissingBean(StringRedisTemplate. class)
publicStringRedisTemplatestringRedisTemplate(RedisConnectionFactoryredisConnectionFactory) {
 StringRedisTemplate template = new StringRedisTemplate();
 template.setConnectionFactory(redisConnectionFactory);
return template;
 }
@Bean
public KeyGenerator wiselyKeyGenerator(){
return (target, method, params) -> {
 StringBuilder sb = new StringBuilder();
 sb.append(target.get class().getName());
 sb.append(method.getName());
 Arrays.stream(params).map(Object::toString).forEach(sb::append);
return sb.toString();
 };
 }
@Bean
public RedisTemplate<String, Serializable> limitRedisTemplate(RedisConnectionFactory redisConnectionFactory){
 RedisTemplate<String, Serializable> template = new RedisTemplate<>();
 template.setKeySerializer(new StringRedisSerializer());
 template.setValueSerializer(new GenericJackson2JsonRedisSerializer());
 template.setConnectionFactory(redisConnectionFactory);
return template;
 }
}
 classJacksonRedisSerializer<T> implementsRedisSerializer<T> {
private class<T> clazz;
private ObjectMapper mapper;
 JacksonRedisSerializer( class<T> clazz) {
super();
this.clazz = clazz;
this.mapper = new ObjectMapper();
 mapper.enableDefaultTyping(ObjectMapper.DefaultTyping.NON_FINAL);
 }
@Override
publicbyte[] serialize(T t) throws SerializationException {
try {
return mapper.writeValueAsBytes(t);
 } catch (JsonProcessingException e) {
 e.printStackTrace();
returnnull;
 }
 }
@Override
public T deserialize(byte[] bytes)throws SerializationException {
if (bytes.length <= 0) {
returnnull;
 }
try {
return mapper.readValue(bytes, clazz);
 } catch (IOException e) {
 e.printStackTrace();
returnnull;
 }
 }
}
LoginController.java
package com.example.loginlimit.controller;
import javax.servlet.http.HttpServletRequest;
import com.example.loginlimit.annotation.LimitCount;
import lombok.extern.slf4j.Slf4j;
import org.apache.commons.lang3.StringUtils;
import org.springframework.web.bind.annotation.GetMapping;
import org.springframework.web.bind.annotation.RequestParam;
import org.springframework.web.bind.annotation.RestController;
@Slf4j
@RestController
public classLoginController{
@GetMapping("/login")
@LimitCount(key = "login", name = "登入介面", prefix = "limit")
public String login(
 @RequestParam(required = true) String username,
 @RequestParam(required = true) String password, HttpServletRequest request) throws Exception {
if (StringUtils.equals("張三", username) && StringUtils.equals("123456", password)) {
return"登入成功";
 }
return"帳戶名或密碼錯誤";
 }
}
LoginLimitApplication.java
package com.example.loginlimit;
import org.springframework.boot.SpringApplication;
import org.springframework.boot.autoconfigure.SpringBootApplication;
@SpringBootApplication
public classLoginLimitApplication{
publicstaticvoidmain(String[] args){
 SpringApplication.run(LoginLimitApplication. class, args);
 }
}
演示一下效果

上面這套限流的邏輯感覺用在小型或中型的計畫上應該問題不大,不過目前的登入很少有直接釘選帳號不能輸入的,一般都是彈出一個驗證碼框,讓你輸入驗證碼再送出。我覺得用我這套邏輯改改應該不成問題,核心還是介面嘗試次數的限制嘛!
來源:juejin.cn/post/7232128694503145533
IT交流群
組建了程式設計師,架構師,IT從業者交流群,以
交流技術
、
職位內推
、
行業探討
為主

加小編 好友 ,備註"加群"


