01剪貼簿管理器
你是否曾發現自己忙於處理多個文本片段,而忘記了自己復制了什麽?有沒有想過有一個工具可以記錄你一天中復制的所有內容?
這個自動化指令碼可以監控你復制的所有內容,將復制的每個文本無縫地儲存在一個時尚的圖形界面中,這樣你就不必在無盡的分頁中搜尋,也不會遺失一些有價值的資訊。
該自動化指令碼利用 Pyperclip 庫的強大功能無縫捕獲復制數據,並整合了 Tkinter 以視覺化方式跟蹤和管理復制的文本。
import tkinter as tk
from tkinter import ttk
import pyperclip
defupdate_listbox():
 new_item = pyperclip.paste()
if new_item notin X:
 X.append(new_item)
 listbox.insert(tk.END, new_item)
 listbox.insert(tk.END, "----------------------")
 listbox.yview(tk.END)
 root.after(1000, update_listbox)
defcopy_to_clipboard(event):
 selected_item = listbox.get(listbox.curselection())
if selected_item:
 pyperclip.copy(selected_item)
X = []
root = tk.Tk()
root.title("Clipboard Manager")
root.geometry("500x500")
root.configure(bg="#f0f0f0")
frame = tk.Frame(root, bg="#f0f0f0")
frame.pack(padx=10, pady=10)
label = tk.Label(frame, text="Clipboard Contents:", bg="#f0f0f0")
label.grid(row=0, column=0)
scrollbar = tk.Scrollbar(root)
scrollbar.pack(side=tk.RIGHT, fill=tk.Y)
listbox = tk.Listbox(root, width=150, height=150, yscrollcommand=scrollbar.set)
listbox.pack(pady=10)
scrollbar.config(command=listbox.yview)
update_listbox()
listbox.bind("<Double-Button-1>", copy_to_clipboard)
root.mainloop()
套用
捕捉從各種來源復制的研究筆記並進行分類。
擴充套件指令碼可以捕捉重要的行事曆事件、提醒事項、密碼等。
02 程式碼品質檢查器
每個開發人員都會遇到這樣的挫折:在 Python 程式碼中尋找錯誤,卻發現自己迷失在錯誤的迷宮中。作為開發人員,我們深知編寫簡潔高效程式碼的重要性,但手動分析程式碼品質可能是一項壓力巨大的任務。
本自動化指令碼利用 Pylint 和 Flake8 Python 軟體包對程式碼品質進行全面審查。將你的程式碼與編碼標準進行比較,並找出邏輯錯誤。它可確保的程式碼符合行業最佳實踐並保持無錯。
import os
import subprocess
defanalyze_code(directory):
# List Python files in the directory
 python_files = [file for file in os.listdir(directory) if file.endswith('.py')]
ifnot python_files:
 print("No Python files found in the specified directory.")
return
# Analyze each Python file using pylint and flake8
for file in python_files:
 print(f"Analyzing file: {file}")
 file_path = os.path.join(directory, file)
# Run pylint
 print("\nRunning pylint...")
 pylint_command = f"pylint {file_path}"
 subprocess.run(pylint_command, shell=True)
# Run flake8
 print("\nRunning flake8...")
 flake8_command = f"flake8 {file_path}"
 subprocess.run(flake8_command, shell=True)
if __name__ == "__main__":
 directory = r"C:\Users\abhay\OneDrive\Desktop\Part7"
 analyze_code(directory)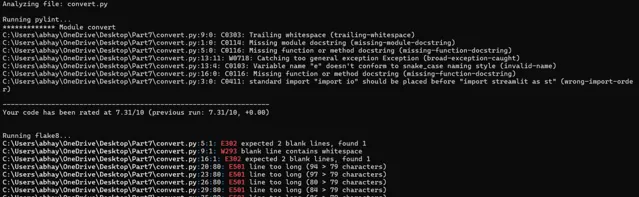
套用
自動程式碼增強器 - 對該指令碼稍作擴充套件,可用於建立一個 Python 指令碼,用於辨識程式碼中的問題並作出相應修改。
自動程式碼審查。
03 不篡改檔
檔篡改又稱數據篡改,是指未經授權故意更改資訊,包括破壞、篡改或編輯數據。
全球許多威脅行為者濫用檔篡改技術,在關鍵系統檔中引入不同的漏洞或後門,從而危及安全性並使未經授權的存取成為可能。
要降低這種風險,關鍵是要驗證檔的完整性,確保它們與原始狀態保持一致。這個自動化指令碼可以幫助你測試任何檔,並辨識其是否被篡改。
import hashlib
import os
defcalculate_sha256(file_path):
 sha256 = hashlib.sha256()
with open(file_path, 'rb') as file:
for chunk in iter(lambda: file.read(4096), b''):
 sha256.update(chunk)
return sha256.hexdigest()
defcheck_integrity(file_path, expected_checksum):
 actual_checksum = calculate_sha256(file_path)
return actual_checksum == expected_checksum
if __name__ == "__main__":
 file_path = input("Enter the path to the file: ")
 expected_checksum = input("Enter the expected SHA-256 checksum: ")
if os.path.isfile(file_path):
if check_integrity(file_path, expected_checksum):
 print("File integrity verified: The file has not been tampered with.")
else:
 print("File integrity check failed: The file may have been tampered with.")
else:
 print("Error: File not found.")
04 智慧交易
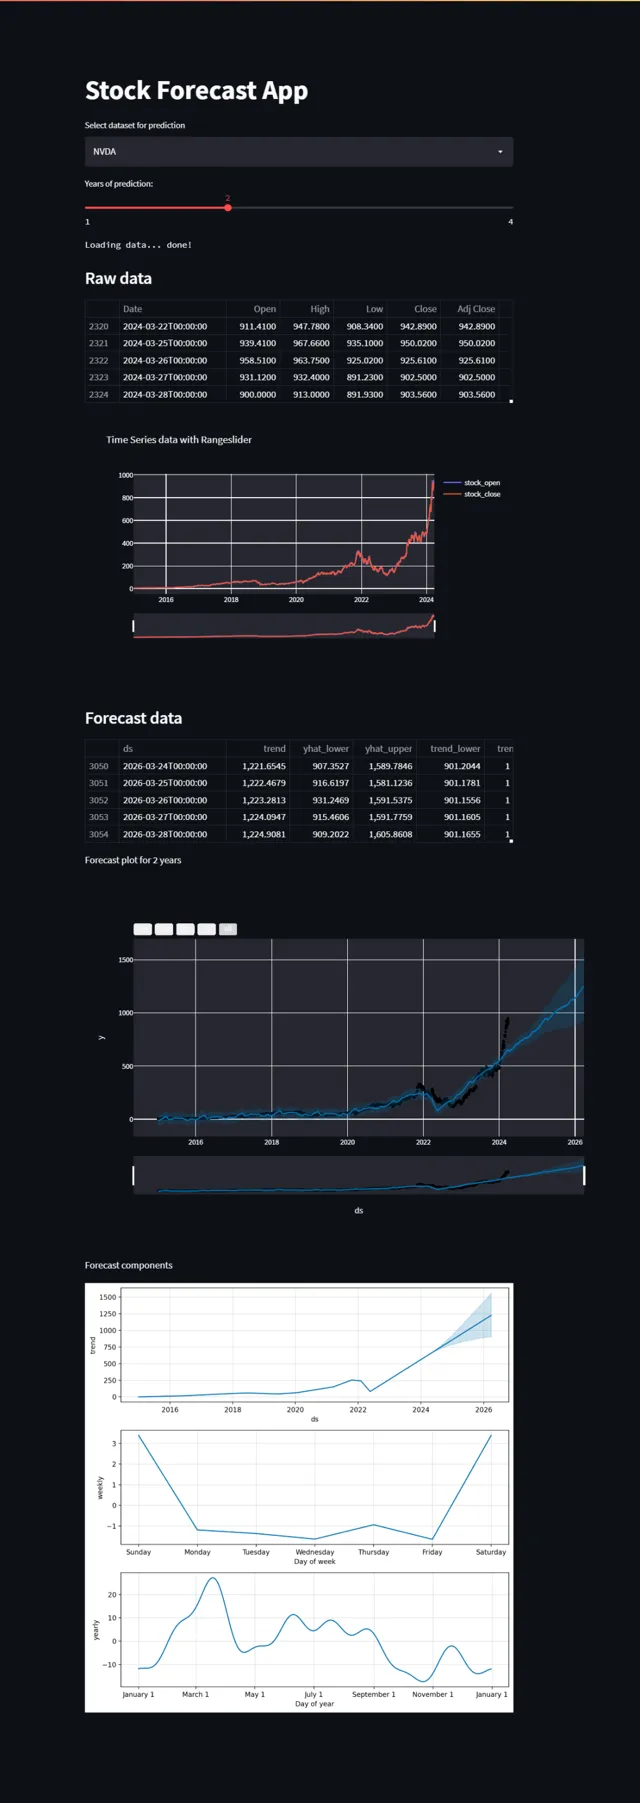
交易是指買賣股票、債券、貨幣、商品或衍生品等金融工具,以獲取利潤。期刊交易員整天都在檢視不同的儀表盤,試圖找出買入或賣出的完美決策。
這個自動化指令碼可以幫助交易者和投資者很好地了解你願意投資的任何股票。它利用*****Prophet* Python 庫,根據從雅虎財經獲取的歷史股票數據預測近期股票價格。
import streamlit as st
from datetime import date
import yfinance as yf
from prophet import Prophet
from prophet.plot import plot_plotly
from plotly import graph_objs as go
START = "2015-01-01"
TODAY = date.today().strftime("%Y-%m-%d")
st.title('Stock Forecast App')
stocks = ('MSFT',"TSLA",'GOOG', 'AAPL', "NVDA")
selected_stock = st.selectbox('Select dataset for prediction', stocks)
n_years = st.slider('Years of prediction:', 1, 4)
period = n_years * 365

@st.cache
defload_data(ticker):
 data = yf.download(ticker, START, TODAY)
 data.reset_index(inplace=True)
return data

data_load_state = st.text('Loading data...')
data = load_data(selected_stock)
data_load_state.text('Loading data... done!')
st.subheader('Raw data')
st.write(data.tail())
# Plot raw data
defplot_raw_data():
 fig = go.Figure()
 fig.add_trace(go.Scatter(x=data['Date'], y=data['Open'], name="stock_open"))
 fig.add_trace(go.Scatter(x=data['Date'], y=data['Close'], name="stock_close"))
 fig.layout.update(title_text='Time Series data with Rangeslider', xaxis_rangeslider_visible=True)
 st.plotly_chart(fig)
plot_raw_data()
# Predict forecast with Prophet.
df_train = data[['Date','Close']]
df_train = df_train.rename(columns={"Date": "ds", "Close": "y"})
m = Prophet()
m.fit(df_train)
future = m.make_future_dataframe(periods=period)
forecast = m.predict(future)
# Show and plot forecast
st.subheader('Forecast data')
st.write(forecast.tail())
st.write(f'Forecast plot for {n_years} years')
fig1 = plot_plotly(m, forecast)
st.plotly_chart(fig1)
st.write("Forecast components")
fig2 = m.plot_components(forecast)
st.write(fig2)
要執行此程式,首先需要使用 pip 安裝 Streamlit、yfinance、prophet 和 plotly python 庫。
pip install streamlit prophet yfinance plotly
然後使用命令
streamlit run smart_trade.py 執行
它
套用
演算法交易
股票價格比較儀表板
05 自動影像下載器
收集影像數據是電腦視覺計畫的關鍵挑戰。正如 Andrew Ng 所說,如果你能收集到大量數據集,那麽演算法就不重要了。數據對提高模型的效能和準確性起著關鍵作用。
只需幾行程式碼,這個自動化指令碼就能幫助你在幾分鐘內從網上下載數據。
# Importing the necessary module and function
from simple_image_download import simple_image_download as simp
# Creating a response object
response = simp.simple_image_download
## Keyword
keyword = "Dog"
# Downloading images
try:
 response().download(keyword, 20)
 print("Images downloaded successfully.")
except Exception as e:
 print("An error occurred:", e)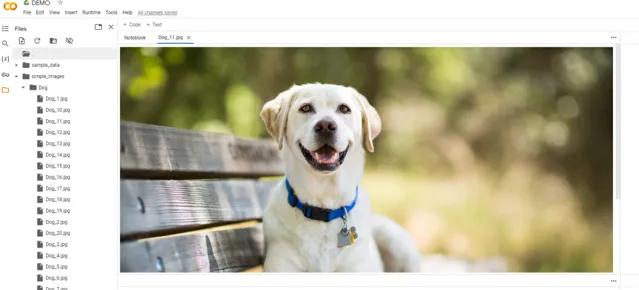
06 埠掃描程式
在電腦網路中,埠是允許不同行程或服務透過網路連線和交換數據的通訊端點。埠由數值標識,並與特定協定相關聯。
開放埠就像建築物中的門窗,每個埠都是網站與外部網路通訊的潛在入口。然而,在沒有采取適當安全措施的情況下開放埠,會使網站容易受到網路攻擊。
這個自動化指令碼會將網站 URL 作為輸入,並檢查該網站是否存在任何開放埠。無論你是作為 "紅隊 "的一員在執行任務,還是在 "藍隊 "中堅守陣地,這個指令碼都能為你提供有用的便利工具。
import socket
from prettytable import PrettyTable
# Dictionary mapping common ports to vulnerabilities (Top 15)
vulnerabilities = {
80: "HTTP (Hypertext Transfer Protocol) - Used for unencrypted web traffic",
443: "HTTPS (HTTP Secure) - Used for encrypted web traffic",
22: "SSH (Secure Shell) - Used for secure remote access",
21: "FTP (File Transfer Protocol) - Used for file transfers",
25: "SMTP (Simple Mail Transfer Protocol) - Used for email transmission",
23: "Telnet - Used for remote terminal access",
53: "DNS (Domain Name System) - Used for domain name resolution",
110: "POP3 (Post Office Protocol version 3) - Used for email retrieval",
143: "IMAP (Internet Message Access Protocol) - Used for email retrieval",
3306: "MySQL - Used for MySQL database access",
3389: "RDP (Remote Desktop Protocol) - Used for remote desktop connections (Windows)",
8080: "HTTP Alternate - Commonly used as a secondary HTTP port",
8000: "HTTP Alternate - Commonly used as a secondary HTTP port",
8443: "HTTPS Alternate - Commonly used as a secondary HTTPS port",
5900: "VNC (Virtual Network Computing) - Used for remote desktop access",
# Add more ports and vulnerabilities as needed
}
defdisplay_table(open_ports):
 table = PrettyTable(["Open Port", "Vulnerability"])
for port in open_ports:
 vulnerability = vulnerabilities.get(port, "No known vulnerabilities associated with common services")
 table.add_row([port, vulnerability])
 print(table)
defscan_top_ports(target):
 open_ports = []
 top_ports = [21, 22, 23, 25, 53, 80, 110, 143, 443, 3306, 3389, 5900, 8000, 8080, 8443] # Top 15 ports
for port in top_ports:
try:
 sock = socket.socket(socket.AF_INET, socket.SOCK_STREAM)
 sock.settimeout(1) # Adjust timeout as needed
 result = sock.connect_ex((target, port))
if result == 0:
 open_ports.append(port)
 sock.close()
except KeyboardInterrupt:
 sys.exit()
except socket.error:
pass
return open_ports
defmain():
 target = input("Enter the website URL or IP address to scan for open ports: ")
 open_ports = scan_top_ports(target)
ifnot open_ports:
 print("No open ports found on the target.")
else:
 print("Open ports and associated vulnerabilities:")
 display_table(open_ports)
if __name__ == "__main__":
 main()
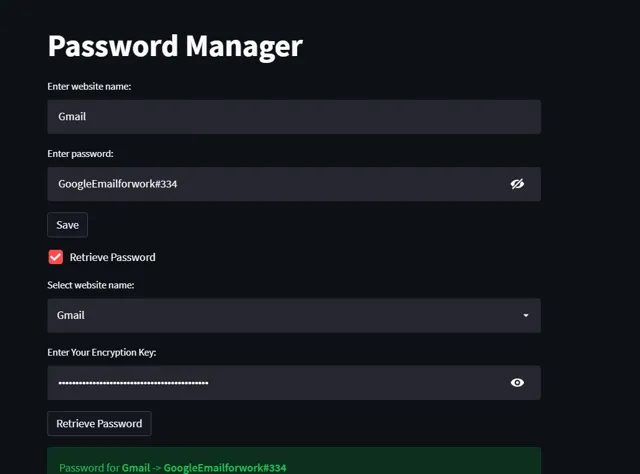
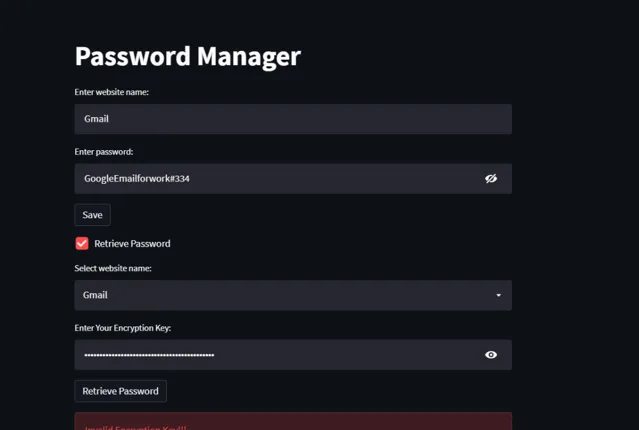
07 密碼管理器
作為一名數位自由職業者,最糟糕的事情之一就是需要記住很多密碼,因為每天你都要註冊一個新網站。
這個自動化指令碼可以幫你管理所有密碼,使用不同的加密技術確保密碼安全,只有你自己才能存取。
這個指令碼最棒的地方在於它是一個網路應用程式,只需稍作改動,你就可以將它部署到雲端儲存上,隨時隨地存取你的所有密碼,而無需擔心安全問題。
import streamlit as st
import csv
from cryptography.fernet import Fernet
from cryptography.fernet import InvalidToken
# Custom encryption key (hardcoded)
CUSTOM_ENCRYPTION_KEY = b'u7wGgNdDFefqpr_kGxb8wJf6XRVsRwvb3QgITsD5Ft4='## 如果您打算在共享平台上使用此指令碼,請確保將此金鑰保存在一個單獨的安全檔中。
# Function to encrypt password
defencrypt_password(password):
 cipher_suite = Fernet(CUSTOM_ENCRYPTION_KEY)
 encrypted_password = cipher_suite.encrypt(password.encode())
return encrypted_password
# Function to decrypt password
defdecrypt_password(encrypted_password):
if isinstance(encrypted_password, bytes):
try:
 cipher_suite = Fernet(CUSTOM_ENCRYPTION_KEY)
 decrypted_password = cipher_suite.decrypt(encrypted_password)
return decrypted_password.decode()
except InvalidToken:
return"Invalid Token"
else:
returnNone
# Function to save website name and password to CSV file
defsave_credentials(website_name, password):
 encrypted_password = encrypt_password(password)
with open('credentials.csv', 'a', newline='') as csvfile:
 writer = csv.writer(csvfile)
 writer.writerow([website_name, encrypted_password.decode()]) # Ensure storing string representation
# Function to retrieve password from CSV file
defretrieve_password(website_name):
with open('credentials.csv', 'r') as csvfile:
 reader = csv.reader(csvfile)
for row in reader:
if row[0] == website_name:
 encrypted_password = row[1].encode()
return encrypted_password
returnNone
# Streamlit UI
st.title("Password Manager")
# Input fields for website name and password
website_name = st.text_input("Enter website name:")
password = st.text_input("Enter password:", type="password")
# Save button to save website name and password
if st.button("Save"):
if website_name and password:
 save_credentials(website_name, password)
 st.success("Website name and password saved successfully.")
else:
 st.error("Please fill in all fields.")
# Retrieve button to retrieve password
if st.checkbox("Retrieve Password"):
 website_name = st.selectbox("Select website name:", options=[""] + [row[0] for row in csv.reader(open('credentials.csv', 'r'))])
 key = st.text_input("Enter Your Encryption Key:", type="password")
if st.button("Retrieve Password"):
if key == str(CUSTOM_ENCRYPTION_KEY.decode()):
if website_name:
 encrypted_password = retrieve_password(website_name)
if encrypted_password:
 decrypted_password = decrypt_password(encrypted_password)
 st.success(f"Password for **{website_name}** -> **{decrypted_password}**")
else:
 st.error("Password not found in database.")
elif key == "":
pass
else:
 st.error("Invalid Encryption Key!!!")
它使用寫死的自訂金鑰進行加密和解密。如果你打算在共享平台上使用此指令碼,請確保將此金鑰保存在一個單獨的安全檔中。
08 信件群發器
電子信件列表是線上參與的貨幣,每個訂閱者都是您數位部落的重要成員。它們是有效數位行銷的心臟。
作為一個有影響力的數位行銷者,與你的追隨者保持互動非常重要,但手動操作是一項艱巨的工作,而使用相關工具則需要花費大量資金。
這款自動化指令碼可利用 Gmail 內建的 SMTP 伺服器,在幾分鐘內批次發送電子信件,讓你可以完全自訂並列使權力。
import smtplib
import ssl
# SMTP server details
smtp_server = 'data.STUDIO.com'
smtp_port = 465
# Sender and recipient details
from_address = 'Winzo Shop'
to_address = ['',''] ## Recepients List
# Authentication details
username = ''## Sender Email
password = ''## Sender Password
# Email message details
subject = '🎉 Exclusive Offer Inside! Get 10% Off Your Next Purchase'
body = '''
親愛的讀者
🏴☠️寶藏級🏴☠️ 原創公眾號『數據STUDIO』內容超級硬核。公眾號以Python為核心語言,垂直於數據科學領域,包括可戳👉 Python|MySQL|數據分析|數據視覺化|機器學習與資料探勘|爬蟲 等,從入門到進階!
歡迎關註
致以最誠摯的問候、
@公眾號:數據STUDIO
'''
# Create an SSL/TLS context
context = ssl.create_default_context()
# Connect to the SMTP server using SSL/TLS
with smtplib.SMTP_SSL(smtp_server, smtp_port, context=context) as server:
# Enable debugging to print the server's responses
server.set_debuglevel(1)
# Login to the SMTP server
server.login(username, password)
# Create the email message
message = f'From: {from_address}\r\nSubject: {subject}\r\nTo: {to_address}\r\n\r\n{body}'
message = message.encode() # Convert the message to bytes
# Send the email
server.sendmail(from_address, to_address, message)
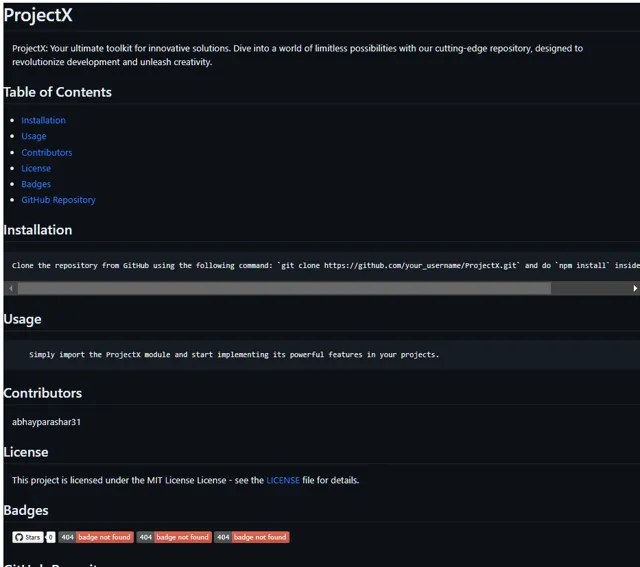
09 Readme.md 生成器
README.md 檔是計畫的入口,提供基本資訊並吸引存取者進一步探索。它被認為是版本庫中最重要的檔之一,但建立起來也相當耗時。
這個自動化指令碼可以根據版本庫名稱、連結和描述等輸入資訊輕松生成 README.md 檔,從而為您節省大量時間。
defgenerate_markdown_file():
# Prompting user for inputs
repository_name = input("\n Enter the name of your GitHub repository: ")
project_description = input("Enter a short description of your project: ")
installation_instructions = input("Enter installation instructions for your project: ")
usage_instructions = input("Enter usage instructions for your project: ")
contributors = input("Enter the contributors to your project (separated by commas): ")
license = select_license()
# Generating badges
stars_badge = "[](https://github.com/{}/stargazers)".format(repository_name, repository_name)
forks_badge = "[](https://github.com/{}/network/members)".format(repository_name, repository_name)
issues_badge = "[](https://github.com/{}/issues)".format(repository_name, repository_name)
license_badge = "[](https://github.com/{}/blob/master/LICENSE)".format(repository_name, repository_name)
# Generating Markdown content
markdown_content = f"""
# {repository_name}
{project_description}
## Table of Contents
- [Installation](#installation)
- [Usage](#usage)
- [Contributors](#contributors)
- [License](#license)
- [Badges](#badges)
- [GitHub Repository](#github-repository)
## Installation
```
{installation_instructions}
```
## Usage
```
{usage_instructions}
```
## Contributors
{contributors}
## License
This project is licensed under the {license} License - see the [LICENSE](LICENSE) file for details.
## Badges
{stars_badge}{forks_badge}{issues_badge}{license_badge}
## GitHub Repository
[Link to GitHub repository](https://github.com/{repository_name})
"""
# Writing content to Markdown file
markdown_file_name = f"{repository_name}_README.md"
with open(markdown_file_name, "w") as markdown_file:
markdown_file.write(markdown_content)
print(f"Markdown file '{markdown_file_name}' generated successfully!")
defselect_license():
licenses = {
"MIT": "MIT License",
"Apache": "Apache License 2.0",
"GPL": "GNU General Public License v3.0",
# Add more licenses as needed
}
print("Select a license for your project:")
for key, value in licenses.items():
print(f"{key}: {value}")
whileTrue:
selected_license = input("Enter the number corresponding to your selected license: ")
if selected_license in licenses:
return licenses[selected_license]
else:
print("Invalid input. Please enter a valid license number.")
if __name__ == "__main__":
generate_markdown_file()
10 OrganizeIT 2.0
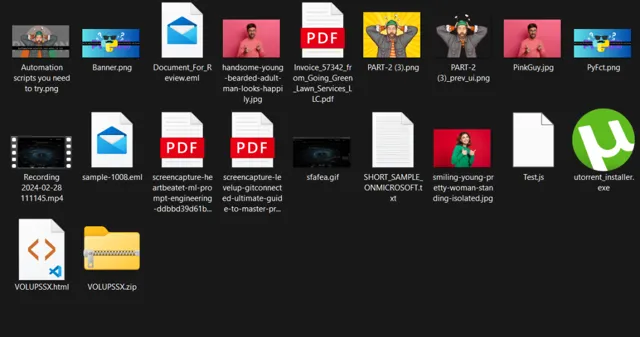
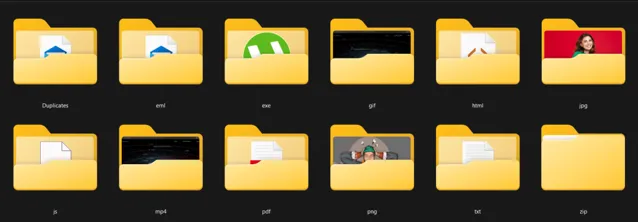
你的下載資料夾是否一團糟? 你是否發現自己在最需要的時候卻找不到關鍵檔? 你是否嘗試過無數次整理資料夾,但都以失敗告終?
這個自動化指令碼可以幫你在幾分鐘內整理好資料夾。你只需指定需要清理的路徑,本指令碼就會根據副檔名自動將所有檔劃分到不同的資料夾中。
這還不是全部它還能透過比較檔的哈希值來檢測和處理重復檔。
import os
import hashlib
import shutil
defget_file_hash(file_path):
with open(file_path, 'rb') as f:
return hashlib.sha256(f.read()).hexdigest()
deforganize_and_move_duplicates(folder_path):
# Create a dictionary to store destination folders based on file extensions
 extension_folders = {}
# Create the "Duplicates" folder if it doesn't exist
 duplicates_folder = os.path.join(folder_path, 'Duplicates')
 os.makedirs(duplicates_folder, exist_ok=True)
# Create a dictionary to store file hashes
 file_hashes = {}
# Iterate through files in the folder
for filename in os.listdir(folder_path):
 file_path = os.path.join(folder_path, filename)
if os.path.isfile(file_path):
# Get the file extension
 _, extension = os.path.splitext(filename)
 extension = extension.lower() # Convert extension to lowercase
# Determine the destination folder
if extension in extension_folders:
 destination_folder = extension_folders[extension]
else:
 destination_folder = os.path.join(folder_path, extension[1:]) # Remove the leading dot from the extension
 os.makedirs(destination_folder, exist_ok=True)
 extension_folders[extension] = destination_folder
# Calculate the file hash
 file_hash = get_file_hash(file_path)
# Check for duplicates
if file_hash in file_hashes:
# File is a duplicate, move it to the "Duplicates" folder
 shutil.move(file_path, os.path.join(duplicates_folder, filename))
 print(f"Moved duplicate file {filename} to Duplicates folder.")
else:
# Store the file hash
 file_hashes[file_hash] = filename
# Move the file to the destination folder
 shutil.move(file_path, destination_folder)
 print(f"Moved {filename} to {destination_folder}")
if __name__ == "__main__":
 folder_path = input("Enter the path to the folder to organize: ")
 organize_and_move_duplicates(folder_path)