一、前言
Elasticsearch作為一個分布式搜尋引擎,自身是高可用的;但也架不住一些特殊情況的發生,如:
集群超過半數的master節點遺失,ES的節點無法形成一個集群,進而導致集群不可用;
索引shard的檔損壞,分片無法被正常恢復,進而導致索引無法正常提供服務;
本地盤節點,多數據節點故障,舊節點無法再次加入集群,數據遺失。
針對上述的情況,今天來聊一聊相關的解決方案。
二、基礎知識
1. 集群經典架構
在聊解決方案之前,首先來看一看ES集群層面的基本知識,es的集群組成通常如圖1-1所示。

圖 1-1 es常用集群架構
如圖1-1所示,為生產環境es集群的經典架構,主要由專有主節點、專有協調節點和數據節點組成:
專有主節點(Master-eligible node): 具有master角色的節點,這使其有資格被選為主節點,只儲存集群元資訊包含cluster、index、shard級別的後設資料;該種角色節點被選舉為master之後,將作為整個ES集群的大腦,負責維護集群層面的元資訊,建立刪除索引等工作。該種節點的個數必須為奇數,通常我們固定為3個,如果該類節點遺失半數,es集群將無法維持es節點形成一個集群。
專有協調節點(閘道器節點): 該種節點不具有任何角色,僅僅用來處理es請求;比如(1)將寫請求的數據歸類轉發到數據所屬的節點(2)查詢請求的二次聚合計算。通常我們也會給該類節點保留ingest角色,ingest的主要作用是對數據進行預處理;比如:欄位重新命名、給數據文件打上指紋和清洗數據等功能主要透過pipeline能力進行處理
數據節點(Data node): 儲存數據和集群元資訊,執行與數據相關的操作,如CRUD、搜尋和聚合。在數據節點上打上不同的內容,可以使其成為hot、warm、cold數據節點,在es7.9版本之後配置略有不同,但是原理基本不變。
如果沒有顯示設定節點角色,es的每個節點都會含有以上三種角色。除此之後還有Remote-eligible node、ml-node和Transform nodes等角色需要顯示的配置,節點才會有該角色。
2.集群元資訊
集群完全啟動主要包含選舉主節點、元資訊、主分片、數據恢復等重要階段;如圖2-1所示[1]。
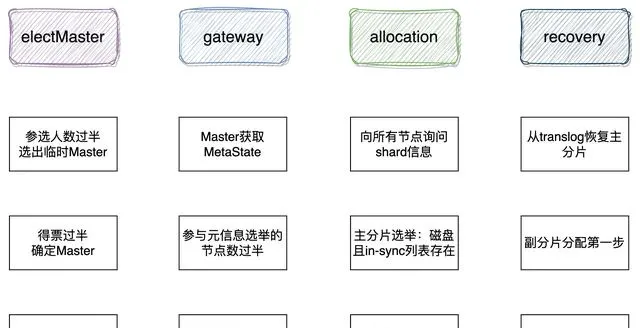
圖 2-1 es集群啟動流程
主節點選舉的過程,不是本文的重點,而是集群元資訊的選舉。被選舉出的master和集群元資訊新舊程度沒有關系;master節點被選舉出來之後,它所要完成的第一個任務,即是選舉集群元資訊。
1)Master選舉成功之後,判斷其持有的集群狀態中是否存在
STATE_NOT_RECOVERED_BLOCK,如果不存在,則說明後設資料已經 恢復,跳過gateway恢復過程,否則等待。
org.elasticsearch.gateway.GatewayService#clusterChanged
//跳過後設資料恢復if (state.blocks().hasGlobalBlock(STATE_NOT_RECOVERED_BLOCK) == false) {// already recoveredreturn; }//此處省略部份程式碼。//進入gateway恢復過程 performStateRecovery(enforceRecoverAfterTime, reason);
2)Master從各個節點主動獲取後設資料資訊
org.elasticsearch.gateway.Gateway#performStateRecovery
# 獲取元資訊核心程式碼final String[] nodesIds = clusterService.state().nodes().getMasterNodes().keys().toArray(String. class); logger.trace("performing state recovery from {}", Arrays.toString(nodesIds));final TransportNodesListGatewayMetaState.NodesGatewayMetaState nodesState = listGatewayMetaState.list(nodesIds, null).actionGet();
3)從獲取的後設資料資訊中選擇版本號最大的作為最新後設資料;元資訊包括集群級、索引級
## org.elasticsearch.gateway.Gateway#performStateRecovery public void performStateRecovery(final GatewayStateRecoveredListener listener) throws GatewayException {# 省略若幹行程式碼## 進入allocation階段;## final Gateway.GatewayStateRecoveredListener recoveryListener = new GatewayRecoveryListener();## listener為 GatewayStateRecoveredListener listener.onSuccess(builder.build()); }
4)兩者確定之後,呼叫allocation模組的reroute,對未分配 的分片執行分配,主分片分配過程中會異步獲取各個shard級別後設資料
#主要實作方法為如下方法 #org.elasticsearch.gateway.GatewayService.GatewayRecoveryListener#onSuccess## 主要工作是構建集群狀態(ClusterState),其中的內容路由表 依賴allocation模組協助完成,呼叫 allocationService.reroute 進 入下一階段:異步執行分片層後設資料的恢復,以及分片分配。updateTask執行緒結束.
ES中儲存的數據: (1)state後設資料資訊;(2)index Lucene生成的索引檔;(3)translog事務日誌。
後設資料資訊:
nodes/0/_state/*.st,集群層面元資訊MetaData(clusterUUID 、 settings 、templates等);
nodes/0/indices/{index_u uid}/_stat e/*.st,索引 層面元資訊IndexMetaData( numberOfShards 、mappings等);
nodes/0/indices/{index_uuid}/0/_state/*.st,分片層 面元資訊ShardStateMetaData(version 、indexUUID、primary等)。
上述資訊被持久化到磁盤:持久化的state不包括某個分片存在於哪個節點這種內容路由資訊,集群完全重新開機時,依靠gateway的recovery過程重建RoutingTable和RoutingNode。當讀取某個文件時, 根據路由演算法確定目的分片後,再從RoutingTable中尋找分片位於哪個節點,然後將請求轉發到目的節點[1]。
⚠️ 註意:在es7.0.0之後es的元資訊儲存方式發生變化;
es7.0.0之後元資訊儲存改使用lucene的方式儲存,見pr50928 Move metadata storage to Lucene)
7.10.2 專有主節點,集群後設資料
./|-- _state| |-- _39h.cfe| |-- _39h.cfs| |-- _39h.si| |-- node-0.st| |-- segments_50d| `-- write.lock`-- node.lock
6.8.13 專有主節點,集群後設資料
./|-- _state| |-- global-230.st| `-- node-2.st|-- indices| |-- -hiy4JnoRfqUJHTJoNUt4Q| | `-- _state| | `-- state-4.st| `-- ylJKVlqISGOi8EkpxHE_2A| `-- _state| `-- state-6.st`-- node.lock
三、災難場景與處理方法
1. master節點遺失
⚠️ 註意本文所述的master節點個數,假設前提均為3個。
場景1 master節點遺失過半
master節點是控制整個集群;當該種節點角色遺失過半,由於集群中投票節點永遠不可能達到quorum無法選主,將無法維持es節點形成一個集群;雖然集群無法形成一個集群,但所仍幸master-eligible節點存活,我們可以使用如下手段進行處理。
es7.0.0版本之前
修改剩余節點的elasticsearch.yaml配置如下,修改quorum的個數,然後啟動剩余的節點,形成一個新的集群;
discovery.zen.minimum_master_nodes: 1discovery.zen.ping.unicast.hosts:-masters-0
重建補充之前遺失的master-eligible節點,加入集群之後.
將集群配置修改為舊的配置,再逐一重新開機下集群中的節點,先從master-eligible開始.
es7.0.0(包含)版本之後
在es7.0.0版本之後,由於es修改集群的啟動配置,新增配置discovery.seed_hosts和cluster.initial_master_nodes;es集群第一次啟動時稱為bootstrap,該過程將配置檔中的cluster.initial_master_node作為初始的投票節點Voting configurations,投票節點具有選舉master和commit cluster state的權利,超過半數以上同意即投票成功。如果在集群健康的場景下,我們需要下線超過半數的master-eligible;則必須首先使用投票配置排除API從投票配置中排除受影響的節點。
POST_cluster/voting_config_exclusions?node_names={node_names}POST_cluster/voting_config_exclusions?node_ids={node_ids}DELETE_cluster/voting_config_exclusions
但是如果遺失的master節點超過半數,則可以使用新的集群處理工具elasticsearch-node unsafe-bootstrappr37696和elasticsearch-node detach-clusterpr37979。
面對遺失半數master-eligible,es7.0.0(包含)版本之後的處理步驟如下:
使用bin/elasticsearch-node unsafe-bootstrap命令讓唯一主節點以不安全的方式覆寫投票節點,就像重新進行bootstrap一樣,自己使用持久化的cluster state形成一個新集群
其他數據節點無法加入新集群因為UUID不同(es使用UUID作為節點和集群的唯一表示,每個節點都會持久化當前集群的UUID),使用bin/elasticsearch-node detach-cluster命令讓節點離開之前的集群
啟動數據節點和新的master-eligible節點(如下補充兩個新的master-eligible),他會加入新集群中
cluster.initial_master_nodes:- {master-0}- {new-master-1}- {new-master-2}discovery.seed_hosts:- {master-ip-0}- {new-master-ip-1}- {new-master-ip-2}
場景2 master節點全部遺失
es7.0.0版本之前
關閉 security 功能(如果開啟了, 最好先關閉security外掛程式功能):
因為新啟動的master節點,沒有數據節點(如果只配置了一個master的角色), security外掛程式的初始化無法完成, 各類介面不好呼叫
如果給新啟動的master節點,配置了master and data角色,則security外掛程式會初始化成功. 會插入index,但是這個index會和原來的data節點上保存的沖突,不知道怎麽解。
elastic
官方xpack-security;關閉鑒權:
xpack.security.enabled:false
啟動足夠的新master-eligible節點形成一個新集群。
discovery.zen.minimum_master_nodes: 2discovery.zen.ping.unicast.hosts:- {new-masters-1}- {new-masters-2}- {new-masters-3}
修改數據節點的為新master的地址,並且刪除掉節點上的_state(因為新集群的cluster UUID不一致),同上。
啟動數據節點,數據被恢復加入到集群。
es7.0.0(包含)版本之後
已經沒有cluster state了,唯一的希望是數據節點上的index數據;恢復方式借助elasticsearch-node工具。
關閉security功能(如果開啟了, 最好先關閉security外掛程式功能),原因同上
啟動足夠的新master-eligible節點形成一個新集群
cluster.initial_master_nodes:- {new-master-0}- {new-master-1}- {new-master-2}discovery.seed_hosts:- {new-master-ip-0}- {new-master-ip-1}- {new-master-ip-2}
bin/elasticsearch-node detach-cluster命令讓數據節點離開之前的集群。
./bin/elasticsearch-node detach-cluster------------------------------------------------------------------------ WARNING: Elasticsearch MUST be stopped before running this tool.------------------------------------------------------------------------You should only run this tool if you have permanently lost all of themaster-eligible nodes in this cluster and you cannot restore the clusterfrom a snapshot, or you have already unsafely bootstrapped a new clusterby running `elasticsearch-node unsafe-bootstrap`on a master-eligiblenode that belonged to the same cluster as this node. This tool can causearbitrary data loss and its use should be your last resort.Do you want to proceed?Confirm [y/N] yNode was successfully detached from the cluster
查詢dangling索引,GET /_dangling, 改api 引入es7.9版本於pr58176。
啟動數據節點並使用Import dangling indexAPI將index數據import到cluster state中(官方推薦,es7.9版本之後). 或者 配置gateway.auto_import_dangling_indices: true引入於es7.6版本pr49174(es7.6.0-7.9.0可用該配置,在7.6版本之前不需要配置預設載入dangling索引)並啟動數據節點。
POST /_dangling/{
index-uuid}?accept_data_loss=
true
匯入完成之後,索引recovery之後即可進行讀寫。
註意
Q1: 為什麽7.6.0之後需要配置,才能處理懸空索引(dangling index)才能讓數據加入新集群,7.6.0之後沒有懸空索引嗎?
A1: 其實也是有的,只不過在es2版本將配置移除(對應pr10016),預設自動載入dangling index(es2.0-es7.6); 具體實作於org.elasticsearch.gateway.DanglingIndicesState#processDanglingIndiceses7.6再次引入dangling配置,es7.9引入dangling index rest api
Q2: 什麽是 dangling 索引?
A2: 當一個節點加入集群時,如果發現儲存在其本地數據目錄中的任何分片(shard)不存在於集群中,將認為這些分片屬於「懸空」索引。懸空索引產生的場景(1)在 Elasticsearch 節點離線時刪除了多個cluster.indices.tombstones.size索引,節點再次加入集群集群 (2)master節點遺失,數據節點重新加入新的集群等
2.數據節點故障
數據節點災難故障之後,無法恢復加入集群;可將數據物理復制到新的節點,然後按照master節點遺失的方式,將數據節點加入集群即可。
3.分片不能夠自動分配
檢視索引分片為什麽無法分配,POST _cluster/allocation/explain
1)分片正常
如果分片數據正常,那麽我們可以嘗試重試分配分片任務;POST _cluster/reroute?retry_failed。
獲取索引的shard在那些節點上,使用_shard_stores api。
GET indexName1/_shard_stores
使用cluster reroute重新分配
# 嘗試分配副本 POST /_cluster/reroute{"commands": [ {"allocate_replica": {"index": "{indexName1}","shard": {shardId},"node": "{nodes-9}" } } ]}
如果是主分片無法分配,可以嘗試如下命令進行分配。
POST /_cluster/reroute{"commands": [ {"allocate_stale_primary": {"index": "{indexName1}","shard": {shardId},"node": {nodes-9},"accept_data_loss": true } } ]}
如果主分片確實是無法分配,只能選擇遺失該分片的數據,分配一個空的主分片。
POST /_cluster/reroute{"commands": [ {"allocate_empty_primary": {"index": "{indexName1}","shard": {shardId},"node": "{nodes-9}","accept_data_loss": true } } ]}
es5.0版本之前參考:
https://www.elastic.co/guide/en/elasticsearch/reference/2.4/cluster-reroute.html
2)分片數據損壞
shard corrupted
錯誤參考Corrupted elastic index( https://discuss.elastic.co/t/corrupted-elastic-index/135932 )
shard-tool( https://www.elastic.co/guide/en/elasticsearch/reference/6.5/shard-tool.html )es6.5版本引入,該操作需要stop節點。
elasticsearch-shard 工具es6.5版本引入pr33848( https://github.com/elastic/elasticsearch/pull/33848 )。
elasticsearch-shard remove-corrupted-data 的 es7.0.0引入pr32281( https://github.com/elastic/elasticsearch/pull/32281 )。
bin/elasticsearch-shard remove-corrupted-data --index {indexName} --shard-id {shardId}## 示列:修復索引twitter的0號分片bin/elasticsearch-shard remove-corrupted-data --index twitter --shard-id 0## 如果--index和--shard-id換成索引分片目錄參數--dir,則直接修復data和translogbin/elasticsearch-shard remove-corrupted-data --dir /var/lib/elasticsearchdata/nodes/0/indices/P45vf_YQRhqjfwLMUvSqDw/0
修復完成之後,啟動節點,如果分片不能夠自動分配,使用reroute命令進行shard分片。
POST /_cluster/reroute{"commands":[ {"allocate_stale_primary":{"index":"index42","shard":0,"node":"node-1","accept_data_loss":false } } ]}
5版本之前可以透過索引級別配置,進行修復
index.shard.check_on_startup: fix ,該配置在es6.5版本移除pr32279( https://github.com/elastic/elasticsearch/pull/32279 )
translog 損壞
修復translog操作,需要stop節點。
修復工具 elasticsearch-translog es5.0.0 引入pr19342( https://github.com/elastic/elasticsearch/pull/19342 )。
elasticsearch-shard remove-corrupted-data translog的 es7.4.1開始引入,pr47866( https://github.com/elastic/elasticsearch/pull/47866 )elasticsearch-shard 可以直接清除translog,也可以像上文中指定--dir那樣進行修復translog。
bin/elasticsearch-shard remove-corrupted-data --index --shard-id --truncate-clean-translog## 示列:修復索引twitter的0號分片bin/elasticsearch-shard remove-corrupted-data --index twitter --shard-id 0 --truncate-clean-translog
清除完成之後使用cluster reroute 進行恢復。
5版本之前可以透過索引級別配置,進行修復
index.shard.check_on_startup: fix ,該配置在es6.5版本移除pr32279( https://github.com/elastic/elasticsearch/pull/32279 )。
segments_N檔遺失
該種場景的檔損壞是最難修復的;官方還未提供工具,我們正在自己調研中。
> > > >
參考資料
[1]elasticsearch集群啟動流程
[2]elastic.co/guide/en/elasticsearch/reference/7.9/dangling-indices-list.html
[3]elastic.co/guide/en/elasticsearch/reference/7.10/node-tool.html
作者丨京東科技 楊松柏(京東雲開發者社群)
來源丨 juejin.cn/post/7326049852345794571
dbaplus社群歡迎廣大技術人員投稿,投稿信箱: [email protected]