前言
目前瀏覽器不支持rtsp協定,常規的解決方案是將rtsp流轉成其他瀏覽器支持的格式才能在Web頁面中播放。這些方案因為多一層解碼轉碼會產生一定的延遲,在一些即時性要求比較高的場景下並不適用。而透過Webassembly技術,我們可以將一部份工作分擔到瀏覽器來減少延遲。
方案設計

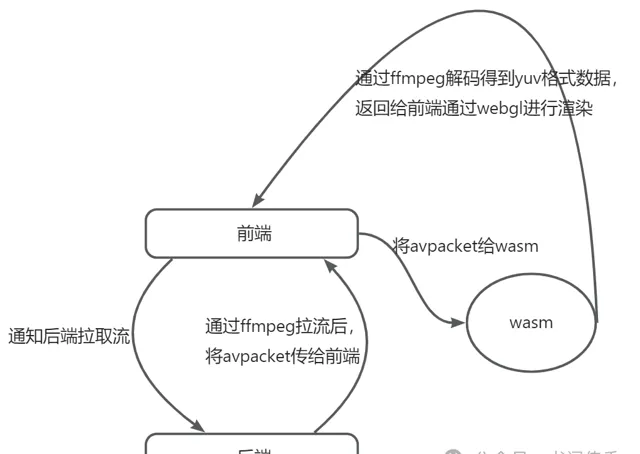
後端拉取rtsp流,獲取原始封包,透過websocket將封包傳給前端,在前端透過webassembly技術來進行解碼,最後透過webgl來播放。其實就是把解碼的工作放在前端來做,目前方案是能走通的,就是效果還在最佳化中。。。
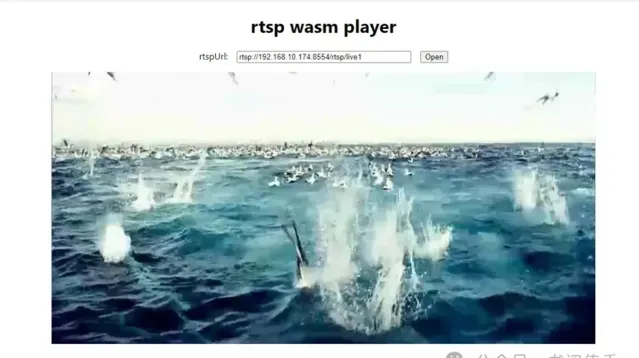
目前實作的效果圖

WASM部份
ps: 本文編譯wasm環境
ubuntu22.04
emscripten 3.1.55
ffmpeg 4.4.4
Emscripten工具鏈
Emscripten可以將c/c++程式碼編譯成wasm
安裝emsdk
# Get the emsdk repogitclone https://github.com/emscripten-core/emsdk.git# Enter that directorycdemsdk# Fetch the latest version of the emsdk (not needed the first time you clone)gitpull# Download and install the latest SDK tools../emsdkinstall latest# Make the "latest" SDK "active" for the current user. (writes .emscripten file)./emsdkactivate latest# Activate PATH and other environment variables in the current terminalsource./emsdk_env.sh
ps: ./emsdk activate latest和source ./emsdk_env.sh指令只能在當前命令列使用,每次新開一個命令列都要重新執行才能生效
編譯ffmpeg
由於我們的wasm中要用到ffmpeg的程式碼,所以需要先將ffmpeg編譯成庫檔,才能正常連結
去官網下載ffmpeg的源碼並解壓,然後在ffmpeg的目錄裏面執行指令
emconfigure ./configure --cc="emcc" --cxx="em++" --ar="emar" --ranlib=emranlib \--prefix=../ffmpeg-emcc --enable-cross-compile --target-os=none --arch=x86_64 --cpu=generic \--disable-ffplay --disable-ffprobe --disable-asm --disable-doc --disable-devices --disable-pthreads --disable-w32threads --disable-network \--disable-hwaccels --disable-parsers --disable-bsfs --disable-debug --disable-protocols --disable-indevs --disable-outdevs --enable-protocol=file \--disable-strippingemmake makeemmake make install
這裏禁用了很多wasm中不需要的模組,emconfigure和emmake都是emscripten提供的指令,類似於configure和make
ps: ffmpeg的版本不能太高,最新版本的ffmpeg已經沒有./configure了
測試ffmpeg庫
透過ffmpeg_test.cpp簡單測試是否能連結到庫檔
extern"C" {#include<libavcodec/avcodec.h>}intmain(){unsigned codecVer = avcodec_version();printf("avcodec version is: %d\n", codecVer);return0;}
編譯和執行的指令,這裏編譯後會得到wasm、js、html三個檔
emccffmpeg_test.cpp ./lib/libavcodec.a \ -I "./include" \ -o ./test.htmlemrun--no_browser --port 8090 test.html
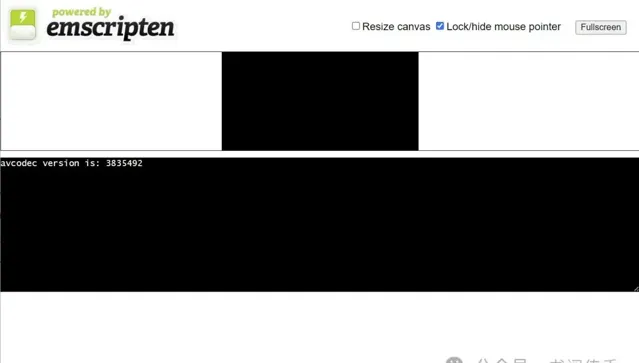
存取test.html後可以正常輸出,說明庫檔沒問題

編寫解碼器
解碼器web_decoder.cpp程式碼如下
#include<emscripten/emscripten.h>#ifdef __cplusplusextern"C" {#endif#include<libavcodec/avcodec.h>#include<libavformat/avformat.h>#include<libavutil/imgutils.h>#include<libswscale/swscale.h>#include<libswresample/swresample.h>typedefstruct { AVCodecContext *codec_ctx; // 用於解碼 AVPacket *raw_pkt; // 儲存js傳遞進來的pkt. AVFrame *decode_frame; // 儲存解碼成功後的YUV數據.structSwsContext *sws_ctx;// 格式轉換,有些解碼後的數據不一定是YUV格式的數據uint8_t *sws_data; AVFrame *yuv_frame; // 儲存解碼成功後的YUV數據,ffmpeg解碼成功後的數據不一定是 YUV420Puint8_t *js_buf;unsigned js_buf_len;uint8_t *yuv_buffer;} JSDecodeHandle, *LPJSDecodeHandle;LPJSDecodeHandle EMSCRIPTEN_KEEPALIVE initDecoder(){auto handle = (LPJSDecodeHandle) malloc(sizeof(JSDecodeHandle));memset(handle, 0, sizeof(JSDecodeHandle)); handle->raw_pkt = av_packet_alloc(); handle->decode_frame = av_frame_alloc();const AVCodec *codec = avcodec_find_decoder(AV_CODEC_ID_H264);if (!codec) {fprintf(stderr, "Codec not found\n"); } handle->codec_ctx = avcodec_alloc_context3(codec);if (!handle->codec_ctx) {fprintf(stderr, "Could not allocate video codec context\n"); }//handle->c->thread_count = 5;if (avcodec_open2(handle->codec_ctx, codec, nullptr) < 0) {fprintf(stderr, "Could not open codec\n"); }// 我們最大支持到1920 * 1080,保存解碼後的YUV數據,然後返回給前端!int max_width = 1920;int max_height = 1080; handle->yuv_buffer = static_cast<uint8_t *>(malloc(max_width * max_height * 3 / 2));fprintf(stdout, "ffmpeg h264 decode init success.\n");return handle; }uint8_t *EMSCRIPTEN_KEEPALIVE GetBuffer(LPJSDecodeHandle handle, int len){if (handle->js_buf_len < len) {if (handle->js_buf) free(handle->js_buf); handle->js_buf = static_cast<uint8_t *>(malloc(len * 2));memset(handle->js_buf, 0, len * 2); // 這句很重要! handle->js_buf_len = len * 2; }return handle->js_buf; }int EMSCRIPTEN_KEEPALIVE Decode(LPJSDecodeHandle handle, int len){ handle->raw_pkt->data = handle->js_buf; handle->raw_pkt->size = len;int ret = avcodec_send_packet(handle->codec_ctx, handle->raw_pkt);if (ret < 0) {fprintf(stderr, "Error sending a packet for decoding\n"); // 0x00 00 00 01return-1; } ret = avcodec_receive_frame(handle->codec_ctx, handle->decode_frame); // 這句話不是每次都成功的.if (ret == AVERROR(EAGAIN) || ret == AVERROR_EOF) {fprintf(stderr, "EAGAIN -- ret:%d -%d -%d -%s\n", ret, AVERROR(EAGAIN), AVERROR_EOF, av_err2str(ret));return-1; } elseif (ret < 0) {fprintf(stderr, "Error during decoding\n");return-1; }return ret; }int EMSCRIPTEN_KEEPALIVE GetWidth(LPJSDecodeHandle handle){return handle->decode_frame->width; }int EMSCRIPTEN_KEEPALIVE GetHeight(LPJSDecodeHandle handle){return handle->decode_frame->height; }uint8_t *EMSCRIPTEN_KEEPALIVE GetRenderData(LPJSDecodeHandle handle){int width = handle->decode_frame->width;int height = handle->decode_frame->height;bool sws_trans = false; // 我們確保得到的數據格式是YUV.if (handle->decode_frame->format != AV_PIX_FMT_YUV420P) { sws_trans = true;fprintf(stderr, "need transfer :%d\n", handle->decode_frame->format); } AVFrame *new_frame = handle->decode_frame;if (sws_trans) {if (handle->sws_ctx == nullptr) { handle->sws_ctx = sws_getContext(width, height, (enum AVPixelFormat) handle->decode_frame->format, // in width, height, AV_PIX_FMT_YUV420P, // out SWS_BICUBIC, nullptr, nullptr, nullptr); handle->yuv_frame = av_frame_alloc(); handle->yuv_frame->width = width; handle->yuv_frame->height = height; handle->yuv_frame->format = AV_PIX_FMT_YUV420P;int numbytes = av_image_get_buffer_size(AV_PIX_FMT_YUV420P, width, height, 1); handle->sws_data = (uint8_t *) av_malloc(numbytes * sizeof(uint8_t)); av_image_fill_arrays(handle->yuv_frame->data, handle->yuv_frame->linesize, handle->sws_data, AV_PIX_FMT_YUV420P, width, height, 1); }if (sws_scale(handle->sws_ctx, handle->decode_frame->data, handle->decode_frame->linesize, 0, height, // in handle->yuv_frame->data, handle->yuv_frame->linesize // out ) == 0) {fprintf(stderr, "Error in SWS Scale to YUV420P.");returnnullptr; } new_frame = handle->yuv_frame; }// copy Y datamemcpy(handle->yuv_buffer, new_frame->data[0], width * height);// Umemcpy(handle->yuv_buffer + width * height, new_frame->data[1], width * height / 4);// Vmemcpy(handle->yuv_buffer + width * height + width * height / 4, new_frame->data[2], width * height / 4);return handle->yuv_buffer;}#ifdef __cplusplus}#endif
編譯指令
emccweb_decoder.cpp ./lib/libavformat.a \ ./lib/libavcodec.a \ ./lib/libswresample.a \ ./lib/libswscale.a \ ./lib/libavutil.a \ -I "./include" \ -s ALLOW_MEMORY_GROWTH=1 \ -s ENVIRONMENT=web \ -s MODULARIZE=1 \ -s EXPORT_ES6=1 \ -s USE_ES6_IMPORT_META=0 \ -s EXPORT_NAME='loadWebDecoder' \ --no-entry \ -o ./web_decoder.js
區別於上面的測試程式碼,這裏我們要自己寫頁面來引入,所以只需要生成wasm和js檔即可
簡單說明一下參數的意思:
-s ENVIRONMENT=web 表示我在web中使用會刪除一些非web的全域功能
-s MODULARIZE=1 是會給你一個工程函式,返回一個Promise
-s EXPORT_ES6=1 啟用ES6
-s USE_ES6_IMPORT_META=0 禁用import.meta.url
-s EXPORT_NAME 設定module的名字預設就是Module
前端部份
引入WASM
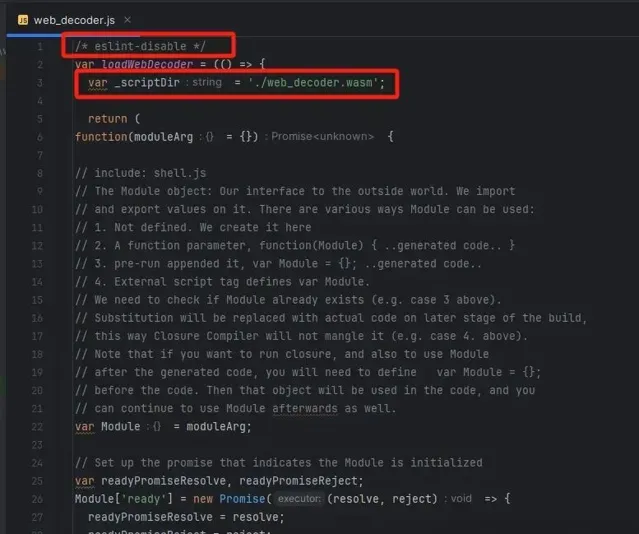
將web_decoder.wasm放到public目錄下面,同時修改web_decoder.js
在第一行加上
/* eslint-disable */
然後修改
_scriptDir = './web_decoder.wasm'

在React中使用
這裏是透過create-react-app建立的計畫,下面是App.tsx的程式碼
import React, {useEffect, useRef, useState} from'react';import'./App.css';import {useWebsocket} from"./hooks/useWebsocket";import {useWasm} from"./hooks/useWasm";import loadWebDecoder from"./lib/web_decoder";import WebglScreen from"./lib/webgl_screen";exportconst WS_SUBSCRIBE_STREAM_DATA = '/user/topic/stream-data/real-time';exportconst WS_SEND_RTSP_URL = '/app/rtsp-url';exportconst STOMP_URL = '/stomp/endpoint';// export const WASM_URL = '/wasm/ffmpeg.wasm';const App = () => {const [rtspUrl, setRtspUrl] = useState<string>('rtsp://192.168.10.174:8554/rtsp/live1');const {connected, connect, subscribe, send} = useWebsocket({url: STOMP_URL});// const {loading, error, instance} = useWasm({url: WASM_URL});const [module, setModule] = useState<any>();const canvasRef = useRef<any>();let ptr: any;let webglScreen: any; useEffect(() => {if (!connected) { connect(); } loadWebDecoder().then((mod: any) => { setModule(mod); }) }, []);const onRtspUrlChange = (event: any) => { setRtspUrl(event.target.value); }const onOpen = () => {if (connected) { send(WS_SEND_RTSP_URL, {}, rtspUrl); subscribe(WS_SUBSCRIBE_STREAM_DATA, onReceiveData, {}); ptr = module._initDecoder();const canvas = canvasRef.current; canvas!.width = 960; canvas!.height = 480; webglScreen = new WebglScreen(canvas); } }const onReceiveData = (message: any) => {const data = JSON.parse(message.body);const buffer = newUint8Array(data);const length = buffer.length;console.log("receive pkt length :", length);const dst = module._GetBuffer(ptr, length); // 通知C/C++分配好一塊記憶體用來接收JS收到的H264流.module.HEAPU8.set(buffer, dst); // 將JS層的數據傳遞給C/C++層.if (module._Decode(ptr, length) >= 0) {var width = module._GetWidth(ptr);var height = module._GetHeight(ptr);var size = width * height * 3 / 2;console.log("decode success, width:%d height:%d", width, height);const yuvData = module._GetRenderData(ptr); // 得到C/C++生成的YUV數據.// 將數據從C/C++層拷貝到JS層const renderBuffer = newUint8Array(module.HEAPU8.subarray(yuvData, yuvData + size + 1)); webglScreen.renderImg(width, height, renderBuffer) } else {console.log("decode fail"); } }return ( <div className="root"> <div className="header"> <h1>rtsp wasm player</h1> <div className="form"> <label>rtspUrl:</label> <input className="form-input" onChange={onRtspUrlChange} defaultValue={rtspUrl}/> <button className="form-btn" onClick={onOpen}>Open</button> </div> </div> <div className="context"> <canvas ref={canvasRef}/> </div> </div> );}export default App;
後端部份
拉流
透過javacv來完成拉流,下面是拉流並透過websocket傳遞原始數據的程式碼
package org.timothy.backend.service.runnable;import lombok.NoArgsConstructor;import lombok.extern.slf4j.Slf4j;import org.bytedeco.ffmpeg.avcodec.AVPacket;import org.bytedeco.ffmpeg.global.avcodec;import org.bytedeco.ffmpeg.global.avutil;import org.bytedeco.javacpp.BytePointer;import org.bytedeco.javacv.FFmpegFrameGrabber;import org.bytedeco.javacv.FFmpegLogCallback;import org.bytedeco.javacv.FrameGrabber.Exception;import org.springframework.messaging.simp.SimpMessagingTemplate;import java.util.Arrays;@NoArgsConstructor@Slf4jpublic classGrabTaskimplementsRunnable{private String rtspUrl;private String sessionId;private SimpMessagingTemplate simpMessagingTemplate;publicGrabTask(String sessionId, String rtspUrl, SimpMessagingTemplate simpMessagingTemplate){this.rtspUrl = rtspUrl;this.sessionId = sessionId;this.simpMessagingTemplate = simpMessagingTemplate; }boolean running = false;@Overridepublicvoidrun(){ log.info("start grab task sessionId:{}, steamUrl:{}", sessionId, rtspUrl); FFmpegFrameGrabber grabber = null; FFmpegLogCallback.set(); avutil.av_log_set_level(avutil.AV_LOG_INFO);try { grabber = new FFmpegFrameGrabber(rtspUrl); grabber.setOption("rtsp_transport", "tcp"); grabber.start(); running = true; AVPacket pkt;while (running) { pkt = grabber.grabPacket();// 過濾空包if (pkt == null || pkt.size() == 0 || pkt.data() == null) {continue; }byte[] buffer = newbyte[pkt.size()]; BytePointer data = pkt.data(); data.get(buffer);// log.info(Arrays.toString(buffer)); simpMessagingTemplate.convertAndSendToUser(sessionId, "/topic/stream-data/real-time", Arrays.toString(buffer)); avcodec.av_packet_unref(pkt); } } catch (Exception e) { running = false; log.info(e.getMessage()); } finally {try {if (grabber != null) { grabber.close(); grabber.release(); } } catch (Exception e) { log.info(e.getMessage()); } } }}
參考文章
https://zhuanlan.zhihu.com/p/399412573
https://blog.csdn.net/w55100/article/details/127541744
https://juejin.cn/post/7041485336350261278
https://juejin.cn/post/6844904008054751246


